Reusing & recycling may seem like a hot topic, but when I find a creative (often crafty!) way to give new life to trash, my mind jumps not to the future but to the past. I think of visiting my great-grandmother Ethel as a young girl. Among many delightful memories of berry-picking & family potlucks, I remember being surprised at her pantry cupboards. There on the shelves were dozens & dozens of pieces of trash! It seemed so out of character for her: an otherwise neat & tidy woman with a closet full of garbage? To my amazement, I soon learned how the things I saw as "spent"-- empty food tubs, glass jars, & milk jugs-- were anything but. Tubs, plain or decorated, kept drawers organized, and those glass jars found an important use year after year as we turned fresh-picked berries into jam. Great-Grandma's thriftiness & creativity weren't a political statement. She was simply a practical, thoughtful person who understood how much was to be gained by using what we already had.
 

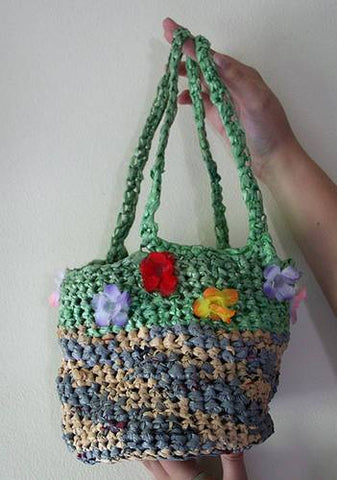
In her tradition, I was overjoyed to learn about plarn some time ago. I was in college (read: no yarn budget), so the idea of making my own yarn out of the plastic bags I already had was an absolute win. I learned the method from this excellent tutorial from @RecycleCindy & had loads of fun making durable sling bags & even a garden tote for my mom. Instant hipster street cred!  


But, eventually, I got bored. As it turns out, I do almost all my shopping from places with unattractive white bags with rudely bold logos, and I got tired of my projects reflecting that fact.  


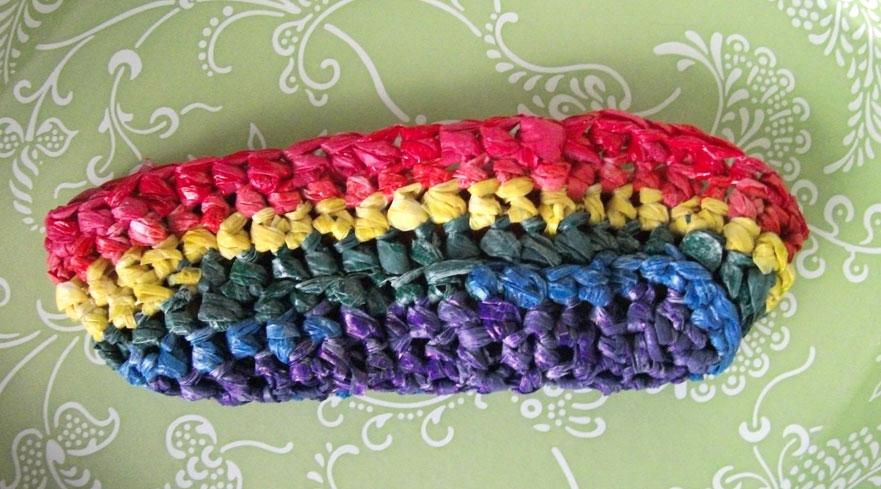
After a period of dormancy, I was  determined to try plarn again, and brainstormed a few ways to improve upon or spice up the process. Several unsuccessful experiments later (let me just tell you now: drop spindle + plarn = curse words), I stumbled upon a darn useful method of stripping logos off & introducing some intentional color into the otherwise bland world of plarn. And odds are good you already have everything you need lying around your home!  

Grab these:

  • White plastic bags
  • Sharp scissors
  • Permanent markers (a word of advice about those later)
  • Rubbing alcohol
  • Flattened paper bag to protect your work surface
  • Rags or old socks
  • Clear acrylic spray coating (if desired)

Do it: 1. Flatten your bag out & lay it on a hard surface. If you're concerned about your work surface, an old paper bag will protect it beautifully.

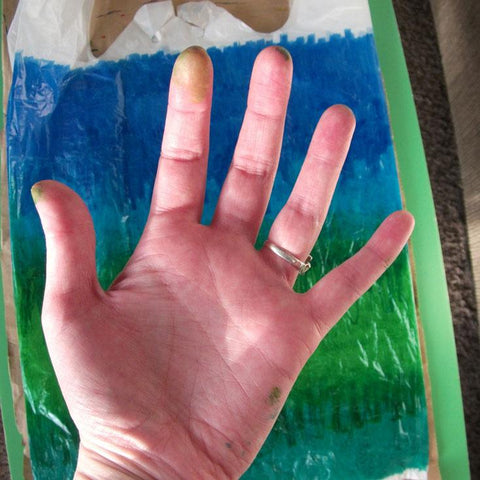
2. Use rubbing alcohol to remove unwanted logos or printing on the bag. Old athletic socks are great applicators!

3. Wipe off any leftover residue with a damp rag or sock, then wipe dry.

4. Use permanent markers to "dye" the front & back sides of the bag in whatever color palette & layout suit you.

5. Be sure to "dye" the sides of the bag as well, although they may take some folding gymnastics to access!

6. Follow Cindy's plarn tutorial directions for rolling your bag up.

7. Give it the snip-snip! Continue following Cindy's directions, making the strips as wide as you like, but no thinner than about 3/4 inch.

8. If your color scheme or layout requires it, don't forget to keep your strips in order!

9. Continue following Cindy's directions to link the strips into a continuous strand of plarn, then knit or crochet into whatever you please!


Advice & Warnings:

  • As with traditional yarn dyeing, plarn dyeing can be quite messy
    (depending on the type of marker you use). If this bothers you, a tight-fitting pair of gloves will protect your hands from any unintentional skin art.
  • Not all permanent markers are created equal! I had best luck with Bic brand permanent markers (hardly stained my hands at all) & worst luck with Sharpies (although the larger color palette more than made up for the mess). Do yourself a favor & stick to the chisel-tip kind to speed things up.
  • Plarn dyed in this fashion will definitely shed color on your knitting needles or crochet hook, regardless of how well your markers behave. Please do not sacrifice a beautiful, hand-carved rosewood tool! My inexpensive metal ones washed clean with a bit of hand soap.
  • If you're concerned about your project shedding color on other things (like your clothing, in the case of a tote bag), consider using a clear sealant of some variety. I used a small amount of Rustoleum Clear Acrylic spray on my project because it was a garden tote & would not be bending around much. (While spray paints no longer contain CFCs, most still do contain small amounts of VOCs, which contribute to smog. If your project is eco-motivated, you may wish to leave out the sealant or choose one without VOCs.)
  • When it doubt, swatch it! Use a spare bag & color a few inches, slice it into strips & make some test plarn. This will allow you to test how well your ink stays stuck without a huge time commitment.
Get creative! In the end, plastic bags are sort of like natural sock blanks, to be dyed & patterned in whatever way strikes your fancy. Here are just a few ideas to get you started:
  • Make easy self-striping plarn by coloring several bags in each color. Once you cut them into strips, you can control the length of the stripes as you assemble the plarn. Alternate several strips of one color followed by the same number of strips in the other color.
  • For plarn that changes color in a gradient (like the one pictured in the tutorial), you don't need to be too fussy about blending the colors. Once the bag is cut into strips, imprecise coloring won't show through.
  • I didn't find it necessary to "dye" the insides of my bags, but you could certainly do so if the irregularity bothers you.
  • With a few furniture-protecting measures, this would be an ideal project to outsource to kids. Many hands make for light work-- just be sure they don't also make rainbow handprints around your home.
  • You can explore all the kinds of self-patterning excitement achievable with sock blanks: zig zags, vertical stripes, polka dots, faux Fair Isles... whatever you can dream up!
  • For an extra-special batch of plarn, write a message on the bag or draw a picture before slicing it into strips. My niece & nephew are doing pictures for their mom, which will then turn into plarn for a Mother's Day Garden Tool Tote. Love it!

Ready to try your own? Let us know how it goes! Share your project on our Facebook VIP group.

Happy plarning! XOXOXO, Meg :)

Ruthie Hunt
Ruthie Hunt


3 Responses

Joanne
Joanne

October 05, 2016

Has anybody tried using clothes dye?

Taunya
Taunya

October 05, 2016

Alcohol Ink works. But you can only rinse with plain water, no soap.

Bri
Bri

October 05, 2016

No

Leave a comment

Comments will be approved before showing up.


Also in Alpaca Direct Blog

Kelley's Favorite Free Knit Sweater Patterns

by Meg Bateman January 02, 2022 1 min read

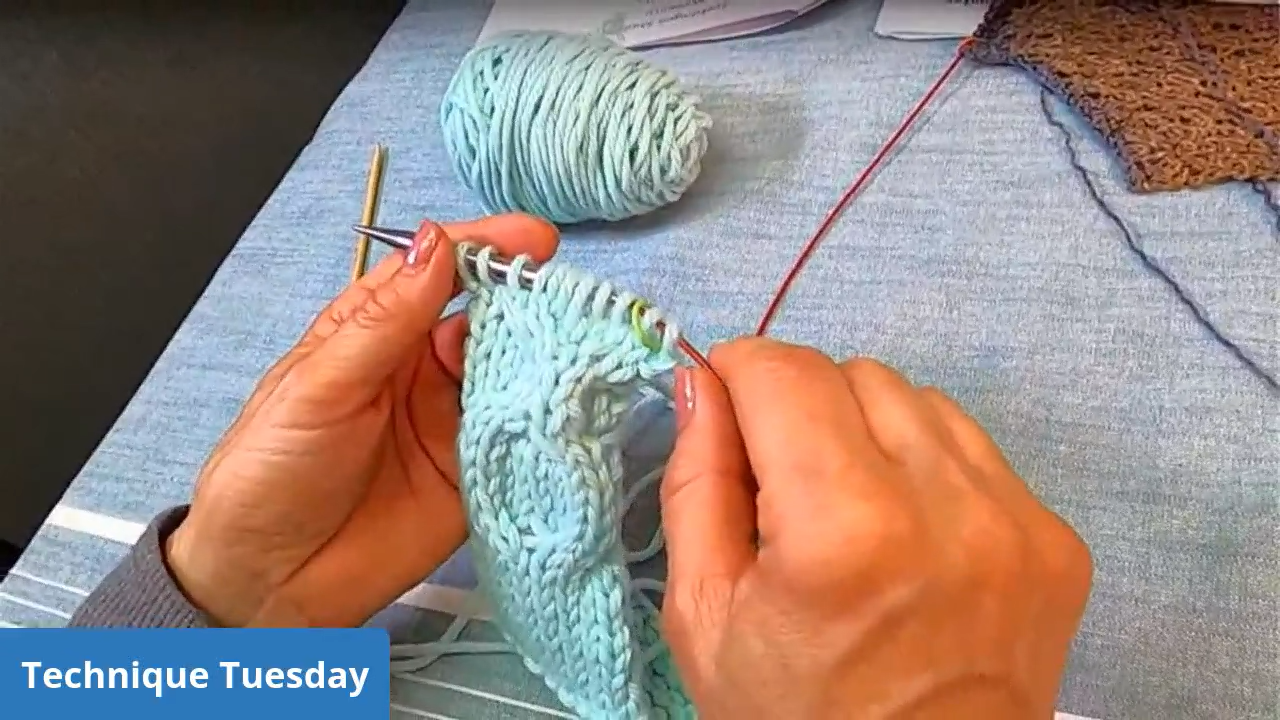
Do you feel lost when it comes to picking out your first knit sweater pattern? This week, Kelley shared her favorite sweater patterns during Technique Tuesday. These patterns all feature minimal seaming, have detailed instructions, and have lots of completed projects on Ravelry! 


Free Beginner Sweater Patterns to Try

Kelley has knit the Brick Sweater several times, and has decided to knit it again with all our Technique Tuesday viewers! Grab some worsted weight yarn and join us for this informal knit along. 

Read More
Christmas Gifts for Knitters & Loved Ones

by Meg Bateman January 02, 2022 1 min read

Do you have a knitter in your life that you would love to give a gift to? Not only do knitters love receiving knitted items, but you can get them some essential knitting supplies and tools as well!
Read More
How to Use the Fix-A-Stitch

by Meg Bateman January 02, 2022 1 min read

Do you struggle with fixing your knitting mistakes or dropped stitches? Kelley loves the Fix-A-Stitch tools! They're uniquely made to make it very easy to quickly fix your knitting mistakes. Here, Kelley demonstrates how to use the Fix-A-Stitch to fix stockinette, purl stitches, and garter stitch using the Fix-A-Stitch tools. 
Read More