
1-Over-1 Cables Without a Cable Needle

I work 1-over-1 cables on two knitting needles - no cable needle needed. Using these tips for cable knitting helps simplify the process. The key is to swap the next two stitches without twisting their loops, then knit them in their new order.
I label the stitches A and B, with A closest to the needle tip:
- Left cross: Keep A in front of B.
- Right cross: Keep A behind B.
- Both crosses: Knit B, then A, while supporting any loose loop.
For practice, I use smooth, light-colored yarn and a 12-stitch swatch, crossing the center pair every 4 rows for at least 16 rows. My focus is <u>secure loops, correct stitch direction, and light tension</u> - not speed. If a stitch drops or twists, I stop and fix the dropped stitch before moving on.
How To Knit a Right Cross (RC) and Left Cross (LC) Without a Cable Needle | Knitting Tutorial
Understand Stitch Order and Hold Loops Securely
Label the next two stitches A and B. In both crosses, the needle order changes to B–A. The difference is which stitch crosses in front.
Use Western-mounted stitches, slipping each stitch purlwise to keep its mount. If a stitch twists, reset it before knitting.
Pinch the bases of loose stitches between your thumb and forefinger, or use cable needle alternatives for added security. Keep the needle tips close to the fabric, move stitches only as far as needed, and control the yarn while a stitch is loose.
Compare Left and Right Crosses
Read the crossing direction from the right side of the fabric. Follow the original A and B through the cross - not just their new positions on the needle.
| Cable direction | Which stitch crosses in front |
|---|---|
| Left cross | A crosses in front of B; cable leans left. |
| Right cross | B crosses in front of A; cable leans right. |
Find Knitting Video Tutorials
Watch Alpaca Direct’s knitting tutorials for a live demonstration of how to support stitches and correct their mount.
In the next section, work each cross directly on the needles using this stitch order.
Knit Left and Right Crosses Step by Step
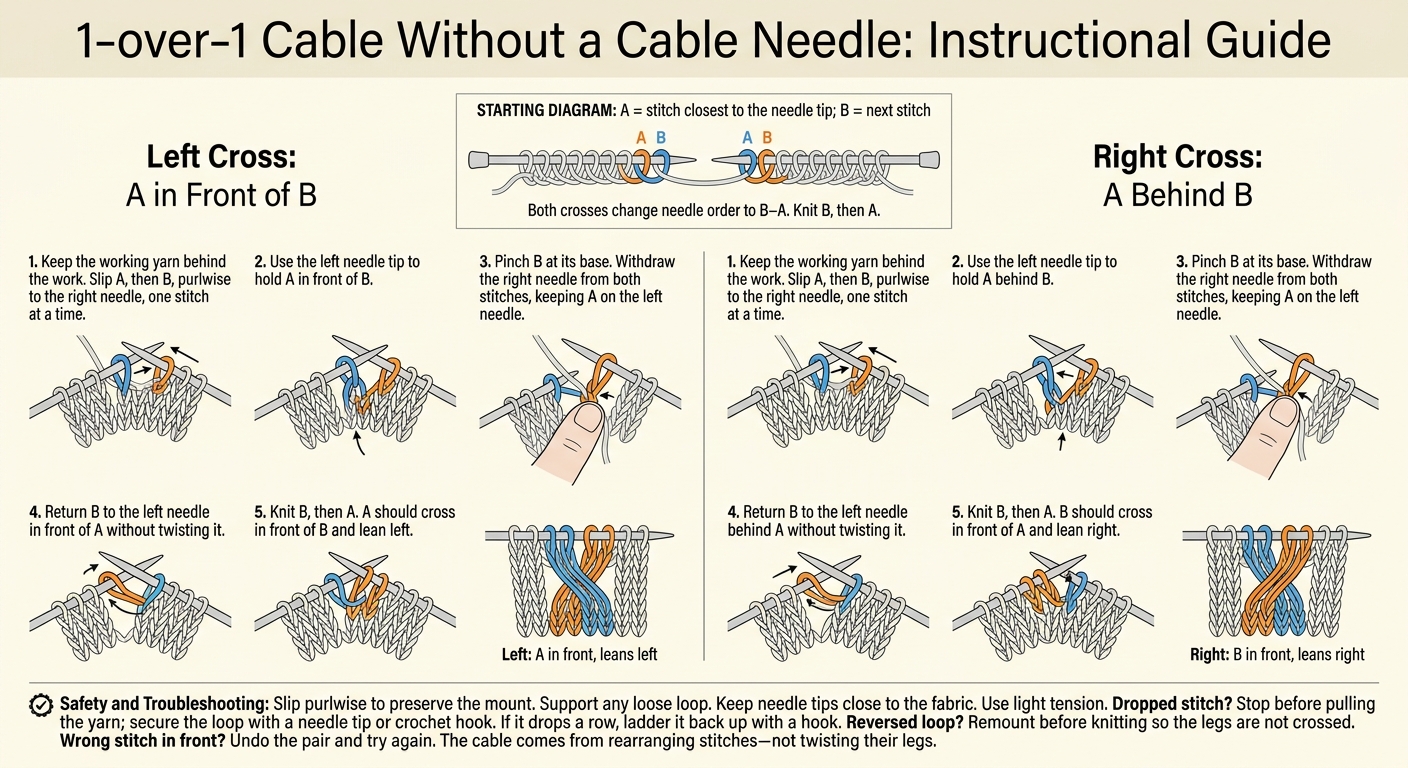
1-Over-1 Cables Without a Cable Needle: Left vs. Right
Follow the A/B order from the previous section, then cross the pair directly on the needles.
Left Cross: Cross A in Front of B
Work the next two stitches in B–A order.
- Keep the working yarn behind the work. Slip A, then B, purlwise to the right needle, one stitch at a time.
- Use the left needle tip to hold A in front of B.
- Pinch B at its base. Withdraw the right needle from both stitches, keeping A on the left needle.
- Return B to the left needle in front of A without twisting it.
- Knit B, then A. A should cross in front of B and lean left.
Right Cross: Cross A Behind B
Work the next two stitches in B–A order.
- Keep the working yarn behind the work. Slip A, then B, purlwise to the right needle, one stitch at a time.
- Use the left needle tip to hold A behind B.
- Pinch B at its base. Withdraw the right needle from both stitches, keeping A on the left needle.
- Return B to the left needle behind A without twisting it.
- Knit B, then A. B should cross in front of A and lean right.
Fix Dropped Stitches and Twisted Mounts
If a stitch drops, stop before pulling the yarn. Secure the loop with a needle tip or crochet hook so it can't unravel farther. If it drops a row, use a hook to ladder it back up.
Before knitting the reordered pair, check how both stitches sit on the needle. If a loop is reversed, remount it so its legs aren't crossed. The cable comes from rearranging the stitches - not twisting their legs.
If the wrong stitch crosses in front, undo the pair and try again. Keep the stitches near the needle tips, and knit without pulling the cross tight.
Use these same hand positions in the 4-stitch practice panel next.
Practice on a 4-Stitch Panel
Use the stitch order from the previous section to make two small practice swatches: one for the left cross and one for the right cross. Here, K means knit, P means purl, RS means right side, and WS means wrong side.
Cast On 12 Stitches and Set Up the Panel
Cast on 12 stitches, then knit 4 rows.
- Row 5 (RS): K12.
- Row 6 (WS): K4, P4, K4.
This sets up 4 center stockinette stitches between two 4-stitch garter borders. Those middle four stitches form the cable field.
Place stitch markers after stitch 4 and before stitch 9. Knit the border stitches on every row.
Repeat the 4-Row Cable Pattern
Begin the repeat on the RS, using the left-cross movement in one swatch and the right-cross movement in the other.
| Repeat row | Instructions |
|---|---|
| Row 1 (RS) | K5, work the chosen 2-stitch cross, K5. |
| Row 2 (WS) | K4, P4, K4. |
| Row 3 (RS) | K12. |
| Row 4 (WS) | K4, P4, K4. |
The cross uses stitches 6 and 7, so your stitch count stays at 12. Work at least 4 repeats (16 rows). After each repeat, check the cross direction and tension from the RS.
Mark each completed cross to keep the crosses 4 rows apart. Knit 4 more rows, then bind off loosely on the RS.
Conclusion: Check Cable Direction, Stitch Mount, and Tension
Keep the stitches in B-then-A order. Hold A in front for a left cross and behind for a right cross. The finished cable should lean in the intended direction - not sit straight or look twisted.
Check your swatch for direction, stitch mount, and tension. Support any loose loop with your thumb and check that neither stitch has rotated. Keep tension light to prevent puckering or gaps.
After checking the swatch, use the same checks in your project. This method works for any pattern that calls for a two-stitch cable. Follow the pattern’s crossing direction and repeat spacing.
FAQs
How do I match left and right crosses to pattern abbreviations?
Where you hold the stitches determines the cable’s direction. For a left cross (LC), hold them in front of the work. For a right cross (RC), hold them behind the work.
To see how to work these crosses without a cable needle, check Alpaca Direct’s educational resources or official YouTube channel.
Can I use this technique when knitting in the round?
Yes, the 1-over-1 cabling technique works when knitting in the round, including hats, socks, and mittens. Just as with flat knitting, you move stitches directly on or off your working needles to make decorative twists - no cable needle needed.
Alpaca Direct offers knitting tutorials and project ideas to help you learn these techniques.
Why does my cable look loose even with even tension?
A cable can look loose even when your tension is even. This can happen if stitches twist or aren’t held securely throughout the cross. Slip stitches purlwise to prevent twisting, and keep held stitches in front for a left cross or in back for a right cross.
Crossing stitches in the wrong order or skipping rows between crossings can also cause uneven slack. Check both your stitch order and the number of rows between crossings.