
Cable Needle Slips Out: Causes and Fixes

When a cable needle slips out, I check the fit first - not tighten the stitches. I start with a needle the same size as my working needle or one U.S. size smaller, then check its grip, shape, and position.
Here’s my checklist:
- Fit: Keep loops at their natural size, without stretching them.
- Grip and shape: Try wood, bamboo, or a bent needle if stitches slide off.
- Support: Center the loops and hold the needle close to the fabric.
- Recovery: Stop pulling the yarn, secure loose loops, and repair dropped stitches before continuing.
I change one thing at a time and test it at the next crossing. The goal is <u>secure stitches, not tighter stitches</u>.
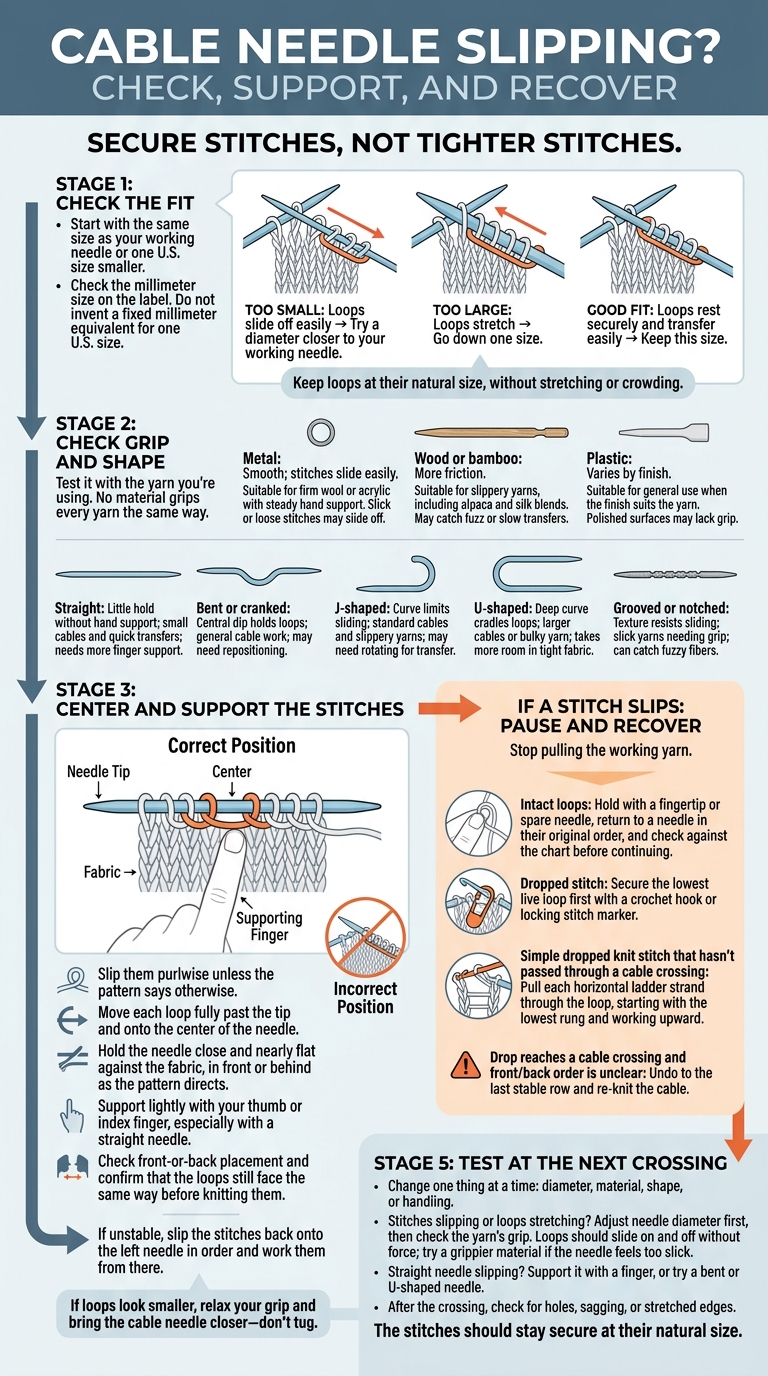
Cable Needle Slipping? Check, Support, and Recover
Choose a Cable Needle That Keeps Stitches Secure
Match Needle Diameter to Stitch Size
Choose a cable needle that fits the held stitches - usually the same size as your working needle or one U.S. size smaller. Check the millimeter size on the label.
Use this chart to spot fit problems.
| Fit | Symptom | Adjustment |
|---|---|---|
| Too small | Loops slide off easily | Try a diameter closer to your working needle |
| Too large | Loops stretch | Go down one size |
| Good fit | Loops rest securely and transfer easily | Keep this size |
Fine yarns need smaller needles; bulky cables need larger ones. The loops should sit comfortably without stretching or crowding.
Choose a Material With Enough Grip
If the size fits but stitches still slip, check the needle’s surface. Test it with the yarn you’re using, since blends behave differently. Some alpaca blends slide easily, while fuzzy yarns can catch on rough surfaces. No material grips every yarn the same way.
| Material | Typical grip | Suitable use | Possible drawback |
|---|---|---|---|
| Metal | Smooth; stitches slide easily | Firm wool or acrylic with steady hand support | Slick or loose stitches may slide off |
| Wood or bamboo | More friction | Slippery yarns, including alpaca and silk blends | May catch fuzz or slow transfers |
| Plastic | Varies by finish | General use when the finish suits the yarn | Polished surfaces may lack grip |
Choose a Shape That Helps Hold Stitches
Once size and material fit, check the shape. A bent or cranked cable needle holds loops in its central dip, helping prevent slips while you work the remaining stitches. Grooves add grip, but they shouldn’t snag fibers.
| Shape | Retention | Suitable use | Handling limitation |
|---|---|---|---|
| Straight | Little hold without hand support | Small cables and quick transfers | Needs more finger support |
| Bent or cranked | Central dip holds loops | General cable work | May need repositioning |
| J-shaped | Curve limits sliding | Standard cables and slippery yarns | May need rotating for transfer |
| U-shaped | Deep curve cradles loops | Larger cables or bulky yarn | Takes more room in tight fabric |
| Grooved or notched | Texture resists sliding | Slick yarns needing grip | Can catch fuzzy fibers |
Support Stitches Without Pulling Them Tight
Slide Held Stitches Away From the Tip
Even a well-fitting cable needle can slip if stitches rest on its taper or the needle drifts away from the fabric. Keep the stitches centered to help prevent them from sliding off.
Transfer the stitches without stretching them. Slip them purlwise unless the pattern says otherwise. Move each loop fully past the tip and onto the center of the needle.
Steady the Needle During the Crossing
Once the loops are in place, focus on keeping the needle steady - not pulling the stitches tight. Hold it close and nearly flat against the fabric, in front or behind as the pattern directs. Support it lightly with your thumb or index finger, especially when using a straight needle.
Work the held stitches when instructed. If the cable needle feels unstable, slip the stitches back onto the left needle in order and work them from there. This can help troubleshoot cable needle problems and make the crossing easier to see.
Check Needle Position and Stitch Orientation
Before knitting the held stitches, check the pattern’s front-or-back instruction and confirm that the loops still face the same way. Compare the first held loop with a neighboring stitch, then carefully reposition any loop that has turned backward.
If the held loops look smaller than nearby stitches, relax your grip and bring the cable needle closer rather than tugging. The stitches should slide easily; forcing them can pinch the cable. Checking their placement now helps keep the next cable row smooth and secure.
How To Fix Mistakes When Knitting Cables
Recover Stitches When the Cable Needle Slips
If a stitch slips despite good support, pause before pulling the working yarn and recover it before continuing. Return intact loops to a needle. If a stitch has dropped below the row, secure it first.
Put Intact Loops Back on a Needle
Hold the loose loops in place with a fingertip or spare needle, then slip them back onto a needle in their original order.
Check the recovered loops against the chart before knitting on. If any loop has dropped, repair it first.
Repair Dropped Stitches
Secure the lowest live loop first with a crochet hook or locking stitch marker to keep more stitches from coming undone. For a simple dropped knit or purl stitch that hasn’t passed through a cable crossing, use the hook to pull each horizontal ladder strand through the loop, starting with the lowest rung and working upward.
If the drop reaches a cable crossing and you can’t tell which stitches belong in front or back, undo the knitting to the last stable row and re-knit the cable.
Test Fit and Support on the Next Cable Row
Test the fix on your next cable row before you keep knitting. Change one thing at a time - diameter, material, shape, or handling - so you can see what works at the next crossing.
- Stitches slipping or loops stretching? Adjust the needle diameter first, then check the yarn’s grip. Loops should slide on and off without force. If the needle feels too slick, try a grippier material.
- Straight needle slipping? Hold it steady with a finger, or try a bent or U-shaped needle, or knit cables without a cable needle.
After the crossing, check for holes, sagging, or stretched edges. The stitches should stay secure at their natural size.
FAQs
Can I use a double-pointed needle as a cable needle?
Yes, you can use a double-pointed needle (DPN) instead of a cable needle. It’s an easy swap, especially if you already have one. Choose a DPN that matches your working needle size or is one size smaller.
Slip the cable stitches purlwise onto the DPN, then hold it in front or behind your work while you knit the remaining stitches. Keep the DPN parallel to your working needle so the stitches stay close without stretching.
How can I prevent gaps after a cable crossing?
Focus on yarn tension and stitch placement. Bring the yarn firmly to the front before working the first purl stitch after the cable panel. Keep the first stitch of the crossing relaxed so it doesn’t pinch. Then gently tug the cable column upward to even out the tension.
If gaps remain, work the purl stitch next to the cable through the back loop on the following row. Another option: add a knit column between the cable and purl sections.
When is cabling without a cable needle safe?
Cabling without a cable needle is safest for small, simple crosses - usually 1x1 or 2x2 cables with two to four stitches. It works well for frequent repeats in hats, socks, or mittens, especially with grippy yarn like wool that helps stitches stay put when they’re off the needle.
For slippery fibers like silk or alpaca, a cable needle is the safer choice. Use one when stitches feel loose or hard to control, too.