
Fall Cable Scarf: Knitting Pattern and Cable Tips

For a 7-inch-wide, 60- to 70-inch-long cable scarf, I start with a washed cable swatch - not stockinette - to plan stitch count, length, and yarn needs. A alpaca and alpaca–wool blends is one starting point for softness and cable shape.
Here’s my approach:
- Frame the cables with garter borders and follow the chart for front and back crossings. When choosing your pattern, consider which cable stitches work best with the drape of alpaca.
- Track every row and check mistakes before they spread.
- Bind off loosely, then wash gently and dry flat without stretching.
My final check: <u>flat borders, even crossings, and the intended size</u>. Blocking can relax the fabric, but it won’t fix a reversed cable.
Knit the Cable Scarf
Check Size, Gauge, and Pattern Terms
Use your swatch gauge to guide your cast-on, then work a long-tail cast-on for a clean, stretchy edge. In the pattern, RS means right side, and WS means wrong side. C4F and C4B indicate front and back cable crosses.
Work the Borders and Cable Repeat
Place markers at the cable-panel edges and work garter-stitch borders to frame the cables. Follow the pattern or chart row by row, using the chart to keep each cable repeat aligned.
Finish the Length and Bind Off
Before starting the final border, measure the scarf from the cast-on edge without stretching it. Cables pull the fabric inward, which affects the measurement. Stop slightly short of your target length to leave room for growth during blocking. Knit the top border to match the bottom, then bind off loosely so the edge doesn’t tighten.
How To Knit Cables Without A Cable Needle
Read the Chart and Work Cable Crossings
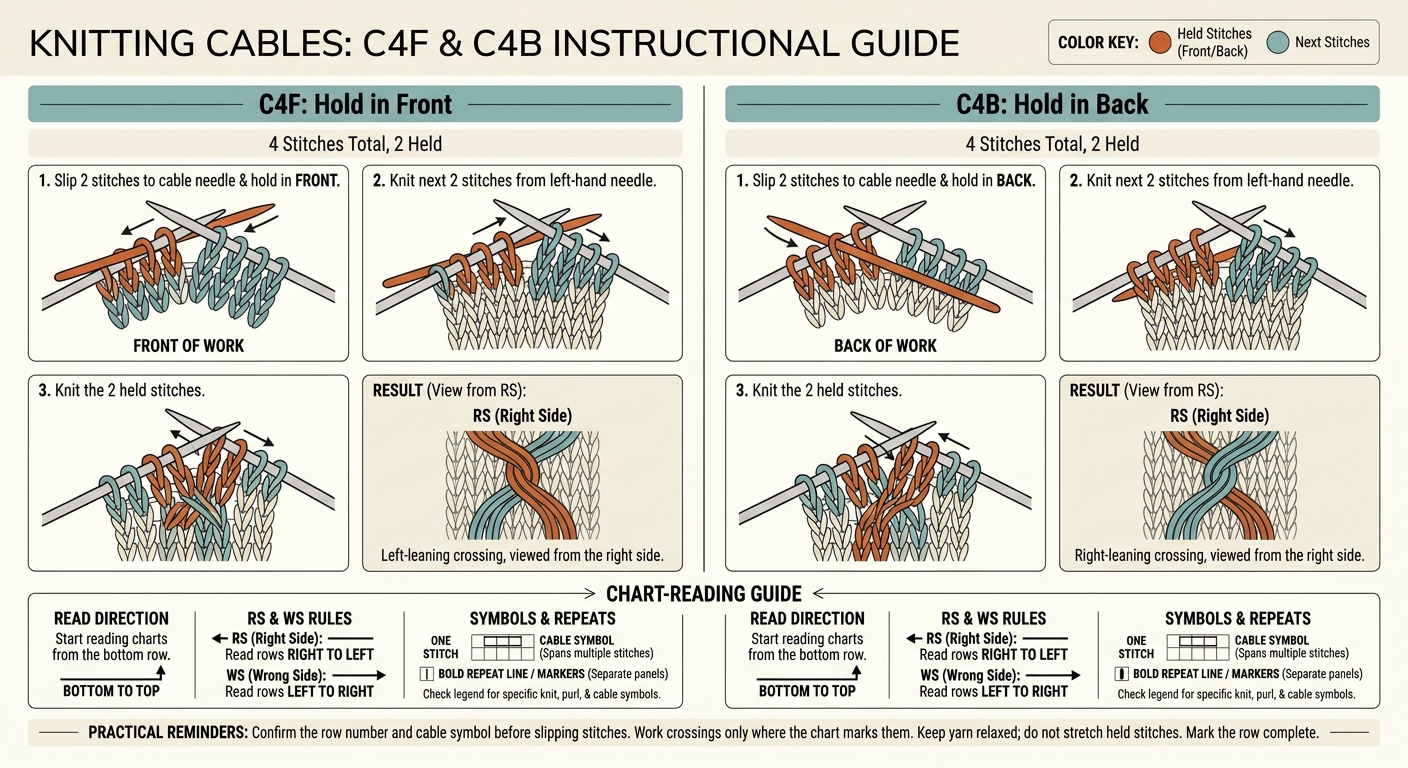
C4F vs. C4B: Cable Knitting Guide
Once the repeat is established, use the chart to keep the cable panel aligned between the borders and work each crossing in its marked place.
Follow Chart Rows and Symbols
Read the chart from bottom to top. Read right-side rows from right to left and wrong-side rows from left to right. Check the legend for each knit, purl, and cable symbol.
Each square represents one stitch. A cable symbol spans all the stitches used in that crossing. Follow the bold repeat lines to match the written repeat, and use markers to separate the cable panel from the background. Work cable crossings only where the chart marks them, and consider these tips for knitting cables to make the process easier.
Work Front and Back Crossings
Before slipping any stitches, confirm the row number and check the cable symbol against the legend. It tells you the crossing direction, the total number of stitches involved, and how many stitches to hold.
For C4F, slip 2 stitches onto a cable needle and hold them in front. Knit the next 2 stitches from the left-hand needle, then knit the 2 held stitches. For C4B, use the same sequence, but hold the cable needle in back. Advanced knitters may even prefer knitting cables without a cable needle to speed up the process. Viewed from the right side, C4F produces a left-leaning crossing, while C4B produces a right-leaning crossing.
Keep the yarn relaxed, and don’t stretch the held stitches - this helps keep your tension even. Mark the row as complete before moving to the next repeat.
Track Rows and Fix Cable Mistakes
Once your cable pattern is underway, tracking rows helps keep repeats aligned.
Record Rows and Repeats
Place a removable marker at each cable repeat. Mark crossing rows on your chart, and advance your counter after every row. Before you stop, write down the last row worked and the row to work next.
If the spacing looks uneven, check the fabric - not just the counter. Find the last crossing, count the knit V’s above it, and compare that count with the interval in your pattern.
If the fabric starts to shift, fix it before the mistake spreads.
Fix Crossings and Uneven Tension
Check your cable panel regularly to catch mistakes while they’re still close to the needles.
| Problem | Likely cause | Correction |
|---|---|---|
| Reversed cable | Cable needle held on the wrong side | Rip back to the error, or ladder down the cable panel and re-cross the stitches correctly. |
| Tight crossings | Working yarn pulled too tightly | Ease your tension and keep stitches from bunching on the needle. |
| Shifting panels | Stitches miscounted between markers or placed incorrectly | Recount the stitches between markers, then rip back to where the shift began. |
| Missed crossing | Twist skipped on the marked row | Count from the last crossing. Tink back for a recent mistake, or rip back to a lifeline for an older one. |
A lifeline gives you a safe stopping point when you rip back. Use laddering only for crossed stitches you can rebuild cleanly. Keep a lifeline in place while the cable panel is still easy to read.
Block and Check the Scarf
After binding off, give the scarf a gentle block.
Wash and Shape Without Flattening Cables
Weave in the ends on the wrong side without pulling the fabric tight. Before washing, check the yarn-care label. Alpaca blends usually need cool water and gentle handling to prevent felting or loss of stitch definition.
Support the scarf with both hands when lifting it, then press out the water with a towel. Never wring it.
Lay the scarf flat and gently square the borders without flattening the cables. Blocking should relax the fabric - not stretch it into shape.
Check Size, Borders, and Cable Definition
Once the scarf is dry, check its finished measurements and compare it with your blocked swatch. Make sure:
- Width and length match the pattern’s intended measurements.
- Borders lie flat.
- Ends are secure without puckering.
- The cable panel stands out clearly from the background.
- Crossings line up correctly. Blocking cannot fix reversed crossings.
FAQs
How do I calculate my cast-on for a 7-inch cable scarf?
Knit a gauge swatch in your cable pattern with your chosen yarn and needle size, then wet-block it. Measure the stitches per inch and multiply by seven to find your cast-on count for a 7-inch-wide scarf.
Cables pull the fabric inward, so don’t use stockinette gauge. Reversible cables need twice as many stitches as stockinette to reach the same width. Before casting on, check your planned scarf width against the blocked swatch.
How much yarn will I need for my scarf?
Check your pattern’s yardage requirements: they account for the extra yarn cables use compared with stockinette stitch. Complex cables pull the fabric inward and add depth, so they need more yarn than simpler patterns.
If you’re substituting yarn, buy at least 10% to 15% more yardage than the pattern calls for. Plan by total yardage - not skein count - and, ideally, check your gauge with a blocked swatch.
How does the alpaca-to-wool ratio affect cable definition?
Pure alpaca doesn’t have wool’s bounce or shape memory, so cables look softer, flatter, and more rounded - not crisp and rope-like. Adding wool gives the yarn more stretch and helps cables keep their shape over time. For sharp, bold cables, a blend with more wool often works better than 100% alpaca. Pure alpaca is better suited to a soft, flowing drape.