
Double-Pointed Needles: DPN Basics for Beginners

Double-pointed needles (DPNs) let you knit small tubes, such as socks, mitten thumbs, and hat crowns. My starting tip: use the needle size your pattern calls for and check your gauge before casting on.
Here’s the setup in plain terms:
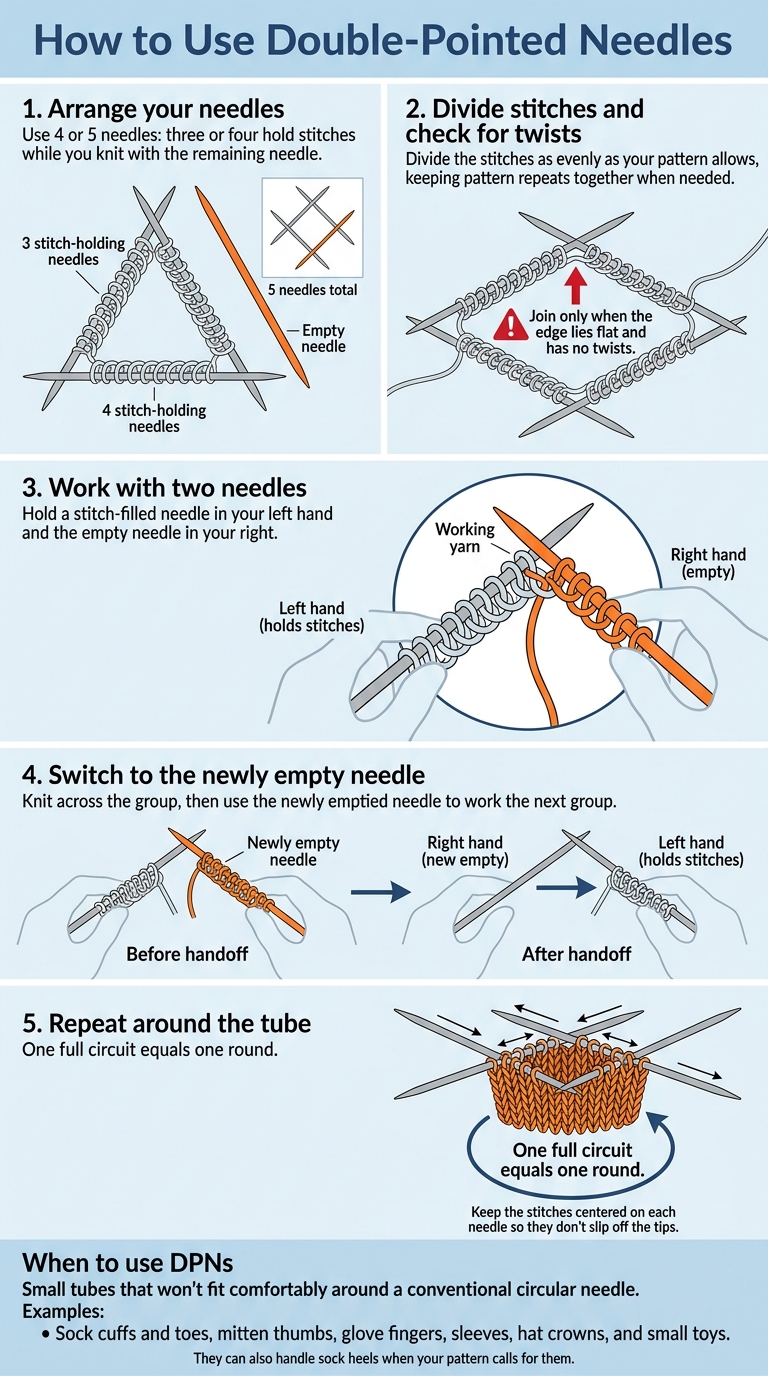
- Use 4 or 5 needles: three or four hold stitches while you knit with the remaining needle.
- Work with two at a time: after knitting across one needle, use the empty needle for the next group.
- Choose your tools: DPNs commonly measure 5–8 inches. Wood and bamboo grip yarn; metal lets stitches slide more freely.
- Watch the joins: keep stitches untwisted, away from the tips, and under even tension to help prevent gaps called ladders.
I’d start with a simple pattern, keep <u>the working needles close together at each join</u>, and use a step-by-step tutorial if the hand movements feel awkward.
3 Ways To Knit In The Round
How DPNs Work and When to Use Them
How to Use Double-Pointed Needles
DPNs work by passing stitches from one needle to another. Once you knit all the stitches on a needle, that empty needle becomes the working needle for the next group. Repeat this process to build a connected tube without a cable. With points at both ends, you can work stitches from either end without turning the piece.
Holding Stitches and Switching Needles
Arrange three stitch-holding needles in a triangle or four in a square. Divide the stitches as evenly as your pattern allows, keeping pattern repeats together when needed. Before joining, lay the needles flat and check that the cast-on edge faces inward all the way around. Join only when the edge lies flat and has no twists.
Hold a stitch-filled needle in your left hand and the empty needle in your right. Knit across the group, then use the newly emptied needle to work the next group. One full circuit equals one round. Keep the stitches centered on each needle so they don’t slip off the tips.
This setup is one of several methods for knitting in the round and works well for narrow projects with small openings and no seams.
Projects That Use DPNs
DPNs suit small tubes that won’t fit comfortably around a conventional circular needle.
Examples include sock cuffs and toes, mitten thumbs, glove fingers, sleeves, hat crowns, and small toys.
They can also handle sock heels when your pattern calls for them.
DPNs aren’t limited to knitting in the round. You can knit small flat sections back and forth, too. For I-cord and other narrow strips, slide the stitches to the opposite end rather than turning the piece.
DPN Benefits and Beginner Challenges
DPNs give you control and flexibility when knitting small circumferences. But open tips and frequent needle changes take practice, especially at joins where loose stitches can leave gaps.
| Feature | Benefit | Beginner consideration |
|---|---|---|
| Small circumferences / short needles | Common 5–8-inch lengths handle narrow tubes, even through decreases. | Needles can feel crowded; leave enough room for the stitches. |
| Cable-free construction | No cable or connector to manage. | Loose needles are easy to misplace. |
| Stitch control | Dividing stitches keeps each group easy to handle. | Keep inactive stitches away from the tips. |
Check your stitch count at needle changes to catch errors early. Laddering refers to loose vertical gaps where needles meet, usually caused by uneven tension at the joins. Pulling too tight can distort the fabric.
Keep the working needles close together at each join. Use your normal tension, then gently snug the second stitch if the join looks loose. Check the first few rounds so you can fix gaps early.
During breaks, store the project and needles together in a pouch, with point protectors on the ends. This helps prevent dropped stitches and misplaced needles. These handling issues also make needle size and material choices worth careful attention.
Choosing DPNs for Your First Project
Check Needle Size, Length, Material, and Gauge
Choose your DPNs based on the pattern, not how the needles look. Check the recommended needle size, finished circumference, and gauge. Needle size and length are separate measurements: pick a length that holds your stitches securely without crowding the tips.
Five-inch DPNs are common for socks, while 6- to 8-inch needles can work better for sleeves or hats.
Next, think about how the material feels as you knit. Bamboo and wood grip yarn better, which helps beginners control slippery stitches. Metal needles are smoother, so stitches slide more freely.
Before starting your project, knit a swatch in the round and check your gauge. If you'd like a visual walkthrough, watch a tutorial on avoiding gaps when joining in the round before casting on.
Supplies and Tutorials at Alpaca Direct
Use product details alongside tutorials to help you choose and learn to use DPNs. At Alpaca Direct, match the needle diameter, length, and material to your pattern. For step-by-step help with casting on and joining on DPNs and basic handling, visit the Alpaca Direct YouTube channel.
Conclusion: DPN Basics to Remember
DPN means double-pointed needle: each needle has a point at both ends. Usually, three or four needles hold the stitches while another works them. DPNs let you knit small circles when a regular circular needle is too large.
The rhythm is simple: knit across one needle, then use the newly empty needle to work the next. Keep going around the tube, making sure the stitches stay untwisted.
Handling several needles can feel awkward at first, and gaps called ladders may appear at the joins. Keep your tension even as you switch needles. With practice, coordination and neat joins usually get easier.
For your first project, follow the pattern’s needle size and check your gauge. Choose a simple small-round project so you can focus on handling the DPNs and keeping the joins even.
FAQs
Should I start with four or five DPNs?
Either option works for beginners. DPNs usually come in sets of five, though sets of four are also available. Divide your stitches as evenly as possible across three or four needles, leaving one free as your working needle.
More needles help spread the weight and can make joins easier to handle. The trade-off? Keeping track of five needles can take some practice at first.
How do I fix ladders between needles?
To fix or prevent **ladders - the loose vertical columns between needles - **keep your needle tips close together as you switch needles. This helps limit stretching. After each needle change, snug up the second stitch slightly instead of pulling every stitch tight.
If ladders keep appearing, move the transition point a few stitches every few rounds to break up the vertical line.
For a visual guide, watch Alpaca Direct’s knitting tutorials on YouTube.
How do I mark the start of a round?
With double-pointed needles, use your empty needle to knit the first stitch of the round. Then slip a stitch marker onto the right needle. Keep the marker in place so you can spot the start of each new round.
For more knitting tips, check out Alpaca Direct’s educational resources and YouTube tutorials.