Your Cart is Empty



If I want sock knitting to go smoothly, I need the right tools for each step: needles, markers, measuring tools, finishing supplies, repair items, and storage. Most sock projects use fingering-weight yarn, US 0–3 needles, and about 350–400 yards for a standard adult pair.
Here’s the short version:
If I’m knitting two at a time, I’ll usually want a 40-inch circular needle. If I’m knitting toe-up, I may need a stretchy bind-off instead of toe grafting. If I’m knitting cuff-down, I’ll often need a stretchy cast-on and a tapestry needle for Kitchener stitch at the end.
| Tool area | What I use it for | Common picks |
|---|---|---|
| Needles | Knitting the sock in the round | DPNs, 9–10" circulars, 32–40" circulars |
| Measuring | Getting the sock to fit | Tape measure, ruler, gauge tool |
| Notions | Tracking shaping and fixing mistakes | Stitch markers, row counter, crochet hook |
| Finishing | Closing and cleaning up the sock | Tapestry needle, scissors, wool wash |
| Repair | Fixing thin spots or holes | Darning needle, darning egg, reinforcement yarn |
| Storage | Keeping tools together | Project bag, needle case, notions pouch |
I’d treat this as a start-to-finish checklist for sock knitting, with the main choices, sizes, and tools laid out in plain terms.
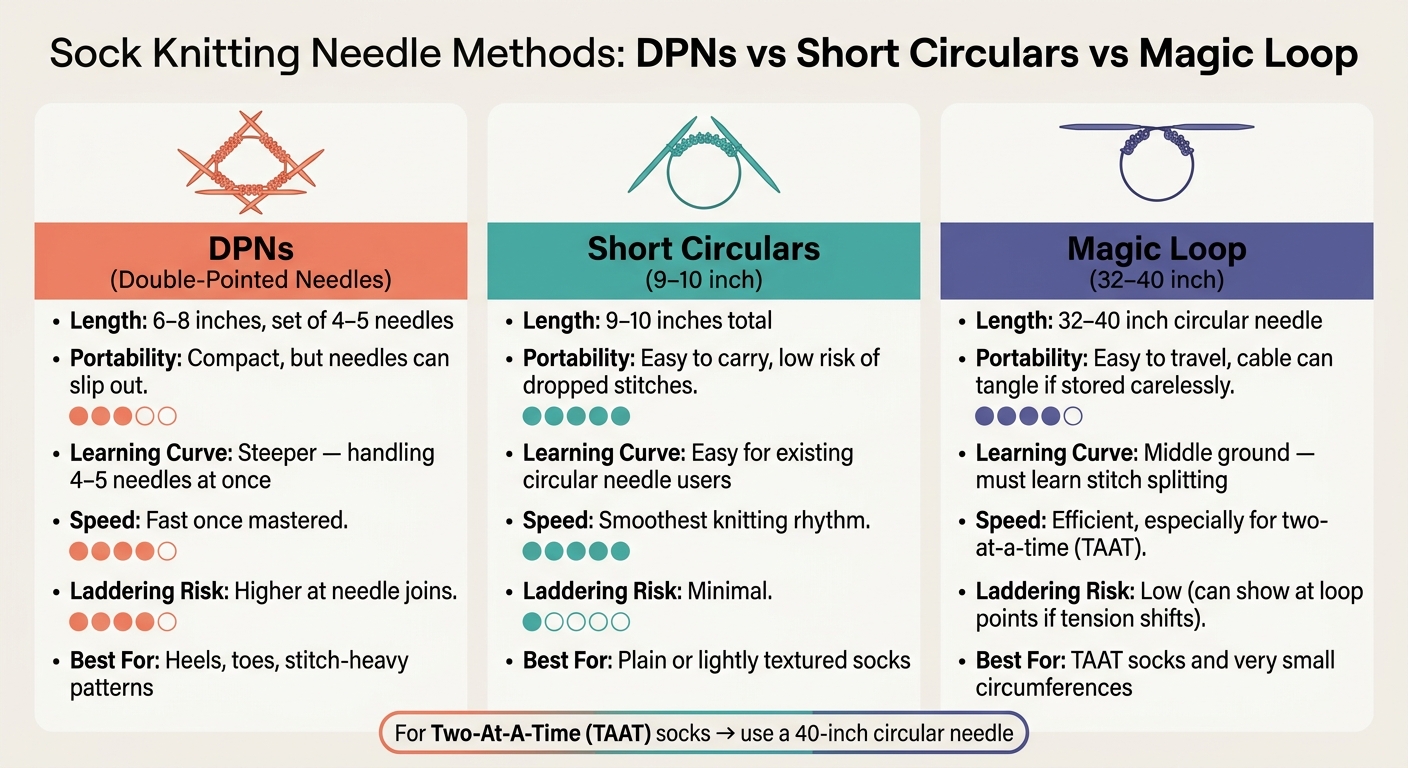
Sock Knitting Needle Methods Compared: DPNs vs Short Circulars vs Magic Loop
Your needle setup affects speed, comfort, and how much control you have over each stitch. After that, the small tools help with fit, counting, and clean execution.
DPNs are the old-school option: a set of 4 or 5 short needles, usually 6–8 inches long, with points on both ends. You spread your cast-on stitches across 3 or 4 needles, then knit with the spare needle, rotating as you go.
Short circulars (9–10 inches total) use a very short fixed circular needle. You cast on, join in the round, and keep knitting without moving stitches from needle to needle. The trade-off is comfort: those tiny tips can feel cramped during long knitting sessions.
Magic loop uses one long circular needle - usually 32–40 inches - and splits the stitches into two sections, with a loop of cable pulled out on each side.
"The most important tool for knitting things two-at-a-time is your set of needles. If the needle cable is too short or too long, it's going to make things too difficult. The cable material matters as well – if it retains too much memory, you'll fight the cable as you knit." - Meg Bateman
| DPNs | Short Circulars (9–10") | Magic Loop (32–40") | |
|---|---|---|---|
| Portability | Compact, but needles can slip out | Easy to carry; low risk of dropped stitches | Easy to take along, but the long cable can tangle if you store it carelessly |
| Learning curve | Steeper; you're handling 4–5 needles at once | Easy if you already use circular needles | Middle ground; you need to learn how to split the stitches |
| Speed | Fast once it clicks | Often gives the smoothest knitting rhythm | Efficient, especially for TAAT |
| Laddering risk | Higher at needle joins | Minimal | Low, though it can show at the loop points if your tension shifts |
| Best use | Heels, toes, and stitch-heavy patterns | Plain or lightly textured socks | TAAT socks and very small circumferences |
At small gauges, needle material matters more than many knitters expect. Metal needles - usually stainless steel or nickel-plated brass - are durable and let stitches slide with little friction, which suits plain stockinette socks. Wood and bamboo give you more grip, which helps with slippery yarns like alpaca blends or silk, though they can be easier to break in the smallest sizes. Carbon fiber or composite needles, such as Karbonz-style needles with carbon shafts and metal tips, sit in the middle: strong enough for fine gauges, warmer in the hand than metal, and with a moderate level of grip.
| Metal | Wood/Bamboo | Carbon/Composite | |
|---|---|---|---|
| Grip | Low (slick) | High | Moderate |
| Speed | High | A bit slower | Comfortable, controlled |
| Durability | Very high | Moderate; can be fragile in tiny sizes | Very high |
| Warmth in hand | Cool | Warm | Warmer than metal |
| Suitability for US 0–2 | Excellent | Good with care | Excellent |
Tip shape matters too, especially when you're working decreases. Sharp tips make K2tog and SSK easier to knit cleanly, and they're a smart pick for lace panels or for knitters who work tightly.
"If you're working on a lace project or a pattern with a lot of increases or decreases, I would recommend a sharper needle." - Kathleen Cubley
Rounded tips can help reduce splitting in fuzzy yarns or loosely plied yarns.
Cable length also matters. 32 inches is the practical minimum for single-sock magic loop, while 40 inches is strongly preferred for TAAT. If you've ever wrestled with a stiff cable, you already know the issue: a flexible cable with little to no memory makes magic loop much easier.
For top-down socks, the cuff and leg usually work well on any of the three methods. A lot of knitters change setups only when the round gets too small for the cable.
For toe-up socks, sharp tips can make those first stitches on a circular setup much easier. Some knitters stick with magic loop from the start so they can use the same setup for the rest of the sock.
Once your needle setup is dialed in, stitch markers, counters, and measuring tools take over the fit work.
Small notions do a lot of behind-the-scenes work in sock knitting. Closed ring markers slip onto the needle and help mark the beginning of the round, pattern repeats, or toe decreases. Locking markers clip right onto a stitch, which is handy when you want to mark exactly where a heel turn began on sock #1 so you can match it on sock #2. A progress keeper shows where you stopped, so it’s easy to jump back in.
A row counter helps you stay on track during gusset decreases and heel shaping, especially when a pattern tells you to knit a set number of rounds instead of knitting to a certain length. One simple habit helps a lot: reset the counter to zero each time you start a new section, then jot down a quick note in your pattern, like “0 = start of heel flap, sock #1 at round 70.” That makes it much easier to match the second sock row for row, not just by guesswork.
Your fix-it kit can stay very small:
The tapestry needle is for weaving in ends and working Kitchener stitch at the toe. The scissors trim tails neatly without cutting into nearby stitches. And the crochet hook? That’s your go-to rescue tool for catching dropped stitches without ripping back whole rounds.
"Reinforcing the parts of your socks that get the most wear will help prevent holes from forming and make your socks last longer." - Kelley Hobart, Shop Owner, Alpaca Direct
Once you can keep track of the knitting, the next job is getting the fit right.
Fit starts with two measurements: foot length from heel to longest toe, and foot circumference around the widest part of the ball of the foot. Take both while standing. A flexible 60-inch tape measure works well for each one. Adult foot circumference often lands around 8–10 inches, and hand-knit socks usually use about 10% negative ease so the sock stays snug instead of slouching or bunching.
| Tool | Best Use | Accuracy | Portability | Limitations |
|---|---|---|---|---|
| Tape measure | Foot/leg circumference and length | Good for curves and longer spans | Very portable; fits in any project bag | Can stretch over time; harder to keep straight for short measurements |
| Ruler (6–8 in) | Stitch/row gauge over 4 in; heel flap height; toe depth | High for short, straight spans | Fits most bags | Not suited to curved surfaces or full foot length |
| Gauge tool | Counting stitches in a fixed window; comparing gauge in both inches and centimeters | Designed for precision gauge checks | Credit card–size; very portable | Limited to gauge tasks; needs a tape measure for body dimensions |
For gauge, place a ruler across stockinette worked in the round and count stitches over 4 inches. Fingering-weight sock yarn often comes in at 28–32 stitches per 4 inches on US 1–2 needles (2.25–2.75 mm). Change the yarn or the needle size, and your gauge can shift too, so it’s smart to check again each time. If a pattern gives gauge in centimeters, it helps to remember that 10 cm is just under 4 inches. Many gauge tools show both scales on one card, which keeps things simple.
After fit, the next piece is yardage.
For a standard fingering-weight crew pair, plan for about 350–400 yards for adult sizes around US women’s 7–8 or men’s 9–10. Larger sizes or knee-high socks may need 500–600 yards. Most fingering-weight sock yarn comes in 100 g skeins with about 400–460 yards.
For everyday socks, a 75–80% superwash merino / 20–25% nylon blend tends to hold up best. Tightly twisted, multi-ply yarn also usually wears better in high-friction spots. If you want a little more backup at the heel, you can carry a strand of reinforcement thread along with the main yarn while knitting that section.
Once the fit is right, these finishing tools help turn the sock into something neat, comfortable, and ready to wear.
Use a blunt tapestry needle to graft the toe with Kitchener stitch for an invisible, seamless toe. A size 18–20 needle works well for fingering-weight yarn, while size 16–18 is a better fit for sport or DK.
Keep your grafting tension even as you go. It helps to stop every inch or two, then smooth out the full graft before moving on. If the toe feels cramped, a bent-tip tapestry needle can make life easier. That small curve helps you slide under stitches without stretching or warping the fabric.
When you weave in ends, work on the wrong side for 1–2 inches, reverse once to lock the tail, and trim only after it’s secure. It’s a small step, but it saves headaches later.
Blocking is optional for plain socks, but it’s worth doing for lace, colorwork, and gifts. It helps the finished sock settle into its final shape and size.
Soak the sock in lukewarm water with wool wash for 10–20 minutes. Then squeeze out the extra water, roll it in a towel, and let it dry on a sock blocker.
Sock blockers are foot-shaped forms made from plastic, acrylic, or wood, and they’re sized to U.S. shoe sizes. For plain ribbed or stockinette socks knit in springy yarn, you can usually shape them by hand and dry them flat. Lace and textured patterns are a different story. Blockers open up stitch definition in a way hand-shaping just can’t.
If you don’t have blockers, don’t sweat it. A form cut from cardboard or shaped from a wire coat hanger can do the job.
Use a gentle no-rinse wool wash for alpaca and wool blends.
After blocking, it’s smart to keep a small repair kit nearby for heels and toes that wear thin over time. The same durability mindset you used when picking yarn for those areas still matters here.
A darning egg or mushroom gives you a firm, curved surface under the worn spot while you mend. Without one, it’s easy to sew through both layers or end up with a puckered patch. Any smooth, firm object that fits inside the sock can work in a pinch.
Pick the repair method based on the fiber:
Don’t sew holes closed. Mending should replace lost fabric, not pinch the opening shut.
| Tool | Purpose | Best Time to Use | Skill Level |
|---|---|---|---|
| Darning Needle | Weaving in ends, Kitchener stitch, mending holes | Finishing or when a hole appears | Beginner |
| Darning Egg or Mushroom | Firm, curved surface to hold sock shape during repair | During darning or mending | Beginner |
| Reinforcement Yarn | Adds durability to heels and toes to prevent thinning | During knitting or via duplicate stitch afterward | Beginner–Intermediate |
Keep these tools together so future repairs stay quick and easy.
Once you’ve got your sock tools, the next step is simple: keep them tidy and safe between knitting sessions.
If you knit socks often, it helps to give each active project its own bag. Keep the yarn, needles, pattern, and a small notions kit together in one place. That way, your cast-on tools, heel-turn setup, and finishing supplies stay with the project instead of drifting into different corners of your house or bag. When everything moves as one unit, you can pick it up and head out without digging around for a tapestry needle or the right stitch marker.
Use a compact project bag that fits fingering-weight yarn, your needles, and the sock in progress. A flat bottom helps it sit well. A zipper or drawstring keeps things from spilling out. And at least one inside pocket makes the little stuff much easier to find.
Store US 0–3 needles in a slim needle case with slots or elastic bands. Loose needles tossed into a larger bag can bend or snap, and no one wants to find that out mid-row. A notions pouch also does a lot of work here. It keeps scissors and tapestry needles from poking through the bag, and it stops tiny tools from getting lost in the yarn.
| Storage Tool | Portability | Protection | Capacity |
|---|---|---|---|
| Project Bag | High; compact fabric bags carry easily in a tote or backpack | Keeps yarn clean | One active project plus a small notions kit |
| Needle Case | High; slim enough to slip inside a project bag | Prevents bending or breakage | Multiple US sizes of DPNs, short circulars, or interchangeable tips |
| Notions Pouch | High; palm-sized and easy to move between projects | Keeps sharp tools contained | Stitch markers, tape measure, scissors, and a tapestry needle |
Keep one small notions pouch in each active project bag so your go-to tools are always there when you need them.
After storage, think about protection. A few small add-ons can save your stitches, your needles, and your eyes.
Point protectors and stitch stoppers are tiny, low-cost tools, but they’re worth having if you travel with your knitting. Silicone or rubber point protectors fit over needle tips and help stop stitches from slipping off inside a project bag or an overhead bin. If you use DPNs, a DPN holder is especially handy. It keeps all the needles together, which matters with US 0–2 sizes that are easy to lose or bend when they’re loose.
Stitch stoppers are also handy when you need to remove a needle. They hold live stitches in place, which makes it easier to switch needles or pack the project more tightly.
Lighting matters more than people think. Fingering-weight yarn on US 0–2 needles can be tough to see in soft overhead light, especially if you’re working with dark shades like charcoal or navy. An adjustable LED or clip-on light can ease eye strain and help you spot mistakes before you have to rip back rows of work. Set the light from the side or a little behind the project so you don’t get glare.
If you knit socks often, task lighting and short breaks can help cut down on eye strain and hand fatigue.
Pick tools that fit the way you knit socks, then keep them organized, protected, and ready to use. Start with needles that match your setup - different methods for knitting in the round like DPNs, short circulars, or magic loop. Add the notions you use for measuring and keeping track. Then include finishing and repair tools so each pair lasts longer. A small toolkit built around your method makes every new sock project easier to start.
For beginners, Magic Loop with a 40- to 47-inch circular needle is often easier than double-pointed needles when you’re working with the small stitch count of a sock.
If you’d rather use double-pointed needles, a 3-needle setup is usually the better place to start since there are fewer joins to deal with. At the end of the day, the best method is the one that feels most comfortable in your hands.
Measure your foot circumference at its widest point, around the ball of the foot. Then subtract 10% from that number for a snug fit.
Next, knit a gauge swatch with your yarn and needles to find your stitches per inch. Multiply the reduced foot measurement, in inches, by your gauge to get your stitch count. After that, tweak the number a bit if you want the fit tighter or looser.
For your first pair, you mostly need sock yarn and the right needles for the method you want to use:
It also helps to keep a locking stitch marker, tapestry needle, and row counter close by.
If you want your socks to last longer, add darning thread plus a darning egg or glass to reinforce the heels and toes.

Comments will be approved before showing up.










