Your Cart is Empty
Winter Sale! Shop Now > |Free USA Shipping On Orders Over $75!


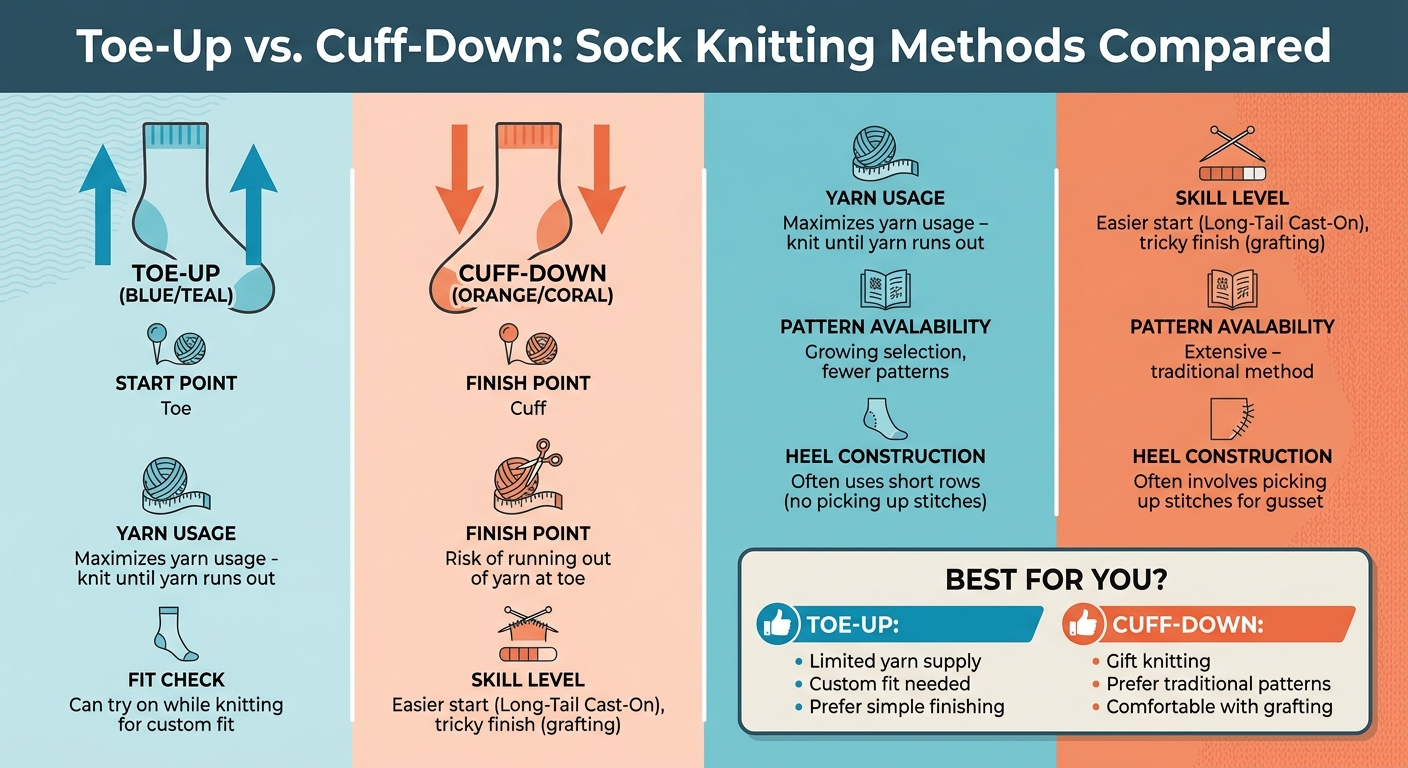
Toe-up and cuff-down are two main methods for knitting socks, each starting from opposite ends of the sock. Here's a quick breakdown:
| Feature | Toe-Up | Cuff-Down |
|---|---|---|
| Start Point | Toe | Cuff |
| Finish Point | Cuff (stretchy bind-off) | Toe (Kitchener stitch) |
| Yarn Usage | Maximizes yarn usage | Risk of running out of yarn |
| Fit Check | Can try on while knitting | Relies on standard sizing |
| Skill Level | Advanced start, simpler finish | Easier start, tricky finish |
Both methods produce durable, well-fitting socks. Your choice depends on your project needs, skill level, and knitting style. Try both to see which works best for you.
Toe-Up vs Cuff-Down Sock Knitting Methods Comparison Chart
Toe-up sock knitting kicks off at the toe with a seamless cast-on technique, eliminating bulky seams. One of the most popular methods for this is Judy's Magic Cast-On (JMCO). This method creates an invisible edge by knitting a row between two rows of live stitches. As KnitFreedom puts it:
"Judy's Magic Cast-On is a fantastic double-sided cast-on. Not only is it the sturdiest... it is also the easiest to knit into".
When finishing JMCO, twist the working yarn and tail together once, then knit the stitches on the second needle through the back loop . For beginners, using a long circular needle (40–47 inches) with the Magic Loop technique can make managing the small number of initial stitches easier than working with double-pointed needles .
From there, you’ll shape the toe and seamlessly transition into knitting the foot.
Once the cast-on is complete, the next step is shaping the toe. This involves working increases like M1L (Make 1 Left), M1R (Make 1 Right), or KFB (Knit Front and Back) until the toe reaches the desired width . These increases can either spiral or form side wedges, depending on your preference.
After shaping the toe, knit in the round to create the foot. A sock ruler can help you measure when it’s time to transition to the heel. The beauty of this method is that you can try the sock on as you go, ensuring a custom fit. As Arnall-Culliford Techniques explains:
"Once you've knit your toe, you can just knit round and round til you've reached your desired length or run out of yarn - no measuring or patterns required!".
With the toe and foot complete, you’re ready to move on to the heel and leg.
When the foot reaches the right length, it's time to work on the heel. A popular choice is the short-row heel, which is worked flat across about half of the stitches to create a cup shape without needing to pick up stitches . To avoid holes at turning points, German Short Rows are especially effective.
Alternatively, you can opt for a heel flap and gusset. This involves increasing stitches on the sides of the foot, shaping the heel with short rows, and knitting a flat heel flap in slip-stitch for durability . Both methods allow for adjustments as you knit, ensuring a snug fit.
After completing the heel, resume knitting in the round to form the leg. If you’ve added extra gusset stitches, decrease them until you’re back to the original leg circumference. To finish, bind off the top of the leg with a stretchy technique like Jeny's Surprisingly Stretchy Bind-Off or the Icelandic Bind-off. This ensures the cuff stretches easily over your heel. Sandi Rosner cautions:
"A tight bind-off on your toe-up socks will be a fatal flaw. Choose a bind-off technique that provides lots of stretch".
For step-by-step demonstrations of these techniques, check out our video tutorials on YouTube: https://www.youtube.com/@AlpacaDirect.
Cuff-down sock knitting begins right at the cuff, and using a stretchy cast-on is key to ensuring the sock feels comfortable. Sandi Rosner, Technical Content Editor at Interweave, emphasizes this point:
"A tight, inelastic cast-on will spoil socks knit from the cuff down. The socks will never be comfortable if the cast-on edge is biting into your calves or ankles."
One of the most popular starting methods is the Long-Tail Cast-On, where you measure about 1 yard of yarn for the tail. However, if you knit tightly or need extra stretch, the German Twisted Cast-On (also called the Old Norwegian Cast-On) is a great alternative, offering more elasticity. After casting on, join the stitches in the round and work a ribbing section - commonly 1×1 or 2×2 - to create a snug cuff. Once the cuff is complete, you move directly into knitting the leg tube.
With the ribbed cuff done, you’ll continue knitting in the round to form the leg tube. When you reach the heel, the process changes: the heel flap is worked flat over about half of the total stitches, while the remaining "instep" stitches are set aside on a needle or stitch holder. The heel flap is knitted until the number of rows matches the number of stitches. Slipping the first stitch of every row during this step creates larger edge loops, making it easier to pick up stitches later.
Next comes shaping the heel. This involves working short rows and decreases - such as P2tog and SSK - to form a cup that fits the heel snugly. After turning the heel, you’ll pick up stitches along the edges of the heel flap and rejoin the instep stitches, resuming knitting in the round. This step adds extra stitches, forming the gusset. The gusset is then shaped by working decreases (usually K2tog and SSK) on every other round until you’re back to the original stitch count. To prevent gaps, it’s helpful to pick up one or two extra stitches in the corners during the first round. Once the heel and gusset are complete, you can move on to knitting the foot.
After finishing the gusset decreases, you’ll knit the foot in the round until it’s about 2 inches shorter than your desired total foot length. The toe is shaped by alternating rounds of plain knitting with decrease rounds (using K2tog and SSK) to create a tapered effect. Continue decreasing until only 8 to 20 stitches remain.
To close the toe, the Kitchener stitch is the preferred method. It provides a seamless finish that looks like a continuation of the knitting. Divide the remaining stitches evenly onto two needles and use a tapestry needle to weave the yarn tail through the live stitches. Knitting one plain round after the final decrease makes the grafting process smoother. As Quince & Co. advises:
"For a smoother finish that reduces irritation, try the Kitchener Stitch - it takes a bit of practice, but the polished look is worth it!"
If the Kitchener stitch feels too tricky, you can opt for simpler methods like the star toe or a three-needle bind-off. These are easier to execute but leave a visible seam.
For a detailed visual guide on cuff-down sock construction, visit our YouTube channel: https://www.youtube.com/@AlpacaDirect
After exploring how both methods are constructed, the main differences become clear in areas like cast-on techniques, heel shaping, and finishing. Each approach affects how easy the sock is to knit and how well it fits in the end.
The starting point sets these two methods apart. Cuff-down knitting begins with beginner-friendly, elastic cast-ons like the Long-Tail or Twisted German Cast-On. These methods create a stretchy edge and use the full stitch count (usually 60 to 72 stitches). This makes it simpler to keep track of your work and ensure the sock fits well.
On the other hand, toe-up knitting calls for more advanced techniques, like Judy's Magic Cast-On or the Turkish Cast-On. These start with just 8 to 16 stitches at the toe, which can feel tricky - especially if you're using double-pointed needles. As Quince & Co. explains:
"Toe Up knitting requires a more advanced cast-on, like Magic Loop or Judy's Magic Cast-On... These can be tricky at first but are so worth it because they create a seamless toe!"
These initial differences also influence how the heel is constructed.
Heel shaping happens at different points depending on the method. In cuff-down knitting, the heel is worked after the leg but before the foot. This typically involves creating a heel flap, turning the heel with short rows, and picking up stitches along the sides to form the gusset.
Cuff-down heels, especially those with a flap and gusset, are known for providing a snug, reliable fit. In contrast, toe-up knitting shapes the heel after the foot is complete, which allows for last-minute adjustments. However, there's a risk of making the foot too long if the heel turn is delayed. Knitwear designer Louise Tilbrook warns:
"A common mistake that people make [with toe-up] is to have the foot too big - i.e. starting the heel turn too late."
Toe-up heels often use short-row techniques for speed, but this can result in less depth - making them less ideal for high insteps unless a gusset is added. Meanwhile, the traditional cuff-down heel flap typically accommodates a wider range of foot shapes.
The way each method finishes also highlights their differences.
The direction of knitting determines how the sock is finished. Cuff-down socks are closed at the toe, usually with the Kitchener stitch, which creates a smooth, seamless finish. As Sandi Rosner notes:
"The preferred method for finishing the toes of cuff-down socks is grafting, also known as Kitchener stitch. This is technique that any knitter can learn, and it gets much easier with practice."
For knitters who find the Kitchener stitch challenging, alternatives like the star toe or a three-needle bind-off are available, though they leave a visible seam.
In contrast, toe-up socks end at the cuff, requiring a stretchy bind-off to ensure comfort. A tight bind-off can make the sock difficult to wear, so techniques like Jeny's Surprisingly Stretchy Bind-Off, the Icelandic Bind-Off, or the Italian Bind-Off are popular choices. If tightness remains an issue, using a needle 5 to 6 sizes larger for the final row can help create looser loops for a better fit.
After diving into the construction of each method, it’s time to weigh the practical benefits and challenges of cuff-down and toe-up sock knitting. Both approaches have their own perks and hurdles.
Starting with cuff-down, it’s the most traditional method, offering an extensive selection of patterns. This makes it a great starting point for beginners who prefer plenty of guidance. Plus, estimating the correct foot length is simpler with standard sizing charts, which is especially handy for gift knitting. However, there are some challenges. Grafting the toe using the Kitchener stitch can be tricky for many knitters, and there’s always the risk of running out of yarn before finishing the second sock. The cast-on edge also needs to be stretchy - too tight, and the sock becomes uncomfortable.
On the other hand, toe-up knitting excels in yarn management. You can knit until the yarn is completely used up, avoiding any leftover scraps or surprises mid-project. This method also skips grafting altogether, and depending on the heel style, you might not have to pick up stitches at all. Plus, the ability to try on the sock as you knit makes it easier to adjust the fit. Designer Louise Tilbrook sums up the appeal beautifully:
"Toe-up socks certainly offer a faster start and there are very few things as satisfying in my knitted life as sitting down with fresh needles and yarn, and 30 minutes later having a fully functional sock toe".
That said, toe-up knitting has its own learning curve. Techniques like Judy’s Magic Cast-On can be intimidating for beginners, and achieving a stretchy bind-off is crucial for a comfortable cuff. Misjudging when to start the heel can also lead to sizing issues, such as a foot that’s too long.
Here’s a quick comparison to break it all down:
| Feature | Cuff-Down | Toe-Up |
|---|---|---|
| Pattern Availability | Extensive; the traditional method | Growing, but fewer than cuff-down |
| Yarn Usage | Risk of running out of yarn at the toe | Ideal for using up entire hanks/balls |
| Toe Construction | Requires grafting (Kitchener stitch) | Starts with advanced cast-on techniques (such as magic cast-on) |
| Heel Construction | Often involves picking up stitches | Often uses short rows (no picking up) |
| Fit Check | Easier to use standard size charts | Easier to try on while knitting |
| Ease for Beginners | Traditional start; tricky finish | Advanced start; simpler finishing |
When deciding between sock-knitting methods, a few practical factors can guide your choice.
One of the first things to think about is yarn management. As Sandi Rosner, Technical Content Editor at Interweave, points out:
"If your yarn supply is limited, you'll need to either plan carefully or embrace the look of contrasting toes [to use toe-up]."
To avoid running out of yarn mid-project, especially with toe-up socks, a simple solution is to use a digital scale. Divide your skein into two equal parts before starting. This ensures both socks can be knit to the same length without surprises.
Another key factor is fit customization. Toe-up construction offers the advantage of trying on the sock as you knit. This makes it easier to adjust the length and width for a snug fit. On the other hand, if you're knitting socks as gifts and don't have access to the recipient's measurements, cuff-down might be the better option. With cuff-down, you can rely on standard sizing charts to guide the toe shaping.
Your skill level also matters. Cuff-down socks tend to use more familiar cast-on methods, making them beginner-friendly. However, techniques like picking up stitches for the heel and grafting the toe can pose a challenge. Toe-up socks, by contrast, require more advanced cast-on techniques, like Judy's Magic Cast-On, but they finish more simply with a stretchy bind-off.
Each method has its own challenges and benefits. Balancing yarn usage, ease of technique, and the ability to customize will help you decide which approach fits your needs best.
Beyond the technical aspects, your personal knitting preferences play a big role. The best way to find your ideal method? Try both. Many knitters stick with the first method they learn, but experimenting can reveal what suits your style. Most sock patterns can be adapted between methods, though some stitch patterns may work better with one approach than the other.
Your project goals might also sway your decision. If you're looking to make quick progress or want a portable project, toe-up socks can be a great choice. Designer Louise Tilbrook shares this sentiment:
"Toe-up socks certainly offer a faster start and there are very few things as satisfying... as sitting down with fresh needles and yarn, and 30 minutes later having a fully functional sock toe."
On the flip side, if you value design flexibility and don’t mind grafting the toe, cuff-down might be more your style. Ultimately, the best method is the one that feels right for your hands, fits your habits, and aligns with your project goals. Experiment to find what works best for you.
When it comes to sock construction, the choice between toe-up and cuff-down methods boils down to differences in direction, finishing techniques, and yarn usage. Cuff-down socks start at the leg and often finish with the Kitchener stitch at the toe. Toe-up socks, on the other hand, begin at the toe and end with a stretchy bind-off. Both approaches offer unique adaptations for heel construction, fit adjustments, and efficient yarn use, making them suitable for different knitting projects.
As Sandi Rosner wisely points out:
"The only way to really know which method is better is to try them both. After all, why should you care which method is better for me? You want to know which method is better for you."
The best way to determine your preference is through hands-on experience. Try one technique for your current project, then switch to the other for your next. You might discover that toe-up socks are perfect for maximizing every bit of yarn from a special skein, while cuff-down socks shine when knitting gifts. Ultimately, your choice will reflect your personal style and knitting goals, as highlighted in the earlier sections.
Looking to take your sock knitting to the next level? Check out Alpaca Direct for premium alpaca yarns, needles, patterns, and video tutorials. Their YouTube channel, Alpaca Direct's YouTube, offers step-by-step guides and demonstrations to help you master both methods with confidence.
For those with a high instep, choosing a heel design that allows for adjustments is key to achieving a comfortable fit. Toe-up socks are a great option because they let you try them on as you knit, making it easier to tweak the fit as needed. Plus, they simplify calf shaping, which is often beneficial for high insteps. While cuff-down socks are the more classic choice, they might need additional gusset or heel modifications to ensure they fit properly.
To avoid a tight bind-off when knitting toe-up socks, opt for a stretchy technique like a sewn bind-off or an elastic bind-off. Be mindful not to pull your stitches too tightly, as this can limit the sock's flexibility. For step-by-step instructions, check out tutorials on sock bind-offs, such as those available on Alpaca Direct's YouTube channel. This will help you create a comfortable and polished finish.
Knitting socks without worrying about running out of yarn? The toe-up method is the way to go. Starting at the toe lets you knit until your yarn is almost used up, giving you full control over the sock's length. Plus, it’s super convenient for making adjustments along the way, ensuring you make the most of your yarn without leaving behind unnecessary scraps.

Comments will be approved before showing up.


