Your Cart is Empty



If I want a shoulder seam that holds its shape, the 3-needle bind-off is one of the best ways to do it. It joins two sets of live stitches and binds them off at the same time, which gives me a firm edge with one pass.
Here’s the short version:
A few key checks matter most:
In short: I’m using this bind-off for a neat seam, more support, and a clean finish without sewing later.
| Check | What I look for |
|---|---|
| Stitch count | Both sides match |
| Needle setup | Needles parallel, points facing right |
| Tail length | About 4–5x seam width |
| Tension | Firm, not tight |
| Ridge placement | RST = inside, WST = outside |
If I want a seam that looks tidy and helps alpaca hold its shape, this method does the job with just a few setup checks and a steady rhythm.
Get two needles holding live stitches and a third working needle. Use the same needle size as the rest of the project, or go up one size if you want a slightly looser bind-off.
Leave a yarn tail that's about 4 to 5 times the width of the seam. That gives you enough length to finish the bind-off and weave in the end without coming up short.
First, make sure the stitch counts match on both needles. Even one extra stitch will throw the seam off.
Next, place the pieces in the seam orientation you picked. Hold both needles parallel in your left hand with the points facing right. Then take a quick look at the stitches on both needles and make sure none of them are twisted.
Once everything is lined up, you’re ready to start with the first stitch pair.
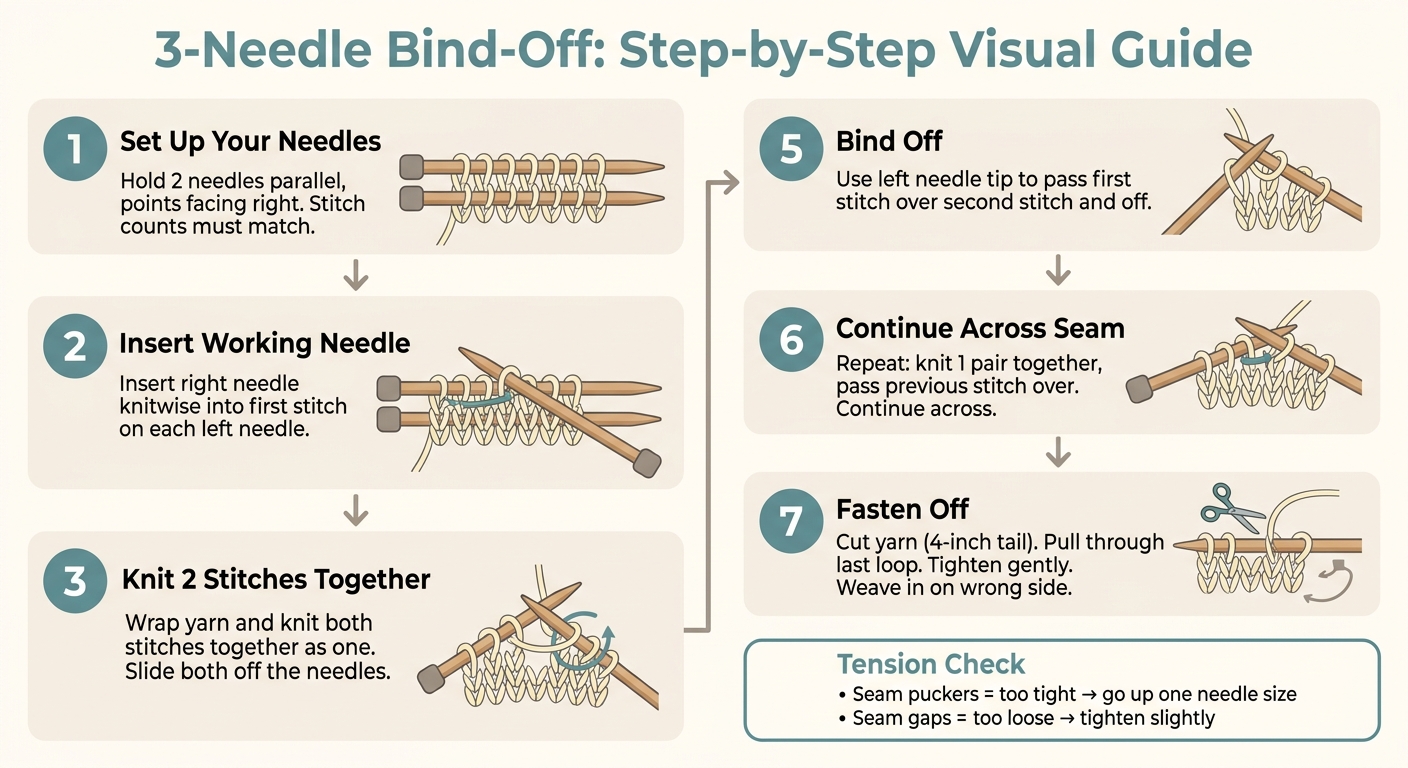
3-Needle Bind-Off: Step-by-Step Visual Guide
Start with both pieces lined up and the wrong sides facing each other. Go into the first stitch on each left-hand needle knitwise with your right-hand needle. Wrap the yarn around the right-hand needle, knit those 2 stitches together as if they were a single stitch, and slide both original stitches off the needles.
Do the same thing with the next stitch pair. At this point, you’ll have 2 stitches on your right-hand needle.
Use the tip of the left-hand needle to lift the first stitch on the right-hand needle over the second stitch and off. That binds off 1 stitch.
Then keep going in the same rhythm: knit 1 stitch from each needle together, then pass the previous stitch over the new stitch. Repeat across the seam until only 1 loop is left.
Cut the yarn, leaving a 4-inch tail. Pull the tail through the last loop and tighten it gently. Then weave in the tail on the wrong side.
Hold both needles parallel in your non-dominant hand. That simple setup helps the yarn move on an even path and cuts down on twisting. A 3-needle bind-off also gives the edge more structure, though it will leave a bold seam line.
Alpaca is soft and drapey, so give each stitch a moment to settle before you snug it up. If the seam starts to pucker or feel stiff, the tension is too tight. Kathleen Cubley, Editor at Alpaca Direct, advises:
"Make sure your... stitches aren't too tight or your seam will pull in at the edges."
If the seam feels tight, move up to the next larger working needle. As you go, gently stretch the seam to check that it still has some give.
Once the tension feels even, check the ridge placement next.
After the last stitch, take a minute to inspect the seam before you weave in the tail. Turn the piece right side out and look at how the seam sits. It should lie flat, without puckering, gaps, or edges that pull inward. It should feel firm, but it still needs a bit of give when you stretch it lightly.
If the ridge sits flat and follows the shoulder line without distorting the fabric, your tension is on track. If the edge pulls in, the bind-off was too tight. If the stitches look a little slack, pull them in slightly next time.
Ridge placement changes the look of the seam, not its strength. Hold the pieces right sides together (RST) if you want the ridge hidden on the inside, or wrong sides together (WST) if you want the ridge to show on the outside as a decorative seam line. Both options hold well, so this comes down to appearance.
| Feature | Inside Ridge (RST) | Outside Ridge (WST) |
|---|---|---|
| Ridge Visibility | Hidden on the interior | Visible on the exterior as a bold line |
| Appearance | Clean, smooth exterior | Textured, decorative seam |
| Best For | Standard shoulder seams | Decorative exposed seams |
For more alpaca knitting help, visit Alpaca Direct and watch the Alpaca Direct YouTube channel.
No. For a 3-needle bind-off, you need three separate needles held in parallel. That lets you knit stitches from the front and back needles together, then bind off as you go.
So don’t use a circular needle as the third needle. Use three straight needles, or other needles in the right size that you can hold side by side.
If your stitch counts don’t match, don’t try to fake a perfect join. If the gap is small, ease in the longer side by working through two stitches at once on that side every few stitches, not on every stitch. That helps the seam sit straighter and line up better.
If the difference is bigger, go back and adjust your knitting or re-bind the pieces so the stitch counts match. Once the counts are too far apart, easing won’t hide it, and the seam usually won’t look clean.
It comes down to the look and feel you want.
A 3-needle bind-off makes a strong, stable shoulder seam. But it also leaves a visible line, so the seam becomes part of the design.
If you want a smoother, less noticeable join, this method may feel too bulky or stand out more than you'd like. One simple fix: work it with the wrong sides together, so the seam stays on the inside of the garment.

Comments will be approved before showing up.










