Your Cart is Empty
Winter Sale! Shop Now > |Free USA Shipping On Orders Over $75!


The Double Moss Stitch is a beginner-friendly knitting pattern that creates a textured, reversible fabric with a checkerboard-like design. It’s perfect for scarves, blankets, and dishcloths due to its flat, stable structure that doesn’t curl at the edges. The stitch works over a four-row repeat using a combination of knit and purl stitches.
This stitch is adaptable for flat or circular knitting, making it suitable for cowls, hats, and even mittens. Start small with a project like a dishcloth to master the pattern and enjoy its timeless texture.
The Double Moss Stitch is a knitting pattern that creates a textured, checkerboard-like surface. Also called the Double Seed Stitch, Double Irish Moss Stitch, or Checkerboard Stitch, it features small knit and purl boxes that give it a distinct, dimensional look. Compared to the Single Moss Stitch, this pattern stands out with a bolder texture thanks to its larger, more defined boxes.
The key difference lies in the sequence. While the Single Moss Stitch alternates stitches every row, the Double Moss Stitch repeats the same sequence for two rows before switching. For example, you would knit K2, P2 for two rows, then switch to P2, K2 for the next two rows. This four-row repeat forms the signature checkerboard pattern, giving the fabric a pronounced texture and a polished look.
"The Double Moss stitch is a beautiful and very simple stitch that creates pretty little boxes of knit and purl."
The stitch is reversible, meaning it looks the same on both sides, making it perfect for projects where both sides are visible. It also creates a stable fabric, which is great for flat pieces and practical items like dishcloths. The raised texture even adds functionality, offering a natural scrubbing surface for cleaning projects.
Now that you know how this stitch works, it’s time to gather your materials and get started!
Having the right materials can make all the difference in achieving the perfect texture and durability for your Double Moss Stitch projects.
The type of yarn you use plays a big role in how your finished project looks and functions. For instance, cotton yarn is a great choice for kitchen items like dishcloths. Its dense, absorbent qualities pair beautifully with the raised texture of the Double Moss Stitch, making it ideal for scrubbing. Louise Bollanos from Handy Little Me recommends using a 100g ball of Pima Cotton (about 232 yards) to create two 10x10-inch dishcloths. To match her gauge, aim for 16 stitches by 26 rows in a 4-inch square.
For wearables like scarves, sweaters, or cowls, alpaca yarn offers unmatched softness, warmth, and a natural drape that highlights the stitch’s dimensional texture. If you’re going for a more traditional look, wool and Aran yarns are excellent options. These yarns emphasize the pattern’s checkerboard depth and structural definition. The Double Moss Stitch works well with various weights, including DK (8-ply), light worsted, and Aran (10-ply). For a wide selection of alpaca yarn, check out Alpaca Direct.
The size of your knitting needles affects both the stitch definition and the fabric density. For medium-weight yarns, US size 7 (4.5 mm) or US size 8 (5 mm) needles are recommended. These sizes help maintain balanced tension and ensure the texture stands out. Aim for a gauge of about 4 stitches per inch (16 stitches per 4 inches) for the best results.
| Yarn Weight | Recommended Needle Size (US) | Recommended Needle Size (Metric) |
|---|---|---|
| DK / Light Worsted / 8-ply | US 7 | 4.5 mm |
| Aran / Worsted / 10-ply | US 8 | 5.0 mm |
A few extra tools can make your knitting experience smoother:
You can expect the total cost for materials and tools for a basic Double Moss Stitch project to be around $10. Once you’ve gathered your supplies, you’re ready to dive into the pattern and start creating!
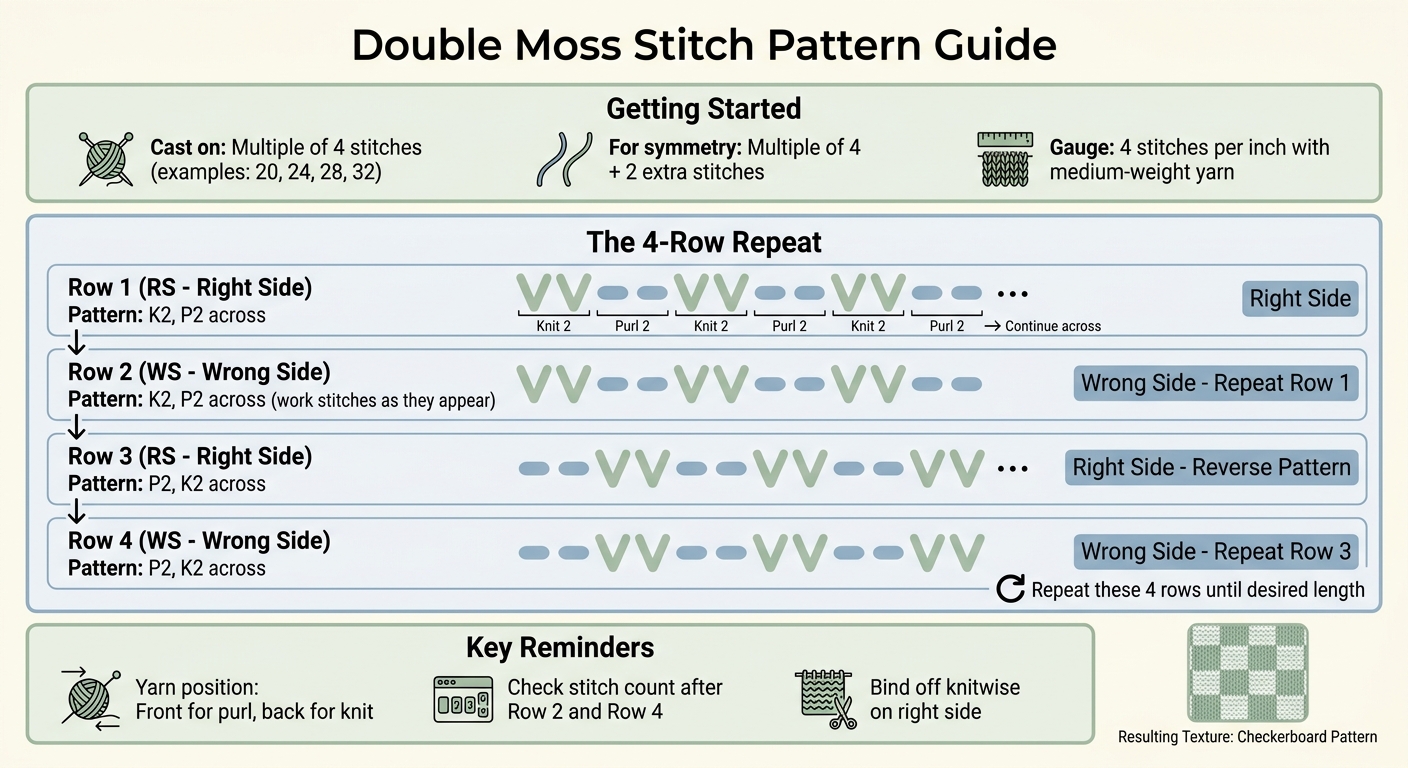
Double Moss Stitch 4-Row Pattern Guide
The Double Moss Stitch creates a beautiful, textured checkerboard pattern that looks the same on both sides. It works over a multiple of 4 stitches, so start by casting on any number of stitches divisible by 4 - like 20, 24, or 28. If you want your rows to begin and end with the same type of stitch for symmetry, cast on a multiple of 4 plus 2 extra stitches.
Here’s the 4-row repeat:
Repeat these four rows until your piece reaches the desired length. When you're ready to finish, bind off all stitches knitwise on the right side for a polished edge.
The stitch pattern alternates the same sequence for two rows, then reverses it for the next two. This creates the signature "boxy" texture, making the Double Moss Stitch a go-to choice for projects like scarves, dishcloths, and blankets - especially since the fabric lies flat and looks great on both sides.
Before starting, check out these helpful tips to make your knitting experience smoother.
Keep your yarn in the right position when switching between knit and purl stitches. Move the yarn to the front for purling and to the back for knitting. This habit avoids accidental yarn-overs and ensures your stitch count stays consistent. Plus, it helps maintain even tension throughout your work.
Since Rows 1 and 2 repeat the same sequence, and Rows 3 and 4 mirror each other, using a row counter can help you track where you are in the pattern. Aim for a gauge of 4 stitches per inch with medium-weight yarn to keep the checkerboard design neat and uniform.
Double-check your stitch count after completing Row 2 and Row 4 to catch any mistakes early, like dropped or added stitches. If you're adding a border, use stitch markers to separate the edge stitches from the main pattern. This makes it easier to see where the K2, P2 sequence starts and ends.
To start, cast on a number of stitches divisible by 4 - this is crucial for the Double Moss Stitch pattern to work properly. For instance, you can cast on 20, 24, 28, or 32 stitches, depending on the size of your project. If you're making something with a border, like a dishcloth, add extra stitches for the edges. For example, cast on 46 stitches: 40 for the main pattern and 6 for the edges.
Before diving into the pattern, knit a few rows in garter stitch (knit every stitch). This creates a solid foundation, gives the bottom edge a clean look, and helps the piece lay flat. Once you've set up the foundation, you're ready to start the main pattern.
With your foundation rows complete, begin the 4-row repeat that defines the Double Moss Stitch:
Keep repeating these four rows until your piece reaches the desired length. This alternating pattern creates the textured look of the Double Moss Stitch.
Once your project is the right length, add a few rows of garter stitch at the end if you included a garter stitch border at the beginning. This ensures the top edge matches the bottom and prevents curling.
To finish, bind off knitwise on the right side for a clean edge. Leave a 6-inch tail when cutting the yarn, and weave in the ends securely to prevent unraveling. This final step gives your project a neat and professional finish.
Knitting in the round takes the Double Moss Stitch to a new level, letting you create that classic checkerboard texture with a seamless, continuous finish. The beauty of this stitch is how effortlessly it adapts to circular knitting. The pattern instructions are almost identical to flat knitting, and you’ll still need to cast on a multiple of 4 stitches to keep the pattern consistent around your project. The best part? You’re always working on the right side of the fabric.
Here’s how it works: when knitting in the round, you don’t have to worry about flipping your work. For Rounds 1 and 2, follow a K2, P2 sequence. For Rounds 3 and 4, switch it up to a P2, K2 sequence. This simple rhythm creates the recognizable checkerboard texture that defines the Double Moss Stitch.
One of the perks of knitting this stitch in the round is that you don’t need to reverse your instructions for wrong-side rows, which is often the case with other patterns. Since you’re always facing the right side of the fabric, the instructions stay consistent. Just repeat the same stitch sequence for two rounds, then alternate for the next two rounds.
To keep things tidy, yarn management is key. A stitch marker at the start of each round and a row counter can help you stay on track with the 2-round repeat. This ensures the pattern doesn’t accidentally shift, which could create unwanted vertical stripes.
The Double Moss Stitch is also reversible, making it perfect for circular projects like cowls, hat brims, or sleeves where both sides of the fabric might show. Plus, it naturally resists curling at the edges, so your finished piece will have a clean, polished look - no blocking needed!
Once you’ve got the hang of the Double Moss Stitch, you can use it to create a variety of projects. Its reversible nature, non-curling edges, and textured look make it a fantastic choice for many designs.
This stitch is a great option for scarves and cowls because it looks polished on both sides. The textured, bumpy surface adds depth without complicating the knitting process, and the edges naturally resist curling - no need for extra borders or blocking. For a classic scarf, cast on a multiple of 4 stitches and aim for a width of about 6 to 8 inches. The dense fabric also provides extra warmth, making it ideal for winter accessories.
When used in blankets or throws, the Double Moss Stitch creates a warm and visually striking fabric.
"Blankets are stunning in double moss… the raised texture creates beautiful warmth and visual depth." - Marly Bird
For larger projects like these, the dense texture not only enhances warmth but also adds a luxurious feel. To keep the edges from stretching, you can add garter stitch borders at the beginning and end. This stitch pairs beautifully with worsted or Aran weight yarns, resulting in a cozy and substantial finished piece.
Hats and mittens take on a whole new level of charm with the Double Moss Stitch. The raised texture adds a unique, touchable detail while also boosting warmth. When knitting hats in the round, make sure to use a stitch count that’s a multiple of 4 to keep the pattern consistent. For mittens, consider using the stitch as an accent - whether on the cuffs or the back of the hand - for a simple way to add texture and style.
The Double Moss Stitch is a fantastic choice for creating textured, reversible fabrics, making it perfect for projects where both sides will be on display. Its four-row repeat is simple to learn and adds a touch of sophistication to your knitting, whether you're crafting cozy winter accessories or stylish home décor.
If you're new to this stitch, starting with a small project like a dishcloth is a great way to practice and get comfortable with the sequence. For an extra touch of luxury, consider using alpaca yarn. Alpaca Direct offers a selection of premium alpaca yarns that pair wonderfully with the Double Moss Stitch, delivering warmth, softness, and durability. They also provide a variety of knitting needles, crochet hooks, and other tools to make your projects even more enjoyable.
For more inspiration and guidance, check out Alpaca Direct or dive into their helpful tutorials on their YouTube channel. With step-by-step lessons, project ideas, and expert tips, you'll not only master the Double Moss Stitch but also expand your overall knitting skills. This pattern is a valuable addition to any knitter's toolkit.
If your Double Moss Stitch is coming out with a striped appearance instead of the intended checkerboard texture, the likely culprit is uneven tension or not sticking closely to the pattern. This stitch is known for its alternating knit and purl blocks, which create its signature textured look.
To fix this, focus on maintaining even tension throughout your work. Also, double-check that you're alternating between knit and purl stitches exactly as the pattern specifies. Small inconsistencies can lead to the striped effect, so staying consistent is crucial for achieving the desired result.
Made a mistake in your Double Moss Stitch? Don’t worry - you don’t have to unravel everything. Here’s a simple way to fix it:
This method saves you from ripping out rows of work, making it a quick and efficient way to fix errors while preserving your progress.
For achieving clean edges in double moss stitch, start with a long-tail cast-on. This method provides a stretchy and smooth foundation, perfect for an even start. When it's time to bind off, opt for a stretchy bind-off like the elastic or sewn bind-off. These techniques not only maintain flexibility but also enhance the neat, textured, and reversible look of the double moss stitch, giving your project a polished finish.

Comments will be approved before showing up.


