Your Cart is Empty



If I want cleaner edges, smoother stitches, and lace that opens up, I need the right blocking surface and the right pins.
Here’s the short version: foam blocking mats give me a flat, water-resistant place to shape damp knitting, and rust-resistant pins, knit blockers, or blocking wires hold it at the right size while it dries. That matters because some fibers can grow by 10% to 15% during wet blocking, and many projects need 24 to 48 hours to dry all the way.
If I’m deciding what to use, I keep it simple:
What matters most is matching the tool to the project. A lace shawl needs even tension and close measuring. A sweater needs each piece shaped to the pattern size. Small items usually need only light pinning and a flat surface.
| Tool | Best for | What I watch for |
|---|---|---|
| Foam mats | Shawls, sweaters, blankets, scarves | Enough space, flat setup, grid lines help |
| T-pins | General blocking | Must be rust-resistant |
| Knit blockers | Straight edges | Less useful on curves |
| Blocking wires | Lace, long edges | Slower to set up |
| Towel | Small accessories | Less stable, no grid |
My takeaway: if I block to the finished measurements, keep ribbing from stretching too far, and wait until the piece is fully dry, I get a better final shape with less hassle.
Below, I break down which mats and pins make the most sense, how I set up the surface, and how I block shawls, sweaters, and small pieces without overdoing it.
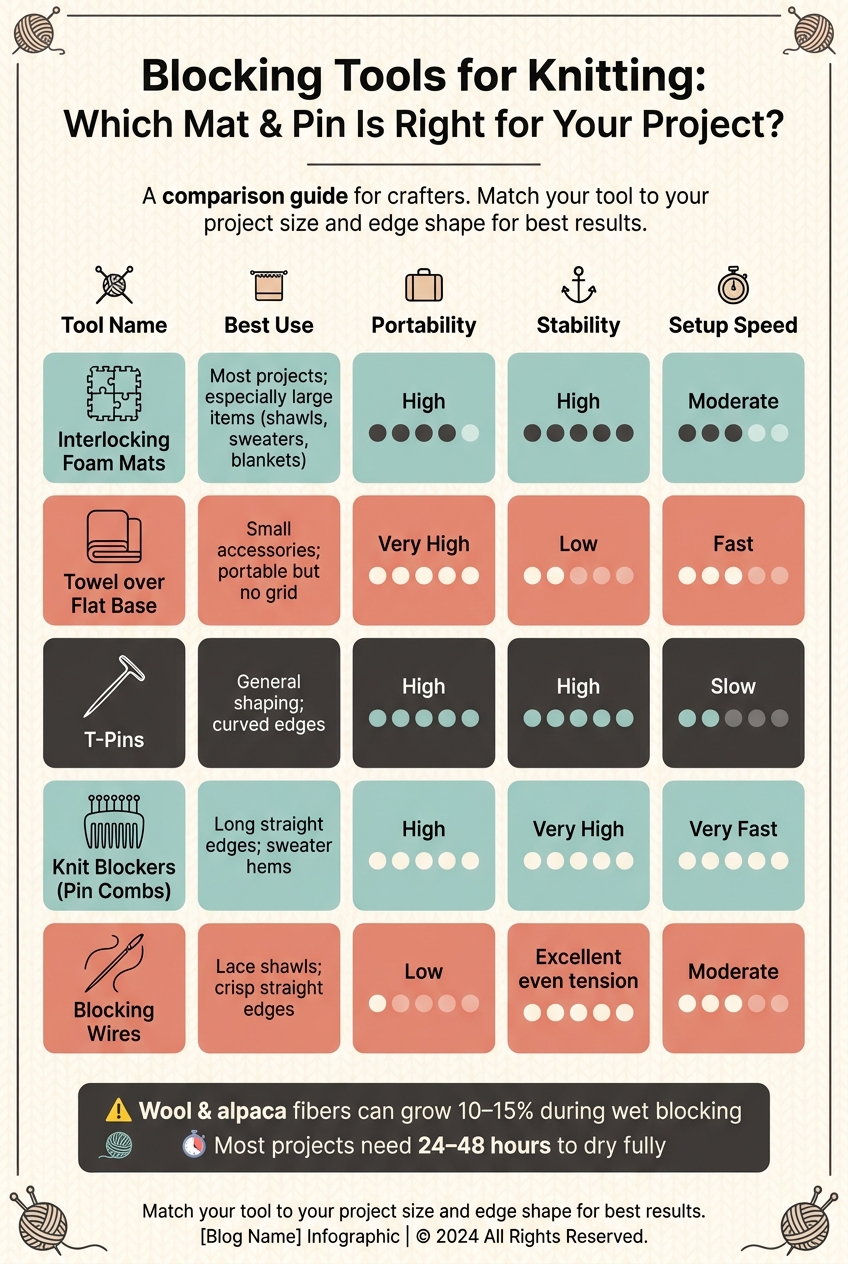
Blocking Tools for Knitting: Which Mat & Pin Is Right for Your Project?
Pick your mat and pins based on two things: project size and edge shape.
For most knitters and crocheters, interlocking foam mats are the go-to option. They’re usually made from EVA foam and fit together like puzzle pieces, which makes it easy to build the exact amount of space you need. A standard set with nine 12" × 12" tiles covers a 3' × 3' area. That’s enough room for many scarves, baby blankets, and garment pieces.
These mats are also water-resistant, which makes them a good fit for steam blocking. Many sets come with 1-inch grid lines, and that small detail helps a lot. You can line up edges, keep corners square, and check that both sides match.
If you’re blocking something small, a clean towel on a flat surface can work in a pinch. It’s fine for simple accessories, but it has limits. Pins don’t hold as firmly, and there’s no grid to help with measuring.
T-pins are the standard all-purpose option. The T-shaped top makes them easier to press into dense foam and pull out again. One thing matters here: use rust-resistant pins. If the item is damp and the pins rust, they can leave stains.
For long, straight areas like sweater hems or blanket edges, knit blockers - also known as pin combs - can save a lot of time. Each comb holds 4 or 8 pins in one piece, so you can secure several inches at once and keep the tension more even across the edge. If you’ve ever pinned a long hem one pin at a time, you know why that helps.
Blocking wires are also worth knowing, especially if you work with lace. You thread the wire through the edge of the fabric, then pin the wire to the mat. This spreads tension across the full edge instead of pulling at one spot at a time, which helps prevent scalloped or peaked borders.
| Tool | Best Use | Portability | Stability | Setup Speed |
|---|---|---|---|---|
| Interlocking Foam Mats | Most projects; best for large items | High (disassembles into tiles) | High | Moderate |
| Towel over Flat Base | Small accessories; portable but less stable, no grid | Very High | Low | Fast |
| T-Pins | General shaping; curved edges | High | High | Slow |
| Knit Blockers (Pin Combs) | Long straight edges; sweater hems | High | Very High | Very Fast |
| Blocking Wires | Lace shawls; crisp straight edges | Low | Excellent even tension | Moderate |
With the right tools picked out, the next step is setting up a flat, steady blocking surface.
Before you block, get a flat, clean surface ready for precise pinning. A solid setup helps the fabric hold its shape, stay on size, and dry without picking up dirt or stains. Once the area is clear, lay out your tiles to match the pattern’s finished size.
Open your pattern schematic first and note the finished dimensions. Then add tiles until the layout matches those measurements. Use a measuring tape to make sure you have space for the full piece, plus extra room for pins or blocking wires. If you’re blocking sweater pieces, measure both sides as you pin so they stay even. It’s much easier to fix a crooked edge now than after the fabric dries.
Wool and other protein fibers, such as alpaca, can grow 10–15% in width or length during wet blocking. That’s a big enough change to throw off the fit, so size your surface to the finished dimensions listed in the pattern, not the pre-blocked measurements. Once the dimensions are set, make sure the setup won’t shift during pinning.
Pick a low-traffic spot where the piece can sit untouched for 24 to 48 hours. Even a slight bump while the fabric is damp can pull it out of shape. Keep the setup away from pets, direct sunlight, and heat sources. Use a level base too, so moisture doesn’t collect on one side. If you’re working on the floor, press the tile edges snugly together before you start pinning.
With the surface ready, the next step is pinning shawls, sweaters, and smaller pieces into shape.
Once your mats are down, it's time to shape the piece. First, weave in any loose ends. Then soak the item in lukewarm water with a no-rinse wool wash for 20 to 30 minutes. When it's ready, gently squeeze out the water, roll it in a clean towel, and press out the extra moisture. As you lift it from the basin, support the full weight with both hands so the fabric doesn't stretch under its own weight.
Lay the damp shawl flat on your mats. If you're blocking a triangular shawl, pin the center line first. Then pin the corners and edges. Work from the middle outward so the shape stays even as you go. Pin each point or scallop so those details hold their form.
Blocking wires help a lot on straight edges because they keep the tension even from end to end. Use a tape measure to check the wingspan and depth against your pattern schematic. This part matters more than people think. Alpaca and superwash wool can grow a lot when wet, so pin to the finished measurements instead of pulling past them.
Block the front, back, and sleeves before seaming so each piece matches the schematic. Start with the chest width. Then set the body length, sleeve length, and neckline. That order makes the whole job feel a lot less messy.
Be gentle with ribbing at the hem, cuffs, and neckline. If you stretch it out, it can lose its spring. With alpaca blends and other animal fibers, light shaping usually does the trick. Let the moisture relax the fabric instead of forcing it into place.
Small items don't need much tension, and they usually don't need many pins either. For a hat, shape it over a bowl so the crown keeps its curve while it dries. Mitts usually just need a few pins along the edges to help them dry flat and even. A swatch only needs enough pins to stay square and smooth.
The goal is simple: keep small pieces flat with the fewest pins needed. Leave the pins in place until the fabric is fully dry.
Once the piece is pinned to size, leave it alone until it's fully dry. That part matters more than people think. Shaping sets the fabric in place, but drying is what holds those measurements. If you unpin too early, the fabric can drift back toward its original shape as the last bit of moisture leaves the fibers.
Drying time will vary based on the fiber, the thickness of the fabric, and the conditions in the room. Lace usually dries faster than a wool or alpaca sweater. A simple check helps: feel the underside. If it still feels cool or damp, it needs more time.
Keep the mats out of direct sun while the piece dries. Some dyes can fade or bleach with sun exposure.
When the fabric is dry all the way through, remove the pins gently. Support the fabric as you go so you don't stretch the stitches. Then smooth the piece by hand to ease out any pin marks.
For storage, keep your mats flat or stacked in a dry place so they don't warp. Store pins in a dry spot too, since even a little moisture can lead to rust and leave stains on your next project. Stainless steel or rust-proof pins are a good way to avoid that issue.
If you'd like to watch blocking and finishing techniques in action, the Alpaca Direct YouTube channel has step-by-step demonstrations.
No. Blocking mats are handy because they’re pinnable and water-resistant, but you don’t need them for every knitting project.
You can block on a spare bed, a sofa cushion, or a carpeted floor with a clean, dry towel on top. For smaller pieces, a rolled towel can help them keep their shape as they dry.
For both lace and sweaters, rust-proof T-pins are the go-to choice because they help prevent staining while your project dries.
With lace, pin out every point, scallop, or tip so the pattern opens all the way. That’s what gives lace its crisp, airy look. With sweaters, pins are used more lightly. Their main job is to hold the edges to the schematic measurements, usually spaced every 0.75 to 1.25 inches.
If you're working on long, straight edges, multi-pin tools can save time. Blocking wires are also handy for keeping shawl edges straight and even.
Leave your project pinned in place until it’s completely dry to the touch. If you pull the pins too soon, while the fabric is still damp, it can slip out of shape.
Drying usually takes 12 to 48 hours, depending on the fiber, yarn thickness, room temperature, and humidity. Before you unpin it, check both sides and make sure the top and bottom are fully dry.

Comments will be approved before showing up.










