Your Cart is Empty
Summer Sale! Shop Now > |Free USA Shipping On Orders Over $75!


If you're tired of losing your cable needles or grabbing the wrong size mid-project, organizing them is the solution. Here's how to keep them tidy and accessible:
These steps save time, reduce frustration, and make your knitting projects smoother.
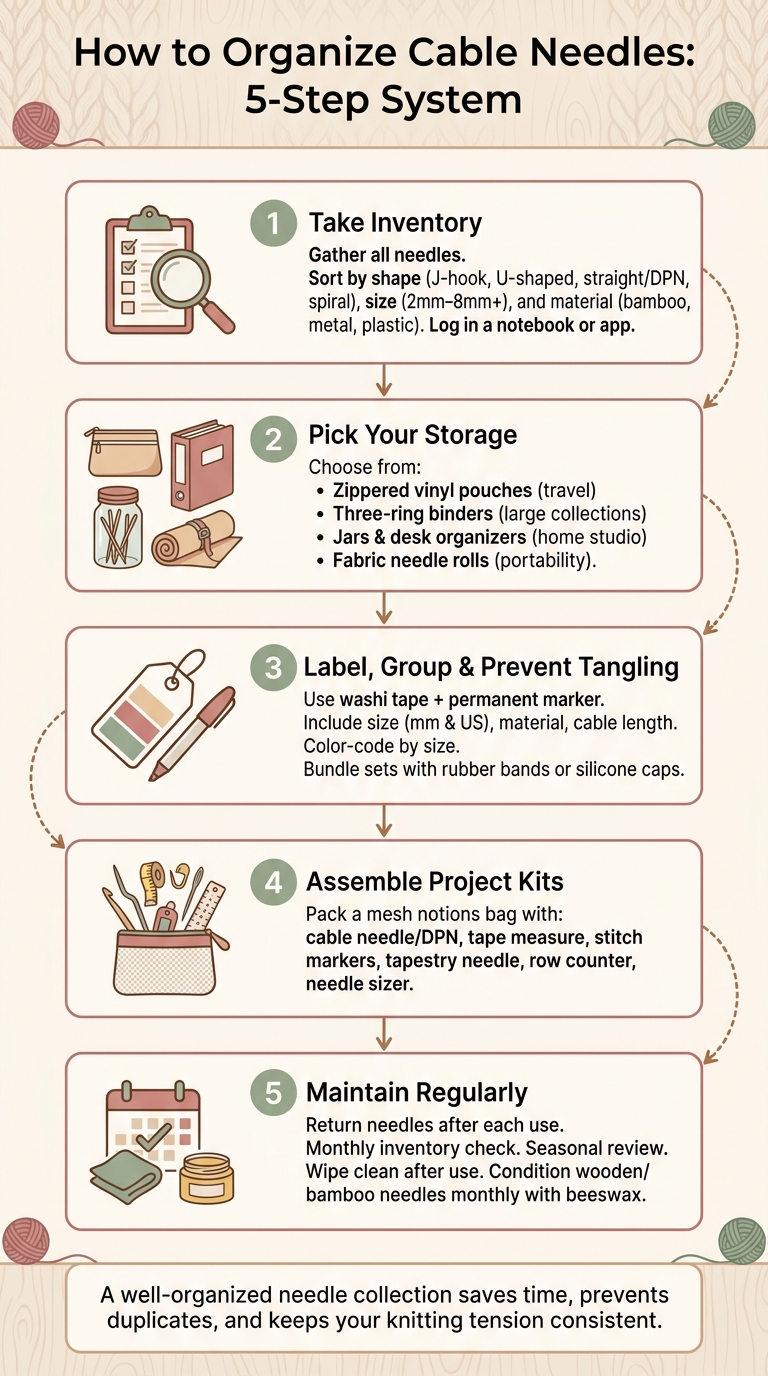
How to Organize Cable Needles: 5-Step System
Cable needles are short tools designed to temporarily hold stitches, allowing you to create the twisted, braided patterns that define cable knits. These needles come in different shapes, each suited for specific handling needs:
These design differences also highlight why storing cable needles can be tricky - they’re small, uniquely shaped, and prone to vanishing into the depths of your project bag.
Most cable needle sets range in size from 2 mm for lace-weight yarn to 8 mm or larger for bulky projects. A basic set typically costs between $5 and $10.
While cable needles are indispensable for cabling, their small size and unique shapes make them frustrating to store. Straight needles can roll off surfaces, and curved ones often snag onto things. Both types easily disappear into the bottom of a project bag, mingling with stitch markers, tapestry needles, and other crafting tools.
"A tangled mess of straights, circulars, and double-pointed needles can quickly transform a relaxing hobby into a frustrating ordeal." - Olin Chan, Olinchan.com
The problem gets worse when you own multiple shapes and sizes. Without an organized system, it’s easy to grab the wrong needle mid-project, which can distort your stitches or throw off your tension.
Having a designated spot for each needle saves time and ensures consistent tension in your work. Plus, it reduces the likelihood of buying duplicates because you couldn’t find the ones you already own.
"The right cable needle helps you create clean, even cables. It also prevents dropped stitches, avoids unwanted stretching, and keeps your cabling process organized." - Knit n' Style
Staying organized also makes a difference in your final product. Using the wrong size needle can loosen stitches, resulting in uneven cables. A well-labeled, tidy collection ensures you always have the right tool on hand, so you can focus on the joy of knitting instead of hunting for misplaced needles.
Start by gathering all your cable needles. These little tools have a knack for disappearing - whether they're tucked into project bags, buried in drawers, or wedged between couch cushions. As Dayna, founder of This Yellow Farmhouse, humorously points out: "The double pointed needle gets lost in the couch. Or worse? Between the car seats!" Doing a thorough search ensures you’re working with a complete collection, which is essential for organizing everything properly.
To begin, use a clear zippered pouch or a mesh bag to collect needles from all the usual hiding spots - project bags, drawers, bins, and yes, even the couch. A clear pouch is especially handy because it lets you see your collection at a glance.
Once you’ve gathered everything, sort your needles based on three factors: shape (like J-hook, U-shaped, straight/DPN-style, or spiral), size (measured in millimeters or US sizes), and material (such as bamboo, metal, or plastic). For unmarked needles, use a needle gauge to measure the diameter before sorting them. While you're at it, inspect each needle and remove any that are warped, splintered, or otherwise damaged. A smaller, well-maintained collection is much easier to manage.
"A smaller, more curated collection is easier to manage and appreciate." - Olin Chan, Creator, Olinchan
After sorting your needles, it’s time to record your findings. Use a notebook or index cards to create an inventory. For each needle, note its shape, size (both US and metric measurements if possible), material, and current status. The status is especially important - if a needle is part of an ongoing project, make a note of which project it belongs to. This prevents confusion and ensures nothing gets misplaced.
| Inventory Category | Details to Record | Why It Matters |
|---|---|---|
| Shape | U-shaped, J-hook, Spiral, Straight/DPN | Helps identify how the needle holds stitches |
| Size | US Size (e.g., US 6) and Metric (e.g., 4.0 mm) | Ensures compatibility with your project gauge |
| Material | Bamboo, Wood, Metal, Plastic | Affects grip and how the yarn interacts with the needle |
| Status | In storage, In project (specify which), Missing | Tracks each needle’s location and usage |
This inventory becomes a valuable tool for managing your collection over time. It helps you avoid buying duplicates, keeps you from losing track of needles mid-project, and saves you from digging through bags when you’re ready to start something new.
Once your inventory is complete, it’s time to choose a storage solution that matches your knitting habits. Whether you’re always on the go, working in a dedicated craft space, or somewhere in between, your storage choice should align with your knitting style. This step sets you up for the next phase: labeling and grouping your needles.
Zippered pouches are an affordable and practical way to keep cable needles organized. Clear vinyl pencil cases or heavy-duty zipper bags are especially handy since they let you see what’s inside without opening them. For a DIY approach, heavy-duty freezer bags with sliders are a great choice - they can handle sharp needle tips without tearing. As Lauren Rad, Owner & Designer of A Bee In The Bonnet, explains:
"A zippered bag is a great way to corral those pesky cords and keep them coiled up as they were in their original packaging."
If you’re a knitter who likes to travel, small zippered pouches are compact enough to fit into a project bag without adding unnecessary bulk.
For larger collections, binders with clear pockets are a practical alternative. A three-ring binder combined with clear page protectors allows you to view your entire collection at a glance. You can organize pages by needle size, shape, or material, and easily add or remove pages as your collection grows. To prevent needles from slipping out, look for binders with zipper closures. If your space is limited, a mini-binder (around 9" x 7") works just as well without taking up too much room.
For DIY enthusiasts, reinforce the punched holes in plastic sleeves with adhesive reinforcement circles. Apply them to both sides of each hole to prevent tearing over time.
If you knit primarily at home, repurposed containers like mason jars or desk organizers can be an effective solution. These options allow you to store straight needles vertically, making it easy to sort them by size. Plus, they’re budget-friendly and make use of items you likely already own.
Fabric rolls are a compact and portable way to store needles. These cases, often around 10" tall and 5" wide when closed, feature narrow pockets to hold cable needles securely. A top flap and tie closure keep everything in place. Amy-Jo, a customer of Alex Collins Designs, shared her experience:
"The design is just perfect, and I'm amazed at how many sets of DPNs and circular needles I can fit in it! It's been a game-changer for my needle storage and organization."
The downside of fabric rolls is that the pockets are opaque, which can make it harder to find specific needles. Adding small labels to each slot can save you time during your projects.
| Storage Option | Best For | Key Benefit |
|---|---|---|
| Zippered Vinyl Pouches | Knitters who travel frequently | High visibility; prevents loss of small pieces |
| Three-Ring Binders | Large or growing collections | Customizable; easy to sort by size |
| Jars and Desk Organizers | Home studio setup | Quick vertical access; budget-friendly |
| Fabric Needle Rolls | Travel and portability | Compact; top flaps keep needles secure |
Choosing the right storage system will make labeling and grouping your needles much easier in the next step.
With your storage system in place, it’s time to make it work smoothly for your day-to-day knitting. Labeling, grouping, and securing your needles will save you from unnecessary hassle.
Good labeling is a game-changer for staying organized. As Dayna from This Yellow Farmhouse wisely notes:
"You think you'll remember, but when it's 10:00 at night, the lights are low, and you're squinting to read what size that tiny US 1 DPN is in the lowlight, you won't be a happy knitter."
Washi tape is a great tool for this. Write on it with a permanent marker, stick it inside a drawer or onto a bundled set of needles, and peel it off cleanly when you need to update. For circular needles, coil the cord and secure it with a binder clip labeled with the cable length. Each label should include the needle size (in both millimeters and US sizes), the material (like bamboo, metal, or plastic), and the cable length.
Another trick? Use color-coded labels. Assign a specific color of tape or stickers to each size so you can grab the right needle instantly without reading every tag. Olin Chan sums it up perfectly:
"Label everything. Memory fades faster than expected."
Once everything’s labeled, you’re ready to sort and store your needles for easy access.
Organize your needles into zones that match how you use them. Keep your go-to cable needles in a handy spot - like the front pocket of your organizer or a jar on your desk. Needles you only use occasionally can go in a less accessible area.
For interchangeable sets, separate the needle tips and cables into clearly labeled compartments. Keeping them apart makes it easier to find matching pieces and reduces the risk of losing small parts. If you use double-pointed needles, bundle each set with a rubber band or needle cap to keep them together.
Once grouped, focus on keeping everything tangle-free to protect your needles and save time.
Tangled needles are frustrating, but the solution is simple. Use rubber bands to bundle sets and binder clips to keep cables neatly coiled. Silicone or rubber caps on needle tips are also helpful - they keep pairs together and prevent needles from slipping out of storage.
Store smaller tools like stitch markers and tapestry needles in a dedicated pouch. And here’s a habit worth forming: always return needles to their designated spot as soon as you’re done using them. This small step can save you from losing tools over time.
For a step-by-step demonstration of these tips, check out our video tutorials on our YouTube channel: Alpaca Direct YouTube.
Once you've organized and labeled your cable needles, the next step is assembling a project kit. This ensures you're always prepared to knit without interruptions. A well-stocked, portable kit keeps your workflow smooth and efficient, making it easier to focus on your craft.
To avoid pausing your knitting to hunt for tools, pack a mesh notions bag with all the essentials. Experienced knitters often emphasize the importance of having everything you need in one place for a more seamless knitting experience.
Here’s what to include in your kit:
"You measure stuff with it, and you need one in your bag at all times."
If you're working with slippery yarns like silk or bamboo, consider including a wooden or notched cable needle. These provide extra grip and prevent stitches from sliding off mid-row.
| Tool | Purpose |
|---|---|
| Cable needle/DPN | Holding stitches for cable twists |
| Tape measure | Checking gauge and project length |
| Stitch markers | Marking pattern repeats |
| Tapestry needle | Weaving in ends |
| Row counter | Monitoring progress |
| Needle sizer | Verifying unmarked needle sizes |
Once your kit is ready, keeping track of tools in active use is crucial. Cable needles, in particular, can easily go missing when moved from storage to a project bag. A simple check-out system can help prevent this.
Megan Graddy from Billy and Baa explains this method:
"Keep track of your needles by using our Needle Check Out cards... Fill in the Check Out Card with all the necessary information to help keep track of its whereabouts."
You can use a sticky note or an index card for this purpose. Write down the needle size, project name, and the date it was checked out. When the project is completed, return the needle to its slot and remove the card. This small habit can save you from misplaced tools and unnecessary frustration.
For more tips, check out our tutorial on assembling a project kit at Alpaca Direct's YouTube channel.
Once your project kit is set up, the key to staying efficient is maintaining that organization over time. Even the best systems can fall apart without consistent care and attention.
After finishing a project, make it a habit to return each needle to its designated spot. This simple step keeps your system intact and prevents future headaches. Regularly updating your inventory is also a smart move - it helps you identify missing or damaged needles before they disrupt your next project. A seasonal review is a great time to gather any stray needles, check for sizes that need replacing, and tweak your storage setup to match your current project needs. For instance, if you’re using specific needle sizes more often, ensure they’re easy to grab. Keeping your tools in good condition is just as important as organizing them.
Needles, especially wooden or bamboo ones, can suffer from warping, cracking, or bending if not stored properly. Avoid damp environments and tight storage spaces that can cause unnecessary stress on the material. Rebecca Nolen, a cross-stitch pattern designer at Sew French, offers this advice:
"To prevent warping, it is essential to store your needles in a straight, flat position. This means avoiding storing them in a curled shape or keeping them in a tight, compressed space."
Direct sunlight is another enemy, as UV rays can weaken and discolor needle materials over time. A quick wipe with a soft cloth after each use removes oils and dirt, keeping them smooth and ready for action. For wooden or bamboo needles, conditioning them monthly with beeswax can help prevent drying and cracking, ensuring they stay in top shape.
For more advice and step-by-step guides on maintaining your cable needle system, check out Alpaca Direct's blog and subscribe to their YouTube channel at https://www.youtube.com/@AlpacaDirect.
Keeping your cable needles organized is more than just a chore - it’s a habit that makes your knitting experience smoother. By taking stock of your tools, choosing practical storage solutions, labeling, preparing kits for specific projects, and maintaining your setup regularly, you can avoid the headaches of misplaced or damaged needles. Each step helps you move seamlessly from starting a project to finishing it.
Dina from Dina's Home of Crafts highlights the benefits perfectly:
"They reduce clutter, save money in the long run, and give you the freedom to tackle any project without scrambling for the right needle."
Proper storage isn’t just about tidiness - it protects your needles. Whether it’s keeping loose cables untangled, ensuring tips from interchangeable sets stay together, or storing wooden needles flat and dry, these small efforts can extend their life and help you achieve consistent, high-quality results.
If you only have a couple of cable needles, the simplest solution is to store one in your notions bag. Opt for a cable needle that's the same size or smaller than your working needles to avoid any stitches slipping off. To stay organized, consider using a notions bag with built-in pockets or loops - this will keep your cable needles secure, neat, and easy to grab when you need them.
To determine the size of an unmarked cable needle, you can use a needle sizer tool. These tools are designed to measure the diameter of knitting needles accurately, which helps maintain consistent tension in your knitting projects. Some sizers, such as those offered by Alpaca Direct, even come with a magnifying section to assist with checking your gauge.
Looking for more tips? Check out the Alpaca Direct blog or their YouTube channel for a variety of knitting tutorials and guidance.
To keep your cable needles from disappearing into the depths of your project bag, dedicate a specific spot for them. This could be a small container like a zippered pouch, pencil case, or drawstring bag. For extra peace of mind, try using a magnetic strip or needle caps to secure them. If you want to go the extra mile, a yarn bag with built-in loops or dividers can make your tools both organized and easy to grab when needed.

Comments will be approved before showing up.


