Your Cart is Empty



If you want an alpaca lace shawl that hangs well and keeps its shape, three things matter most: yarn choice, blocked gauge, and careful shaping.
I’d sum this pattern up like this: it’s a top-down triangular shawl worked in US crochet terms, with side increases plus a center spine, a 4-row lace repeat, and a final border and wet block to open the lace. The pattern is aimed at advanced crocheters, and it uses both written rows and a stitch chart so you can check one against the other.
Here’s the short version:
A few points stand out. Pure alpaca can stretch more over time, while alpaca/wool and alpaca/silk blends can help the shawl hold its form better. Also, lace can change a lot after wet blocking, so checking gauge before blocking can give you the wrong finished size.
If I were starting this project, I’d first swatch with my chosen yarn, block that swatch, measure one full lace repeat, and only then start the shawl. That one step can save a lot of trouble later.
Below, I’ll walk through the pattern in plain English so you can see what to use, how the repeat works, and how to block the shawl so the lace opens cleanly.
For the lightest shawl, use fingering-weight yarn. If you want a bit more body, go with sport weight. Pure alpaca feels soft and warm, but it can stretch over time. If you want more support in the fabric, alpaca/silk blends add strength and sheen, while alpaca/wool blends add elasticity.
Put simply: fingering weight gives you a lighter lace look. Sport weight makes the shawl feel a little fuller. Pure alpaca drapes well but tends to stretch more, while blends can help the shawl hold its shape better.
Plan on 730 to 1,100 yards for a fingering-weight shawl. Shop alpaca lace yarn at Alpaca Direct. Pick your yarn first, then match the hook to the fabric after blocking.
For fingering-weight alpaca, a 3.5–4.0 mm hook usually gives the best drape. It often helps to go a little larger than the yarn label suggests so the lace can open up. If the fabric feels stiff or the stitches look cramped, go up a hook size and swatch again.
You’ll also need:
Blocking wires are also useful for keeping straight edges and sharp points neat. And here’s a simple trick that saves headaches: place stitch markers at even intervals along the foundation chain so you don’t lose count.
Measure gauge after blocking, and measure over one full lace repeat. Lace can change a lot once it’s wet-blocked, so an unblocked swatch won’t show the finished size or drape with much accuracy. Check tension by using the blocked repeat width, not single stitches. Once yarn, hook, and gauge are set, you’re ready for the foundation chain and first repeat.
With your yarn, hook, and gauge ready, start the top-down shaping. This shawl begins at a small chain ring and grows row by row into a triangle. To keep that triangle balanced, you’ll add stitches at both side edges and at the center point on every row. That adds 4 stitches per row and keeps the shape symmetrical. It helps a lot to mark the center point and both edges so your increases stay in the right spots.
The main lace pattern uses a 4-row repeat. As you work, count your stitches at the end of each row. It’s a simple habit, but it can save you from finding a shaping mistake several rows later.
At the center point, the increase group is usually worked as 2 double crochets, ch 1, 2 double crochets in the same space. That center group is what keeps the shawl opening out into its triangular shape.
Once the triangle is set up, move into the lace repeat and then finish with the border. Work the lace motif in staggered repeats so the fabric stays even. Before you start the border, add one transition row to even out the stitch count. Then finish with a small picot or chain-loop edging.
Read the chart from the bottom up. On RS rows, read from right to left. On WS rows, read from left to right. Each symbol lines up with a stitch or chain in the written pattern, so it’s smart to read the written row first and then check it against the chart.
Use the written pattern to place your stitches, then use the chart to confirm the repeat. Here’s what to watch for:
If Ch 4 counts as dc + ch-1 sp, find that turning chain on the chart before you begin the next row.
Use the Alpaca Direct YouTube channel for a quick chart-reading demo.
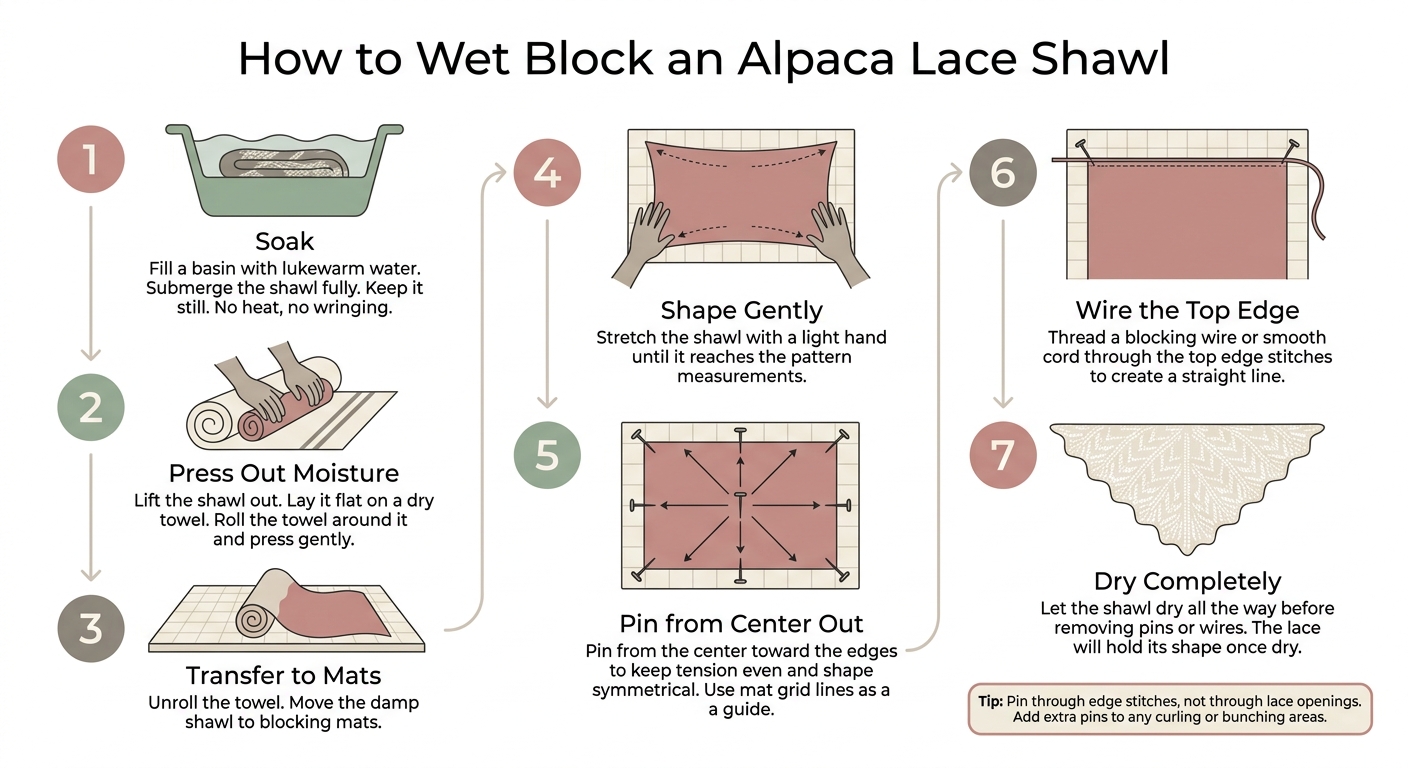
How to Block an Alpaca Lace Shawl: Step-by-Step Guide
After the lace repeat and border, block the shawl to open the stitches and set the shape. This step helps the lace spread out, gives the fabric more drape, and can make the finished shawl a bit larger. Block it to the pattern measurements.
Fill a basin with lukewarm water and place the shawl in fully. Keep it still, and stay away from heat or rough handling. Don’t wring it out.
Instead, lift the shawl from the water, lay it flat on a dry towel, roll the towel around it, and press gently to remove extra moisture. Then unroll it and transfer it to your blocking mats.
Shape the damp alpaca with a light hand. Stretch only until it reaches the pattern measurements.
Let the shawl dry all the way before you remove any pins or wires. Once it’s dry, the lace will keep its shape and the edges will rest flat.
Once the shawl is damp and on the mat, pin from the center out toward the edges. That helps keep the tension even and the shape symmetrical. Use the grid lines on the blocking mats to help line everything up.
Thread a blocking wire or smooth cord through the top edge stitches to make a straight line. Pin each bottom point through the edge stitches, not through the lace openings.
If part of the edge is curling or bunching, add a few extra pins to guide that area into place. As the fabric dries, it will keep that corrected shape.
For the cleanest finish, make sure your yarn, hook, and gauge work together. Fingering- or lace-weight alpaca gives the shawl a lighter, airier drape. And a hook that opens up the lace without squashing it helps the fabric look soft instead of stiff or crowded.
Lace doesn’t show its final shape until after blocking. That’s why you should use blocked gauge, not raw swatch gauge, and measure across a full lace repeat so the shawl opens to the right size.
As you move through the repeat, the chart becomes your fastest visual check. Use it to confirm each repeat while you work, so any mistake in the triangle shaping or lace rhythm gets caught before it travels across several rows.
Keep border chains loose, pin the edges straight, define the points, and let the shawl dry all the way before unpinning. Because alpaca has less elasticity than wool, careful blocking helps set the edge shape more permanently. Once dry, the lace holds its shape and the shawl is ready to wear.
Measure the blocked swatch with a flexible tape, then compare it with the pattern’s schematic or gauge. Lay the swatch flat on a blocking surface and check that it matches the target measurements without stretching the alpaca fibers too much.
If the size is off, change your hook size to adjust your tension. Use a larger hook if you have too many stitches, and a smaller hook if you have too few.
Keep your tension steady while crocheting. Even stitches help the fibers hold their shape and reduce stress on the fabric.
When it’s time to wash your piece, skip wringing and rough agitation. Hand-wash it in cool water with a mild detergent, gently press out extra water, then lay it flat on a clean towel to air-dry. While it’s still damp, reshape it to its original dimensions.
Use wet or steam blocking to gently shape your alpaca shawl to the size you want. This helps open up the lace pattern and gives the piece a more even look.
While the fabric is still damp, carefully pin the edges into shape. That extra step can help smooth out uneven stitch tension and tidy up small irregularities.

Comments will be approved before showing up.










