Your Cart is Empty



If your decreases are spaced well, your knitting narrows smoothly instead of pulling, puckering, or turning pointy.
When I plan decreases, I keep it simple:
ssk and k2tog when I want matching shaping linesThis works for hat crowns, sleeves, and sweater shaping. For example, if I go from 72 stitches to 64 stitches, I need 8 decreases. Since 72 ÷ 8 = 9, I can work one decrease in each 9-stitch section. If the math does not divide evenly, I split the leftover stitches across a few sections instead of stacking them in one area.
A few stitch facts matter too: k2tog and ssk each remove 1 stitch, while k3tog removes 2 stitches at once. In many flat pieces, working paired left- and right-leaning decreases helps the shaping look balanced.
Here’s the whole idea in one glance:
| Topic | What I do |
|---|---|
| Find total decreases | Starting stitches minus target stitches |
| Space decreases | Divide total stitches by number of decreases |
| Handle leftovers | Add 1 extra stitch to some sections |
| Protect edges | Leave 2–3 plain stitches at each side |
| Keep shaping even | Use mirrored decreases when needed |
| Common uses | Hats, sleeves, sweater waist or body shaping |
So the short answer is this: count, divide, mark, and keep the edges clean. That gives me shaping that looks neat and wears well.
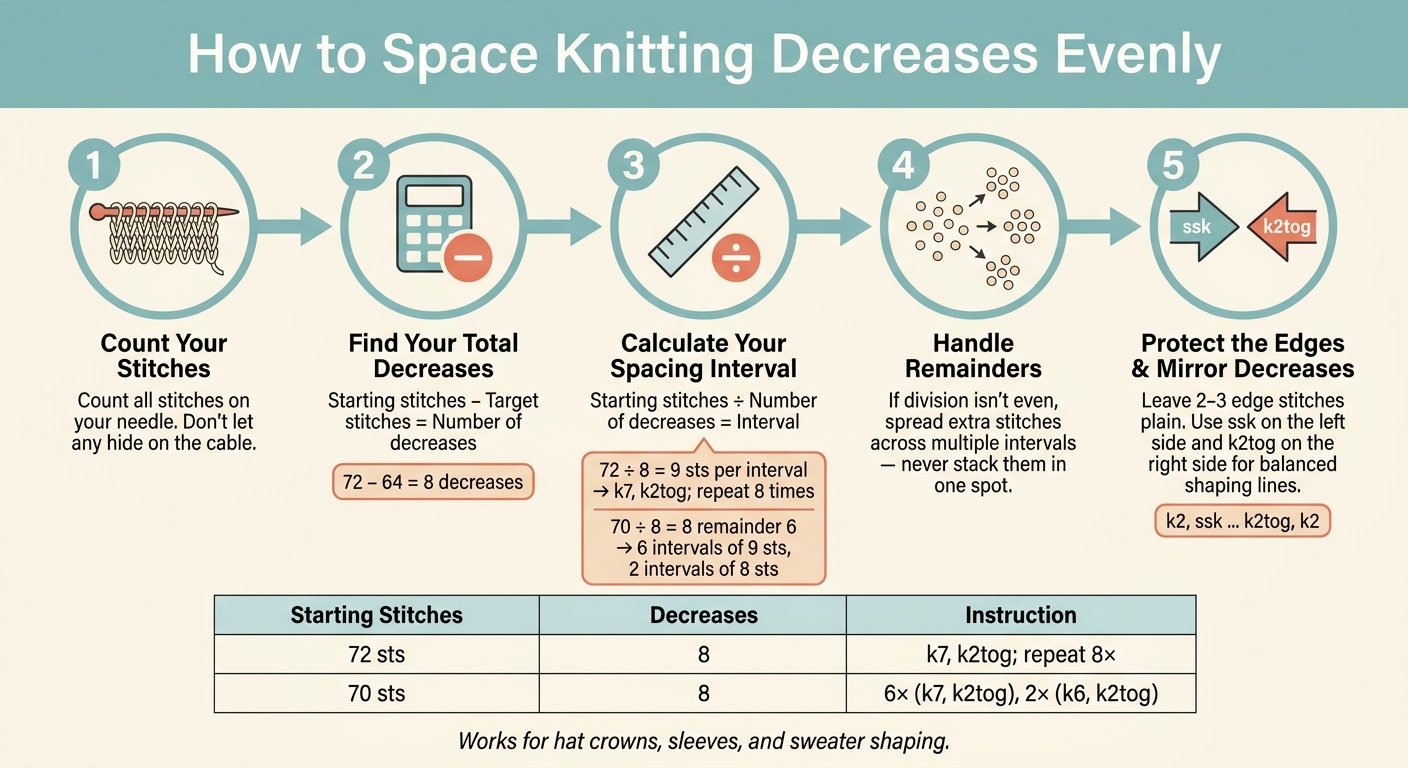
How to Space Knitting Decreases Evenly: Step-by-Step Formula
Start with three numbers: your starting stitch count, your target stitch count, and the number of stitches you need to remove. Subtract the target from the starting count to find how many stitches must go. That number tells you how many decrease actions you'll work across the row or round.
Count every stitch on the needle, and make sure none are hiding on the cable. If you're knitting in the round, slide the stitches to the other needle tip as you count so you don't miss any.
Each k2tog or ssk removes 1 stitch. So if you're going from 72 stitches down to 64, you need 8 decreases.
Once you know how many decrease actions you need, divide the total stitch count by that number to get the spacing interval. If the math doesn't divide evenly, round down to the nearest whole stitch for your base spacing. Then use the remainder to add an extra stitch to some intervals. That's what gives the row a smooth taper instead of a clumped-up look.
With 72 stitches and 8 decreases, 72 ÷ 8 = 9, so you work 9 stitches per interval. With 70 stitches and 8 decreases, 70 ÷ 8 = 8 with a remainder of 6, so 6 intervals are 9 stitches long and 2 intervals are 8 stitches long. Spreading those longer and shorter intervals across the row keeps the fabric looking even.
| Starting Stitches | Decreases | Interval | Remainder | Instruction |
|---|---|---|---|---|
| 72 | 8 | 9 | 0 | k7, k2tog; repeat 8 times |
| 70 | 8 | 8 | 6 | 6 intervals of 9 sts, 2 intervals of 8 sts |
After you work out the intervals on paper, write the counts down and mark each decrease point before you begin knitting. Count out the interval, place a locking stitch marker, and keep going until every decrease spot is marked.
This helps a lot on longer rows or full rounds, where losing count is easy and one missed decrease can throw the whole thing off. Once the markers are in place, you're set up for the next step: keeping the first and last decreases away from the edges.
Before you work the marked decreases, move the outermost ones in from the sides. When a decrease falls right on the edge stitch, the selvedge can pull tight. That makes the seam fussier to line up.
Leave 2–3 edge stitches plain, then spread the rest of the decreases through the middle of the row.
For a sweater front with 90 stitches and 8 decreases, if you keep 3 stitches plain on each side, the row would be: k3, [k9, k2tog] × 3, [k10, k2tog] × 5, k3. Those outer 3 stitches stay unshaped on each shaping row, which gives you a steady column to sew through.
Once the edges are set aside, mirror the decreases on both sides so the shaping line looks cleaner.
If you use the same decrease on both sides, the shaping can slant off a bit. A simple fix is to work ssk on one side and k2tog on the other, so both decrease lines point toward the center of the piece.
For a sleeve knit flat, work: k2, ssk, knit to last 4 sts, k2tog, k2. The edge stitches stay open for seaming, and the decrease columns sit just inside them as a neat mirrored pair.
The same idea works in the round. Put a marker at the underarm and work ssk before the marker and k2tog after it, with a few plain stitches on each side so the seam area stays smooth.
Mirrored decreases help the shaping lie flat while keeping the edge steady.
You can use the same interval method for hats, sleeves, and sweaters. The math stays mostly the same. What changes is where you put the decreases so the shape looks right on the finished piece.
For hat crowns, use the markers from your interval plan to split the round into equal wedges. Then work one decrease per wedge on each decrease round. If you have a 96-stitch hat with 8 decrease points, place a marker every 12 stitches and work a decrease at each marker.
If the stitch count doesn’t divide evenly, spread the extra stitches across a few wedges instead of dumping them all in one spot.
With 100 stitches and 8 decrease points, make four sections 13 stitches long and four sections 12 stitches long, alternating the larger wedges evenly around the round. Work one decrease round, then one plain round, at first, and switch to every round as the crown narrows.
For flat shaping, spread the decreases across the full length of the section. Use your total decrease count and your row gauge to figure out where those shaping rows should go.
Here’s the basic idea:
If the shaping section is 18 inches long, spread those 12 decrease rows at regular intervals, such as every 1.5 inches on average.
For side shaping, place the decreases near the seam lines. Mark the side seams, then work paired decreases a few stitches in from each marker, not right on the edge. Work: k1, ssk, knit to 3 sts before marker, k2tog, k1; slip marker; repeat.
For a symmetrical sweater, split the decreases evenly between the front and back. To remove 8 stitches at the waist, decrease 2 stitches on each side of the front and 2 on each side of the back over the shaping interval. That removes 4 stitches per shaping round, split evenly between front and back.
Use this quick checklist before every decrease section.
If you have leftover stitches after dividing, spread them across the row or round.
These same steps work for hats, sleeves, and sweaters.
Even spacing starts with simple division. Move your decreases in from the edges, then mirror left- and right-leaning decreases so the shape looks balanced and neat.
For video demos of k2tog, ssk, and CDD, see Alpaca Direct's YouTube channel.
Divide the total stitch count by the number of decrease points to figure out the spacing. Then work each decrease at that interval across the row or round.
If you end up with a few extra stitches, spread them out between decreases as plain knits so the spacing stays even. Stitch markers can help too, especially if you want to keep every decrease lined up the same way.
The sources don’t directly say whether you should count edge stitches when planning decreases.
What they do stress is this: place your decreases accurately across the row or round, and use stitch markers to keep the shaping even and repeatable.
So if you want a clean look, focus less on the edge-stitch rule itself and more on consistent placement. That’s what gives you the effect you’re after, whether that’s a centered hat spine, raglan shaping, or another clean line in your knitting.
If you want a bit more help seeing how that works in practice, Alpaca Direct also has tutorials and videos.
Choose the decrease based on the direction you want the stitch to lean. Use SSK for a left-leaning decrease on the knit side of your work, and k2tog for a right-leaning decrease.
Patterns often pair these two decreases to create symmetrical shaping, especially on shawls or along garment edges.

Comments will be approved before showing up.










