Your Cart is Empty
Winter Sale! Shop Now > |Free USA Shipping On Orders Over $75!


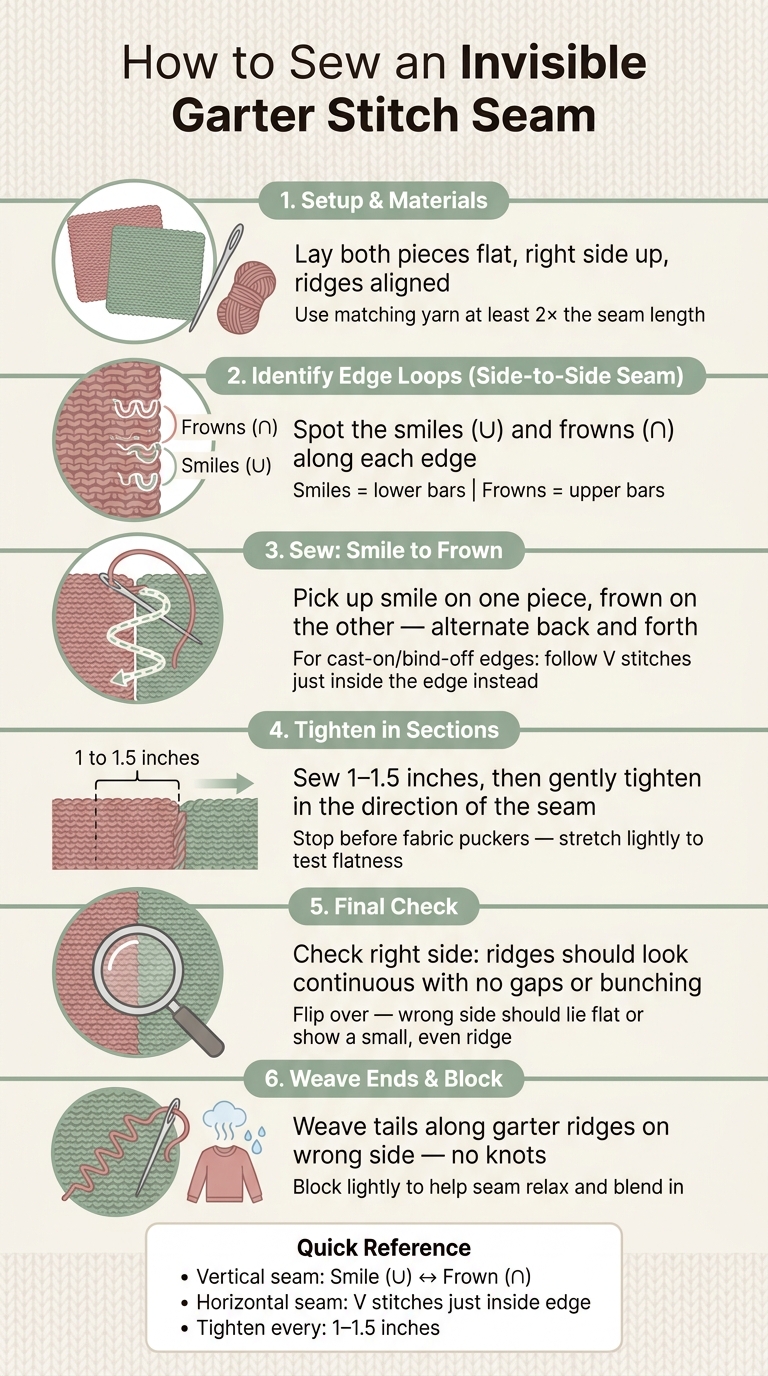
If you pick up the right edge loops and tighten every 1 to 1.5 inches, your garter stitch seam will lie flat and blend into the ridges.
I’d sum it up like this: for a side-to-side join, I sew smiles (∪) on one piece to frowns (∩) on the other. For cast-on or bind-off edges, I follow the V stitches just behind the edge. Then I tighten in short sections, not all at once, so the fabric doesn’t pucker.
Here’s the short version:
One small detail matters a lot: I keep both pieces with the right side up and line up each garter ridge before I start. That’s what makes the seam hard to spot from the front and neat on the back too.
You only need a few things to get started: two finished garter stitch pieces, a blunt tapestry needle, and matching yarn - ideally the same yarn used for the project. A blunt needle makes the job much easier because it slips between stitches without splitting the yarn or poking through the fabric. Yarn with clear stitch definition also helps, since those edge loops are simpler to spot and follow.
If your yarn tail is at least twice the length of the seam, go ahead and use it for seaming. Before you begin sewing, place the pieces together and make sure they match up.
Lay both pieces flat with the right side facing up, and keep them pointing in the same direction. Set them side by side so the edges you want to join run parallel to each other. Then line up the garter ridges across the gap so the seam will look neat and even.
For larger pieces, it helps to pin them lightly or add removable markers to keep the edges from shifting while you work. After that, you're ready to find the stitch path for the seam.
Set up on a flat surface with bright light so the edge loops are easy to see and the pieces stay steady. Once the pieces are lined up and your yarn is ready, you can start tracing the seam path.
How to Sew an Invisible Garter Stitch Seam: Step-by-Step Visual Guide
Once the pieces are lined up, take a second to read the edge stitches before you sew. In garter stitch, the edge loops alternate between frowns (∩) and smiles (∪). The seam stays invisible when you pick them up the same way every time.
For a vertical seam, work just inside the outer edge. On one piece, catch the lower bars, or smiles (∪). On the other, catch the upper bars, or frowns (∩), from the matching ridge.
If the outer edge looks loose, go in one stitch farther and catch the next smile instead. That small shift can make the seam look much cleaner. When you match smiles on one piece with frowns on the other, the ridges lock together and blend into the seam.
Once you can spot those smiles and frowns, the sewing itself gets much easier. Just keep your tension even.
For cast-on or bind-off edges, follow the V-shaped stitches or purl bumps just inside the edge. Insert your needle along that same path on the other piece and repeat. This helps the join lie flat.
It also helps to end one piece on a wrong-side row and the other on a right-side row so the ridges interlock cleanly. Those are the loops you'll follow in the sewing step.
Now that the seam path is mapped out, sew in short sections and check the fit as you go. Take your time. Stay even with each stitch, and don’t pull the yarn tight too early.
Pick up the lower loop (smile) on one piece and the upper loop (frown) on the other. Move back and forth between the two pieces, working one ridge at a time. As you sew, you’ll make a loose ladder. Once you tighten it, that ladder slips out of sight.
Sew about 1 to 1.5 inches before tightening. Then pull the yarn in the direction of the seam and stop before the fabric starts to pucker.
Use that same light, even tension for the horizontal join below.
For cast-on or bind-off edges, follow that same careful stitch matching along the V-shaped stitches just behind the edge. For a horizontal join, line up the cast-on or bind-off edges stitch for stitch, with the right sides facing up. Insert the needle under both legs of each V stitch just behind the edge on one piece, then do the same on the other.
Alternate between the pieces and follow the same V-stitch path on both sides. That’s what keeps the join neat and even.
Keep your needle placement steady so the seam stays straight.
After each section, stretch the seam lightly lengthwise to make sure it stays flat and flexible, not stiff or puckered. If you’re working with alpaca yarn, use a softer pull so you keep its drape and softness.
Once the sewing is done, take a minute to inspect the seam before you secure the ends.
After you tighten the last stitch, check the seam before weaving in the tails. Lay the fabric flat on a table and look at the right side. The join should look like one continuous garter stitch pattern, with no gaps or puckering. Then flip it over. The wrong side should lie flat, or show a small, even ridge for the side-to-side join.
Run your fingers along the seam too. If the ridges feel off or the fabric bunches up, fix the tension now, before you weave in the ends. Watch for jogs and stretched stitches.
If the seam lies flat, go ahead and finish the tails.
Thread each yarn tail onto a blunt tapestry needle and weave each tail along nearby garter ridges on the wrong side so it disappears into the fabric. Skip knots. They add bulk, and they can show through.
Light blocking is enough for alpaca. Stay away from heavy pressure or soaking the fabric, so the ridges keep their loft and the seam has room to relax and blend in.
Look at the very outer edge stitches along the horizontal garter ridges. Each ridge usually has two parts: an upper arch and a lower scoop.
For an invisible seam, switch between those two on each piece. Pick up the scoop on one edge, then the arch on the other. When you keep catching the same matching edge bumps all the way along, the join stays neat and flat.
If your garter seam puckers or cinches, you're probably pulling the yarn too tight as you go. Try to work with a lighter hand instead of snugging up every stitch.
Give the yarn a gentle tug only every inch or so to close the seam. It's much easier to tighten a loose seam later than to loosen one that's too tight, so aim for tension that matches the rest of your fabric.
Yes - you can use this technique on cast-on and bind-off edges.
In most cases, start by joining the cast-on edges first. Then join the bind-off edges and use one or two stitches at the end to close any small gap.
For horizontal joins, like end-to-end seams, the duplicate purl stitch method works well. It creates a flat seam that’s almost invisible.

Comments will be approved before showing up.


