Your Cart is Empty



If your cast-off edge is too tight, the fix is usually simple: undo only the bind-off, catch each live stitch at once, and bind off again with more stretch. In most cases, the fabric below is fine. The problem is the last row.
Here’s the short version of what I’d do:
A few trouble spots cause most of the pain:
One small but useful step: measure the edge before and after. Even a difference of 0.5–1 inch can affect fit on a cuff or neckline.
So if your edge looks neat but feels too small, don’t rip back more than you need to. I’d reopen the last row, secure each stitch as I go, and redo the bind-off with a stretchier hand.
Getting your tools set out before you touch the bind-off can save you a headache. It helps keep a small fix from turning into a bigger mess. Once everything is in place, lay the fabric flat and find the last bound-off stitch.
You’ll need a Fix-A-Stitch tool, which offers benefits for various project types, a pair of scissors, and a tapestry needle type. Keep the knitting needle size that matches your project gauge close by so the reopened stitches can rest on the needle without feeling cramped or loose. It also helps to have a smaller needle nearby for catching reopened stitches without pulling them out of shape.
If there’s any chance you’ll need to stop in the middle of the repair, set out locking stitch markers or a length of waste yarn. That way, you can secure the stitches and pause without panic.
Lay the fabric flat on a clean, well-lit surface and smooth the edge gently. Don’t stretch it. Bright light makes a big difference here because you need to see each loop clearly before you start unpicking.
Before you begin, measure the edge width in inches with a tape measure so you have a baseline to check after the repair. Then find the right side and wrong side of the fabric. The knit side shows “V” shapes. The purl side shows horizontal bumps.
Next, locate the yarn tail and trace the last bound-off loops before unpicking. If the last stitch looks loose, hold it lightly with your fingers so it doesn’t drop farther down the column.

If you want a close-up example, Alpaca Direct has helpful video demos. Check Alpaca Direct's website and YouTube channel for demos that show Fix-A-Stitch insertion, tension control, and edge cleanup.
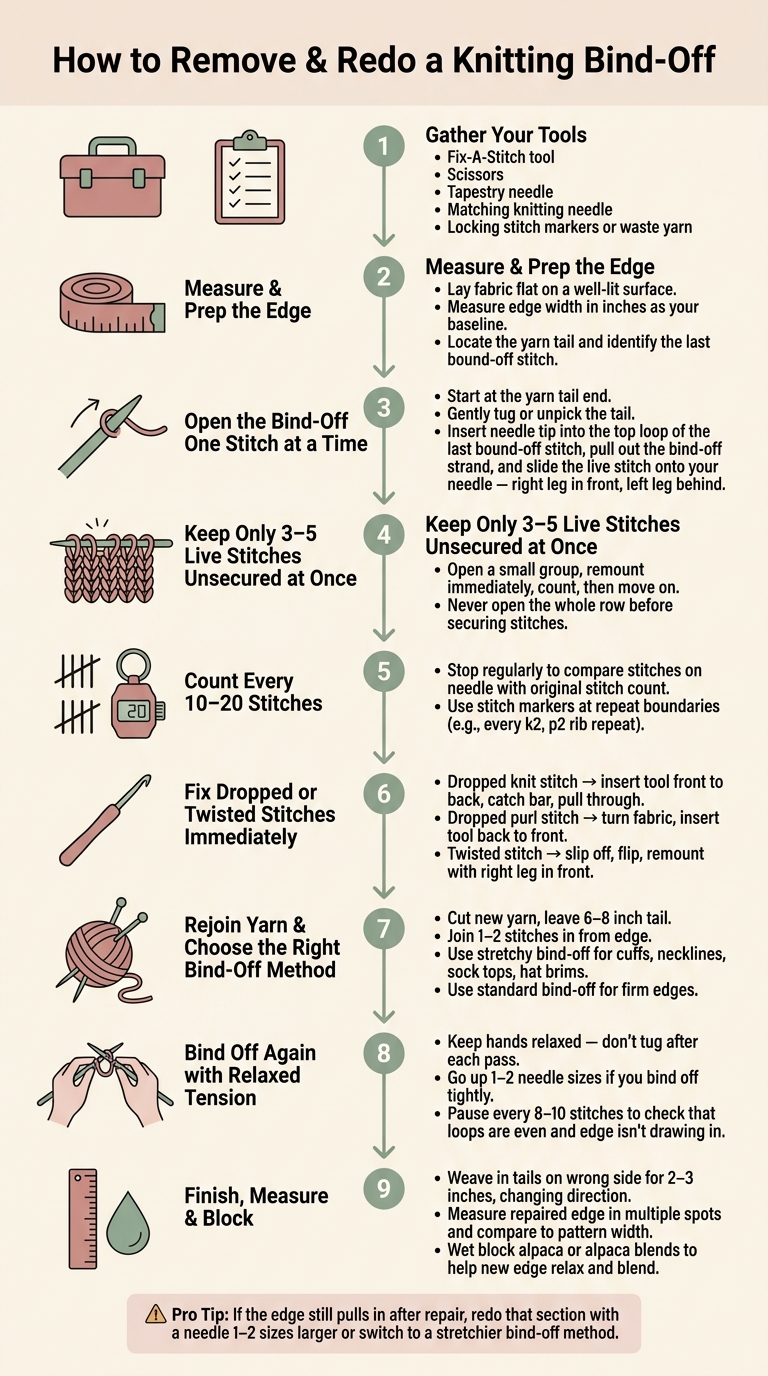
How to Remove & Redo a Knitting Bind-Off: Step-by-Step Fix
Start at the yarn tail end and reopen the bind-off in small sections. The idea is straightforward: free one stitch at a time, put it straight back on the needle, and stay in control as you work across the row.
Begin at the yarn tail. Give it a gentle tug to see if the bind-off will undo cleanly without cutting. If the tail was woven into the fabric, use a tapestry needle to unpick it with care. Try not to cut unless you have to. If you do, snip only the tail strand, not the bind-off yarn.
Once the path is open, undo the bind-off in reverse. Insert your needle tip into the top loop of the last bound-off stitch, pull out the bind-off strand, and let that stitch open back up into a live loop. Slide it onto your needle right away with the right leg in front and the left leg behind.
If a stitch lands twisted, slip it off purlwise and put it back so the right leg sits in front.
If a stitch drops below the edge while you're opening the bind-off, clip a locking stitch marker into the loose loop at once so it doesn't run farther down. Then use your Fix-A-Stitch tool to ladder it back up.
For a dropped knit stitch, insert the tool from front to back, catch the next horizontal bar above it, and pull that bar through until the stitch is back at needle level.
For a dropped purl stitch, turn the fabric so the purl side faces you, insert the tool from back to front, and pick up the dropped stitch on the purl side by pulling each bar through on the correct side.
Soft alpaca yarn can slip fast, so it's smart to grab dropped loops right away.
Once those loops are back at needle level, keep going across the edge in short sections.
The safest way to handle this is to keep only 3–5 live stitches unsecured at a time. Open a small group, remount it, count it, then move on. Don't open the whole row before putting stitches back on the needle.
Every 10–20 stitches, stop and compare the stitches on your needle with your original stitch count. If you're working in a repeat like k2, p2 rib, place a stitch marker at each repeat boundary. That makes a missing stitch much easier to spot.
It also helps to flex the edge gently with both hands. Hidden gaps or extra loops tend to show up that way, while they're still simple to fix with the Fix-A-Stitch tool.
Once all stitches are remounted and steady, move to the new bind-off.
Once the live stitches are back on the needle, it’s time to rebuild the edge with the right amount of stretch. Cut a new length of yarn and leave a 6–8 inch tail. Join it 1–2 stitches in from the edge so the starting point blends in and has a bit more support.
For cuffs, necklines, sock tops, and hat brims, use one of several stretchy bind-off methods. For edges that need to stay firm, go with a standard bind-off. If the edge needs extra give, a stretchy or sewn bind-off is usually the better fit.
Keep your hands relaxed, and don’t tug the yarn tight after each pass over. That’s often where things go wrong. If you tend to bind off too tightly, switch to needles 1–2 sizes larger just for this row.
Try to match both the needle size and the bind-off style to the amount of stretch the fabric needs. Every 8–10 stitches, pause and lay the work flat. Check that the loops look even and that the edge isn’t starting to draw in.
As soon as the new bind-off is done, check the edge while it’s still easy to fix. Weave in the tails with a tapestry needle on the wrong side, following the path of the existing stitches for at least 2–3 inches and changing direction a few times. That helps keep the tail in place without knots.
Then lay the project flat and measure the repaired edge in a few spots. Compare those numbers to the width listed in the pattern. Also check that the stitch count matches what you had before the repair. If it doesn’t, you may have dropped a stitch or added one by accident.
For alpaca and alpaca blends, a gentle wet block can help the new edge relax and blend into the surrounding fabric.
Because the stitches are still live, small mistakes are much easier to fix now than after the edge is rebound. If the reopened edge looks uneven, deal with it before you bind off again.
A twisted stitch is easiest to catch before the new bind-off goes on. On the knit side, check that the right leg of each stitch sits in front of the needle. If the left leg is sitting forward, slip the stitch off, flip it, and remount it the right way before you work it. After you pick up a dropped stitch, remount it with the right leg in front and the left leg in back.
For a small dropped section near the edge, work one bar at a time from the side that matches the stitch orientation: front to back for knit stitches and back to front for purl stitches.
The best rule here is simple: fix the smallest area you can. Don’t reopen more stitches than the problem calls for. Rework only the affected section, correct the tension or stitch orientation, and bind off again across that span. If the edge still pulls in, redo that section with a larger needle or a stretchier bind-off.
If the bind-off starts to run, stop right away and secure the live stitches before you do anything else. Use Fix-A-Stitch only for isolated drops or twists. If the damage starts spreading, stop and reopen more fabric instead. If the same area keeps twisting after you remount it, or the row becomes hard to read, go back to the last stable row and rebuild from there.
Also, match the bind-off style to the amount of stretch the finished edge needs.
Once the stitches are corrected and the edge lies flat, rebinding should go pretty fast.
Redo only the bind-off row if the problem is just on that edge and the rest of your knitting looks good. This is a good fix when the bind-off is too tight, looks uneven, or you decide you want a different edge finish.
You can take out only that row, pick up the live stitches with a Fix-A-Stitch tool, and bind off again neatly without ripping back the rest of the piece.
Use your fingers to pull up the exposed loop so the stitch doesn’t keep unraveling. If you can’t fix it right away, clip a locking stitch marker into the loop to keep it in place.
Before you start unpicking, you can also add a lifeline to the row below. That gives you a safe stopping point and helps prevent stitches from dropping past where you want to work.
A variation of Elizabeth Zimmerman's sewn bind-off is a great pick when you need a very stretchy edge. It’s a good fit for neckbands, toe-up socks, and any project that needs extra give across stitch patterns.
The easy sewn bind-off is another solid option when you want an elastic edge, especially for garter stitch projects.

Comments will be approved before showing up.










