Your Cart is Empty



One twist at the join can ruin the whole project. If I want a clean start, I need to do 3 things before round 1: lay the cast-on flat, keep the working yarn on the right needle, and check the edge again after the first round.
Here’s the short version:
A few project-specific problems show up fast when the join twists:
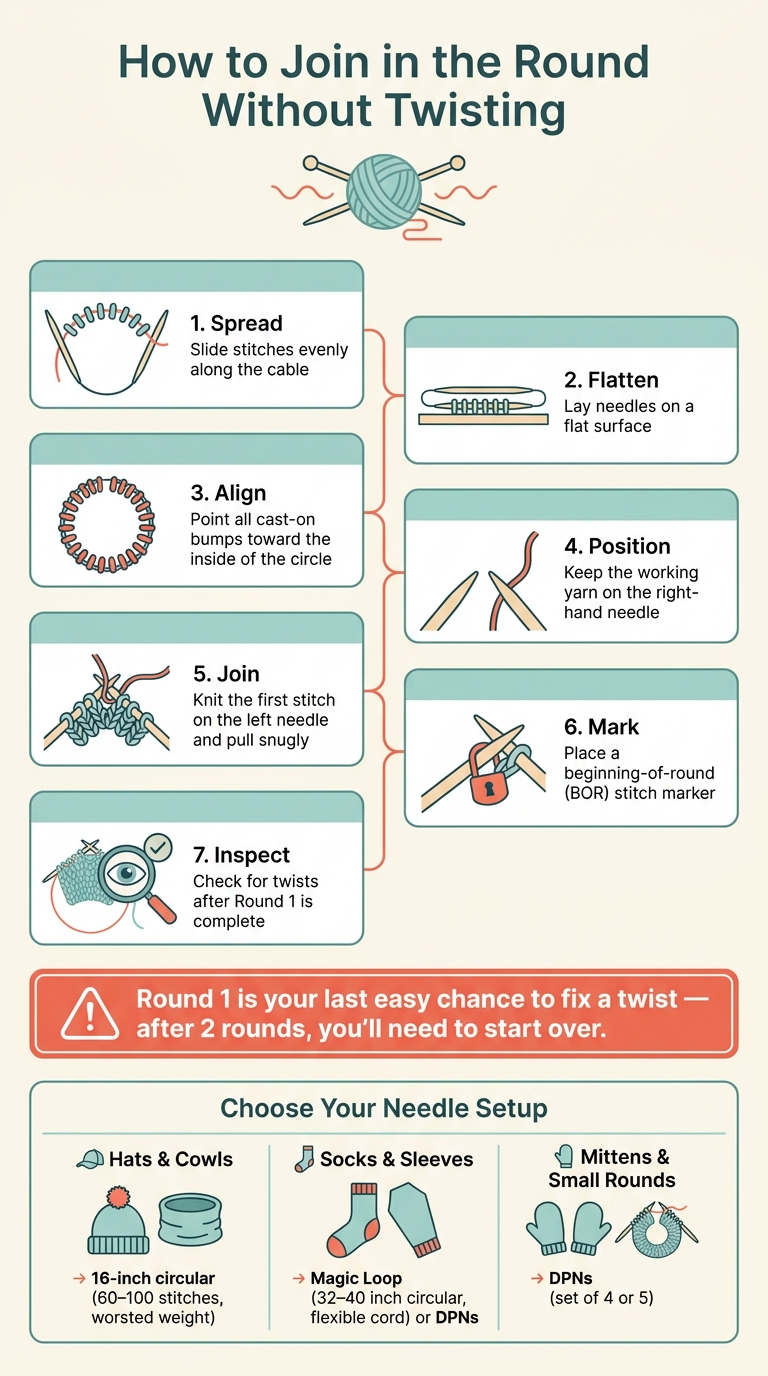
How to Join in the Round Without Twisting: 7-Step Checklist
| Method | Best for | Join look | Twist risk | Main note |
|---|---|---|---|---|
| Direct join | Most round projects | Small gap can show | Medium | Fast and simple |
| Extra-stitch join | Hats, cowls | Cleaner edge | Low | Cast on 1 extra stitch |
| Magic Loop | Socks, sleeves, small tubes | Small gap | Low | Works best with a flexible cord |
| DPNs | Socks, mittens, small rounds | Small gap | Low | Check each needle for edge direction |
The big idea is simple: I don’t prevent twists while knitting. I prevent them before I knit the first stitch.
Most twists happen during setup, so it’s worth checking the cast-on before you join. After you join, that twist gets locked into the fabric.
A 16-inch circular works well for adult hats and cowls. It usually fits about 60–100 stitches in worsted weight yarn. If you're using the Magic Loop method for smaller items like socks or sleeves, go with a 32- to 40-inch circular and look for a flexible cord that doesn’t hold a stubborn curl. For very small circumferences, DPNs give you the control you need.
| Needle Type | Length | Best For |
|---|---|---|
| Circular | 16 inches | Adult hats, cowls, necklines |
| Circular | 32–40 inches | Magic Loop: socks, sleeves, hats |
| DPNs | Set of 4 or 5 | Socks, mittens, hat crowns |
For the cast-on, use something stable and stretchy, like long-tail. If your pattern uses an extra-stitch join, cast on one extra stitch.
If you're practicing, smooth, light-colored yarn is the easiest to read. You can see the edge more clearly, which makes spotting a twist much simpler. Dark or textured yarn tends to hide the cast-on bumps, and that can make setup a pain.
Spread the stitches out evenly on the cable or across your DPNs. Then set the work on a flat surface and check the cast-on edge. The bumps should run in one straight line all the way around, without spiraling.
That line should look continuous and unbroken, usually facing toward the inside of the circle. If you see the edge start to twist anywhere, stop and gently rotate the stitches back into place before you do anything else. Also, count your stitches before joining.
If the edge still looks messy or hard to follow, knit one or two flat rows first.
One or two flat rows can help with long cast-ons or slippery yarn, especially when the edge is hard to read. It gives you a clearer view of the cast-on and makes twisting less likely.
After you join, sew the gap closed with the yarn tail.
Once the cast-on is lying flat, you’re ready to use the join method that matches your needles.
Once your cast-on is laying flat and your stitch count is right, you're ready to join. Keep the working yarn at the right needle. Then place a beginning-of-round (BOR) marker on the right needle and knit into the first stitch on the left needle with the working yarn, not the tail.
Insert the right needle into the first stitch on the left needle and knit it with the working yarn. Pull that first stitch snug so the join closes up neatly.
After round 1, stop for a second and inspect the fabric. The cast-on edge should form one continuous line all the way around. If it starts to spiral, the work is twisted. At that point, it has to be unraveled - there's no fix later.
This approach gives you a cleaner join. Cast on one extra stitch beyond your pattern count, then do this:
When you're set, pull the tails snug to close the join with no gap.
If you're using DPNs or Magic Loop for a small circumference, take a moment to line everything up before working the first round.
For DPNs, spread the stitches evenly across 3 or 4 needles. Before you knit the first stitch, check that the cast-on ridge faces the center on every needle. It shouldn't point outward or twist between needles.
For Magic Loop, fold the work at the midpoint of the cable and pull a loop of cord out between the two halves. Then make sure the cast-on ridge faces inward on both sides before you begin. Kathleen Cubley of Alpaca Direct explains why the cord matters:
"A needle with a non-memory cord is best for Magic Loop... you need a cord you can 'be friends with,' one that isn't all wound up, because you'll be fighting with it as you try to work the technique." - Kathleen Cubley, Alpaca Direct
Choose the join method below:
| Join Method | Difficulty | Gap at Join | Best Use | Twist Risk |
|---|---|---|---|---|
| Standard Direct Join | Easy | Small gap possible | Most general projects | Moderate |
| Extra-Stitch Join | Intermediate | Seamless/Invisible | Hats, cowls, professional finish | Low |
| Magic Loop Join | Intermediate | Minimal | Socks, sleeves, small circumferences | Low (with flexible cord) |
Check that first round now. That's the easiest moment to spot a twist before you knit any farther.
Even seasoned knitters slip up at the join. It happens. The good news is that most join problems are easiest to spot in the first round, before the fabric gets far enough along to hide them.
Once you join, use that first round as your last easy check. Take a quick look to make sure the stitches still line up the way they should. Watch for three common issues: the cast-on edge flipped before round one, starting with the tail instead of the working yarn, or using a circular needle that's too long for the project circumference.
If you notice a twist before you finish the first round, stop right away and untwist the stitches until the cast-on edge lies flat. Catching it early saves a headache.
After two rounds, there usually isn't a dependable shortcut. At that point, the fix is to rip back and cast on again.
A few small checks can save you from a lot of hassle. Lay the work flat, separate the tail from the working yarn, and count your stitches after the first round. These habits matter most on small-circumference projects, where mistakes tend to show up fast.
| Problem | Likely Cause | Best Fix |
|---|---|---|
| Wrong yarn strand | Started with tail instead of working yarn | Undo stitches and restart with the working yarn |
| Stitch count off | Dropped or extra stitch at the join | Increase or decrease in round 2 |
Once the join sits flat, the shape of your project tells you what setup makes sense next.
For hats, begin on a 16-inch circular. When the crown decreases start to bunch up and the stitches feel cramped, move to DPNs or Magic Loop. If you choose DPNs, divide the remaining stitches evenly across three or four needles. If you'd rather stay on one needle, Magic Loop lets you keep going with a long circular.
"You can use Magic Loop to decrease from 90 stitches to eight stitches, on a hat for example, from cast-on to cast-off, without having to change to double-pointed needles." - Kathleen Cubley, Alpaca Direct
The best time to switch is simple: do it as soon as the crown decreases make the stitches crowd the needle.
Cowls can be a little sneaky, especially with long cast-ons. The more stitches you cast on, the easier it is for a twist to slip in without you noticing.
Before you join, run a finger along the full cast-on edge and check that it lies flat in a ring rather than curling into a spiral. You want the edge to read as a true circle before round one locks everything in place.
Socks need tools that handle small circumferences well. DPNs, a 9-inch circular, or Magic Loop all work, especially if your Magic Loop needle has a flexible, low-memory cord.
At the cuff or toe, a clean, gap-free join matters. It helps avoid pressure points, which is a big deal in something you're going to wear inside a shoe. When working with DPNs or Magic Loop, pull the second stitch after each needle change a bit snugger than usual. That small move helps stop ladders - those loose vertical columns that can show up where needles change over.
For socks, keep the cast-on edge straight and the first transition snug. That alone goes a long way toward a smoother start.
A clean join starts with setup, not luck. Run through this checklist before you knit the first round.
| Step | Action |
|---|---|
| Spread | Slide stitches evenly along the cable |
| Flatten | Lay needles on a flat surface |
| Align | Point all cast-on bumps toward the inside of the circle |
| Position | Keep the working yarn attached to the right-hand needle |
| Join | Knit the first stitch on the left needle and pull snugly |
| Mark | Place a beginning-of-round stitch marker |
| Inspect | Check for twists again after Round 1 is complete |
Round 1 is your last chance to catch a twist before ripping back.
A little care here saves a lot of frustration later. Stick to this routine for clean, twist-free starts on hats, cowls, and socks.
The working yarn is the strand still attached to the yarn ball. When you’re ready to join in the round, it should hang from the last stitch you cast on at the tip of your right-hand needle.
Before you start knitting, check that this strand is in the right spot to knit the first stitch on your left-hand needle.
Yes - you can knit a few flat rows before joining in the round.
This is often called a flat-row join or anti-twist method, and it can help prevent twists in projects with a lot of stitches.
You simply knit or purl one row back and forth, then join the ends. This can leave a tiny gap at the base, but it’s usually hard to notice after blocking. If it still shows, you can close it later with the yarn tail.
A loose join is common, and it’s not the same thing as a twisted cast-on. Most of the time, it happens because the first stitch has a bit too much slack or the tail isn’t giving enough support.
To tighten things up, tug the working yarn firmly right after the first stitch. You can also hold the working yarn and the tail together for the first few stitches to help steady the join. If there’s still a small gap, keep knitting. It often settles into the fabric after 5 to 10 rounds.

Comments will be approved before showing up.










