Your Cart is Empty



If you want a cast-on that looks neat, has some stretch, and sets up your first row at the same time, this is the one to learn.
I’d sum it up like this: use smooth worsted-weight yarn, US 8 (5.0 mm) needles, and measure a tail that is about 3 times the project width plus 6–12 inches. Then hold the tail over your thumb and the working yarn over your index finger, repeat the same 4 motions for each stitch, and check that the edge stays even and easy to slide.
Here’s the whole article in a short list:
A small fact that helps: for practice, 30–40 stitches is often enough to spot tension issues fast without using much yarn. That makes it easier to fix mistakes before starting a full project.
If you’re new to knitting, this article gives you the full setup, motion, fixes, and practice plan in plain steps.
Start with smooth, light-colored worsted-weight yarn, US size 8 (5.0 mm) needles, and a tape measure or ruler. Light-colored, smooth yarn makes each stitch easier to spot, which helps a lot when you're learning. Worsted-weight yarn pairs well with US size 7–9 (4.5–5.5 mm) needles. If you want a bit more grip, wooden or bamboo needles are a good pick.
A simple way to measure the tail is the three-times-width method. Measure out yarn to about three times the width of your project, then add 6–12 inches.
If you want a more exact estimate for a set number of stitches, use the wrap-count method. Wrap the yarn once for each stitch, measure the length of one wrap, multiply that by your stitch count, then add 6–12 inches.
Once you've measured the tail, place the slipknot on the needle and get the yarn set in your hands.
Before you make the stitch, look at the two strands. The loose end hanging from the slipknot is the tail yarn. The strand that runs back to the ball is the working yarn.
Hold the tail over your thumb and the working yarn over your index finger so the strands form a "Y" shape. Then bring the needle under the thumb strand, over the index strand, and back through the thumb loop. It may feel a little awkward at first, and that's normal. A few practice tries usually help your hands settle into the motion.
Now you're set to make the first stitch with the long tail cast on.

Alpaca Direct's alpaca-blend yarns, beginner-friendly needles, and YouTube tutorials can help you practice the long tail cast on.
With the tail measured and the yarn in place, you're ready to cast on.
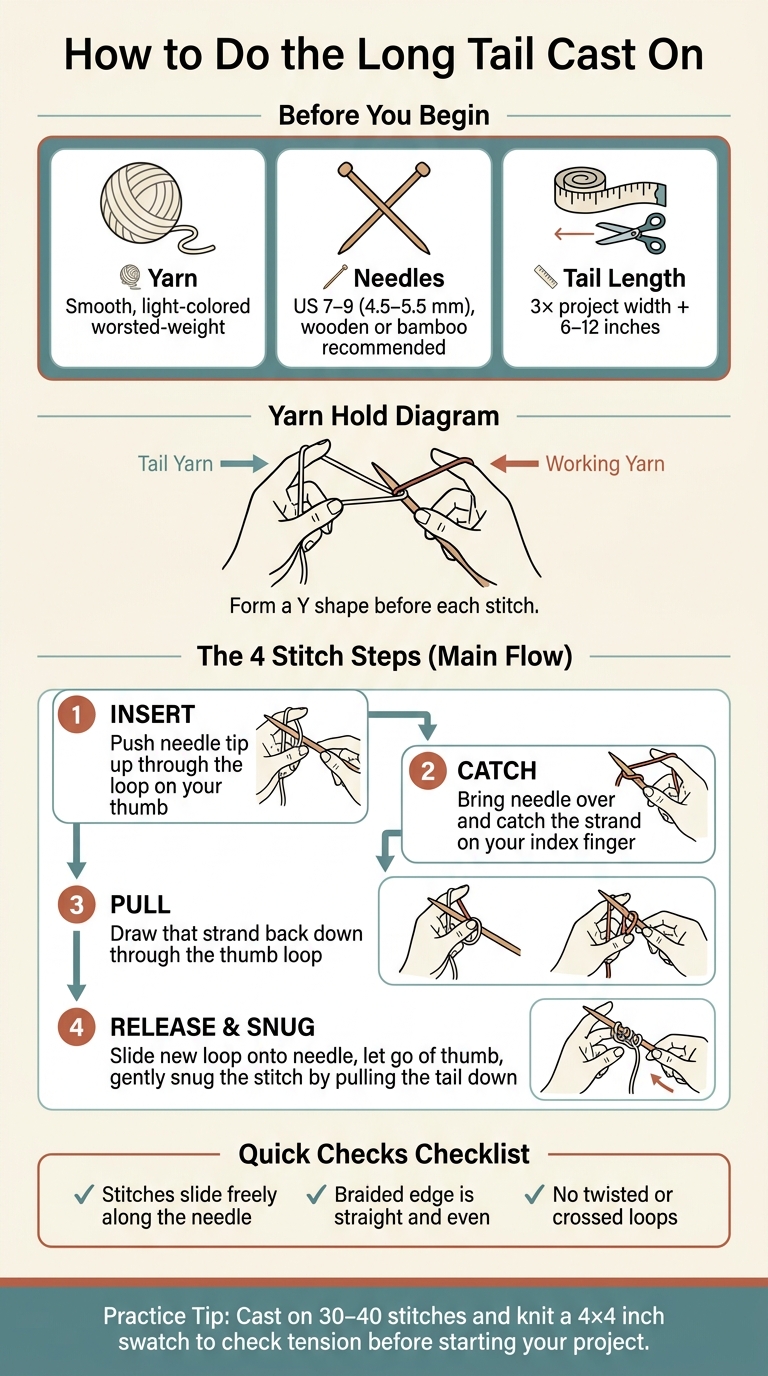
Long Tail Cast On: 4-Step Visual Guide for Beginners
Using that same yarn hold, begin with the first loop on the needle.
Make a slipknot and place it on the needle. It should feel secure but still slide with ease. Then use the same thumb-and-index setup to begin the first stitch: tail over your thumb, working yarn over your index finger.
For each stitch, repeat the same four motions:
After each stitch, wrap the tail over your thumb again and repeat.
Slide the stitches along the needle. Each one should move freely. Then look at the bottom edge. The cast-on makes a braided edge along the base, and it should sit in a straight, even line without flipping or twisted stitches. If the edge feels tight or looks uneven, fix it before you move on.
Before you knit the first row, fix these common cast-on problems. It’s a lot easier to sort them out now than after you’ve worked a few rows.
This usually means the tail was too short. The fix is simple: measure it again before you start.
If you run out of yarn halfway through the cast-on, you can join the ends with spit splicing, which is a felting join used for wool and alpaca. If your yarn won’t felt, a Russian Join is a secure option.
Then cast on again with a better-measured tail.
If your cast-on feels tight, try using a needle one size larger for the cast-on, then switch back to your main needle for the first row. If the stitches slide around too much or the edge looks uneven, wooden or bamboo needles can help because they give you more grip.
Fix the edge now. It’s much harder to clean up once you’ve started knitting.
Twisted stitches can make the cast-on edge look uneven. Before you move on, run your finger along the edge and check each loop. Straighten any stitches that look crossed or flipped, then count them again.
That stitch count matters more than people think. If you miss stitches here, your final stitch count changes, and that can affect the fit.
Start small. A few swatches are the best way to build the motion until it feels automatic. Once the cast-on starts to feel steady, keep using swatches to dial it in.
Cast on 30–40 stitches with smooth, light-colored, medium-weight yarn. That makes the loops much easier to see. Then knit a 4 x 4 inch swatch so you can check both the edge and the first row.
After that, lay the swatch flat and take a close look. The loops should face the same direction and sit evenly on the needle. If the first stitches look a little different from the last ones, your tension is still settling down. That’s normal. Just keep your focus on making each repeat look the same.
Once the edge looks even from start to finish, move on to a simple project like a scarf, cowl, or basic hat.
For a visual refresher, practice with video instruction. The Alpaca Direct YouTube channel shows cast-on technique from more than one angle, which can help you line up hand position, yarn tension, and stitch formation.
Alpaca Direct also has tutorials, project ideas, and knitting supplies.
No. The slipknot usually does not count as a stitch in your final stitch count.
It’s mostly just a starting anchor that holds the yarn in place while you begin. After the first round, count your stitches to make sure your total is right.
The long-tail cast-on is a solid, stretchy option for a lot of knitting projects. But you don’t need it every time.
Some patterns ask for a certain method instead. For example, toe-up socks often use Judy’s Magic Cast-On, while some buttonholes call for a crochet cast-on. That’s why it’s smart to check your pattern first and use the cast-on it recommends.
If your cast-on edge feels too tight, use a needle that's one or two sizes larger just for the cast-on. After that, switch back to your usual needle size for the rest of the project.
It also helps to ease up on the working yarn as you make each stitch. In many cases, a tight cast-on comes down to tension that's a little too firm.

Comments will be approved before showing up.










