Your Cart is Empty



If I want the short answer: I use a straight tapestry needle for long, flat seams, and a bent-tip needle for grafting, ribbing, sock toes, cuffs, and other tight spots.
That’s the whole choice in one line. A straight needle moves in a direct path, which helps on blanket panels, scarf seams, and sweater sides. A bent tip catches under stitches more easily, which helps when fabric is crowded and the angle is awkward.
Here’s the fast breakdown:
About 80% to 90% of finishing jobs in knitting fall into just a few tasks: seaming, weaving in ends, and grafting. So in most cases, I don’t need a big set of tools. I just need the right needle shape for the fabric in front of me.
Quick Comparison
| Needle | Best use | What it does well | Where it can feel awkward |
|---|---|---|---|
| Straight | Flat seams, stockinette, garter | Direct path, steady motion, easy over long sections | Tight stitches, small rounds, dense texture |
| Bent tip | Grafting, ribbing, ends, shaped seams | Scoops under strands, easier angle, less yarn splitting | Long flat seams |
If I knit a mix of garments, socks, hats, and scarves, both styles earn a place in my notions bag.
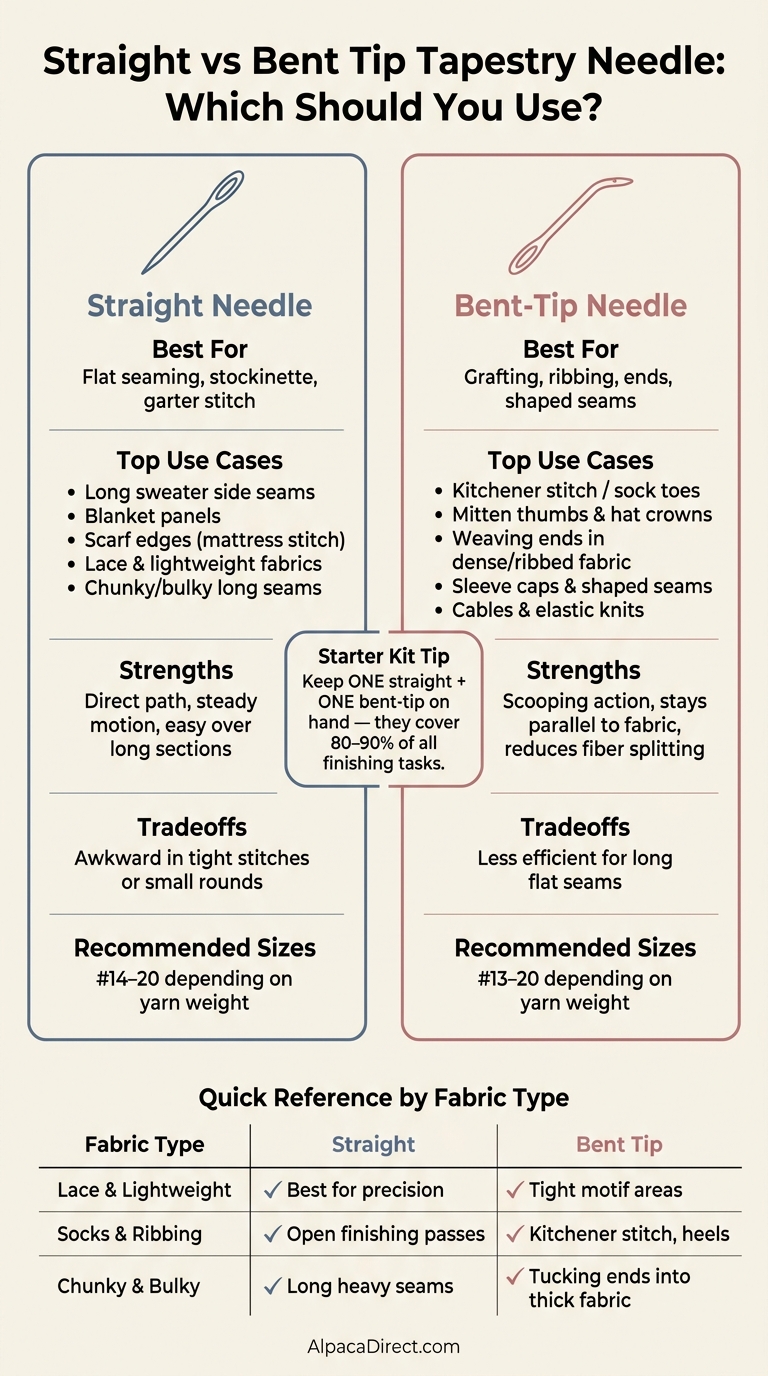
Straight vs Bent Tip Tapestry Needle: Which Should You Use?
Straight needles are usually better for long, flat finishing. Bent tips tend to work better in tight spots or on angled seams.
Use this comparison to line up the needle style with the finishing job in front of you.
| Needle Style | Best For | Strengths | Tradeoffs | Common Project Types |
|---|---|---|---|---|
| Straight | Flat seaming, basic stockinette/garter | Predictable on flat seams | Awkward in tight stitches | Blankets, scarves, flat garment panels, sweater side seams |
| Bent Tip | Grafting, shaped seams, weaving in ends | Scooping action, makes it easier to keep the needle parallel to the fabric, reduces fiber splitting | Less efficient for long flat seams | Sock toes, mitten thumbs, hat crowns, sleeve caps, ribbing |
For long, flat seams - like sweater side seams, blanket panels, or mattress stitch along a scarf edge - a straight needle usually feels like the obvious pick. The shaft stays firm, the path through the fabric stays direct, and the in-and-out motion is easy to repeat over many inches.
Shaped seams are a different story. If you're finishing a sleeve cap, a bent tip gives you more control around the turns. The curve helps the needle stay parallel to the fabric surface instead of forcing a steep angle. In plain English, that makes it easier to pick up stitches without stabbing through the yarn itself. And for Kitchener stitch, a bent tip often makes that stitch-by-stitch grafting process feel smoother.
Once a seam starts curving or narrowing, the choice usually shifts with it.
On smooth fabrics like stockinette and garter stitch, a straight needle slips through the ladders between stitches with little fuss, and either style can do the job well.
Dense or textured fabrics, like ribbing, are where a bent tip often earns its keep. The curved end can scoop under strands instead of pushing through them, which lowers the odds of splitting a ply by mistake. That's especially helpful when you're tracing the stitch path to hide and secure the tail.
Small rounds - sock toes, mitten thumbs, and hat crowns - don't leave much room for your hands to work. A straight needle can push your wrist into an awkward position just to hit the right entry point. And when that happens, tension can get uneven fast, or the needle can catch and split the yarn.
A bent tip makes those entries easier from either side, with less hand repositioning. That can help keep your tension more even while you work.
Lace, socks, and bulky knits change the equation again, so the next section gets more specific by fabric type.
Fabric density changes which needle tends to feel fastest, even when you're doing the same finishing job.
| Fabric Type | Needle Style | Why it works |
|---|---|---|
| Lace & Lightweight | Straight | Best for precision - slim profile is less likely to distort openwork |
| Lace & Lightweight | Bent Tip | Useful in tight motif areas - catches small strands without disturbing surrounding fabric |
| Socks & Ribbing | Straight | Follows vertical rib columns cleanly on open finishing passes |
| Socks & Ribbing | Bent Tip | Keeps needle parallel to the fabric - ideal for Kitchener stitch and heels |
| Chunky & Bulky | Straight | Best for long, heavy seams - firm shaft holds a direct path through dense layers |
| Chunky & Bulky | Bent Tip | Slides around bulky strands without splitting - tucks ends deeply into thick fabric |
With lace, everything comes down to control. You need a needle that moves through open stitches cleanly without pulling the fabric out of shape. Straight needles usually do that best. Their firm, narrow shaft is easy to guide, which helps you avoid snagging delicate fibers like silk or fine merino.
Bent-tip needles still have a place here. In tighter motif areas, that slight curve can help you catch a small strand without nudging the stitches around it.
From open lace, the next challenge is elastic fabric, where reach starts to matter as much as precision.
For Kitchener stitch at the toe, a bent tip often makes the job smoother. The curve helps the needle catch each stitch cleanly while staying parallel to the fabric, which makes it easier to keep the graft even.
On ribbing, straight needles still work well for open finishing passes because they follow the vertical knit columns cleanly on the wrong side. If you're dealing with slippery yarn, use a split tail only when you need extra grip.
Then thick fabric shifts things again. Once the yarn gets bulky, the job is less about fine precision and more about clean movement through heavy layers.
Bulky yarn changes how much force and flex you need to finish neatly. Straight needles are still the better pick for long seams in thick fabric, since the firm shaft helps keep the seam even over many inches.
For weaving in ends, bent-tip needles have an edge. They move around bulky strands instead of pushing straight through them, which helps you avoid splitting the yarn. With super bulky yarn, split the tail and weave each ply on its own to cut down on bulk.
Once you know how each needle acts, the next step is simple: build a small kit around the projects you actually make. A good setup should cover flat seams, tight rounds, and textured fabric without stuffing your notions bag with extras.
Start with the sizes that match the yarn weights you use most.
| Yarn Weight | Needle Size | Style to Include |
|---|---|---|
| Fingering / Sock | #18–20 | One straight, one bent-tip |
| DK / Sport | #16–18 | One straight, one bent-tip |
| Worsted / Aran | #14–16 | One straight; add a bent-tip for ribbing or cables |
| Bulky / Super Bulky | #13–14 or large plastic | One large needle, straight or bent-tip |
The eye should hold the yarn without fraying it. And the needle itself shouldn’t be so thick that it pushes nearby stitches out of shape.
Here’s a simple test: pull the yarn through and look at the stitches. If they settle back into place, you’ve got the right size. If they stay stretched or the yarn starts to look fuzzy or worn, switch needles.
Straight needles are a good fit for long, flat seams. Bent-tip needles shine in tight rounds, textured fabric, and grafting.
That split makes life easier. If you’re seaming sweater pieces on a table, a straight needle usually feels more natural. If you’re weaving in ends near ribbing or working inside a hat crown, a bent tip gives you a better angle.
For alpaca projects, needle material matters too. Metal tapestry needles are usually the best pick for alpaca and alpaca-blend yarns because their smooth surface moves through soft, fuzzy fibers without snagging.
Plastic needles can still do the job for bulky alpaca hats or scarves, especially when you’re weaving through big, open stitches. But over time, the eye can get rough and start catching delicate fibers.
If you want to see the techniques in action, the Alpaca Direct YouTube channel walks through weaving in ends, mattress stitch, and Kitchener stitch step by step.
Both styles deserve a spot in your finishing kit because each one does a different job better.
Use a straight needle for long, flat seams where you want a smooth, direct path. Use a bent-tip needle for grafting, sock toes, and tight stitches where that curved point makes life easier.
With both styles on hand, you can handle most finishing tasks without much fuss.
It comes down to control vs. speed. Straight tapestry needles are a solid pick for everyday jobs like weaving in ends and standard seaming.
Bent-tip needles help most when stitches are tight or the fabric is more detailed, like lace. The curved tip makes it easier to slip under loops without splitting the yarn. A straight needle will handle most projects just fine, but a bent-tip needle can give you a bit more precision on finer work.
Match the needle eye to your yarn weight. The eye should be big enough for the yarn to slide through with a gentle tug, but not so big that it leaves you with a thick, misshapen seam. Before you start, thread the yarn and give it a quick test.
Here’s the simple rule:
It’s a small detail, but it can save you a lot of hassle once you begin stitching.
It comes down to what feels easier in your hand and what kind of project you're finishing.
Bent-tip needles can make stitch pickup simpler. They also help when you need to move between layers while weaving in ends or seaming. That little curve can give you a bit more control, especially on dense fabric or trickier seams.
Straight needles are the classic option. They're simple, familiar, and often easier for beginners to use right away. For basic finishing, a straight needle is more than enough.
A simple way to think about it: if you're doing more detailed seaming, a bent-tip needle may feel easier. If you're just handling standard finishing work, a straight needle works perfectly well.

Comments will be approved before showing up.










