
Garter Stitch Half Circle Shawl: Free Beginner Pattern

I’ll walk you through a garter stitch half-circle shawl, worked flat from a 9-stitch garter tab. Before casting on, knit and wash a swatch, then measure the center 4 inches once it’s dry. In garter stitch, 1 ridge equals 2 rows.
I’ll cover yarn and tools, the tab and markers, shaping and stitch checks, plus fixes for mistakes. To finish, you’ll work four plain rows, use a stretchy bind-off, and wash and block the shawl. My final step: <u>record the finished size, gauge, and yarn used</u> so you have notes for your next shawl.
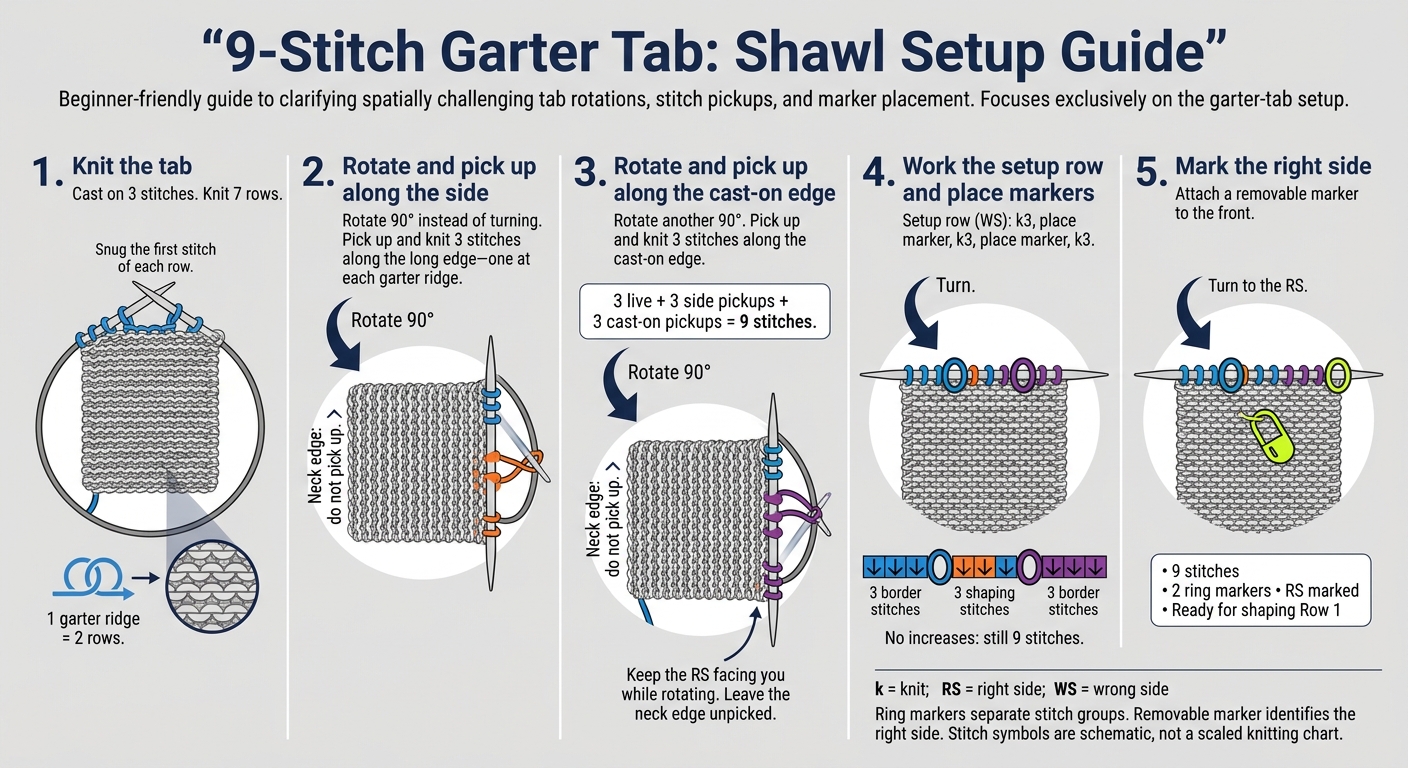
9-Stitch Garter Tab: Shawl Setup Guide
Easy Sewn Bind-Off Knitting Tutorial
2. Start the Garter Tab and Place Markers
k = knit; kfb = knit into the front and back of one stitch to increase 1; sm = slip marker; RS = right side; WS = wrong side.
Knit a 9-Stitch Garter Tab
Cast on 3 stitches and knit 7 rows. Snug the first stitch of each row to keep the edge tidy.
Now rotate the tab 90 degrees instead of turning it. Pick up and knit 3 stitches along the long edge, one at each garter ridge. Rotate another 90 degrees, then pick up and knit 3 stitches along the cast-on edge. You’ll have 9 stitches: 3 live + 3 side pickups + 3 cast-on pickups.
              3 live stitches
          ┌──────────────────┐
No pickup │                  │ ← Pick up 3 stitches
here:     │    Garter tab    │   along this long edge
neck edge └──────────────────┘
          Pick up 3 stitches
          along cast-on edge
Keep the RS facing you as you rotate to each edge. Leave the neck edge unpicked - it becomes the top edge and keeps the garter border continuous.
The tab is now ready for the setup row.
Knit the Setup Row and Mark the Right Side
Turn the work and knit the setup row (WS): k3, place marker, k3, place marker, k3. This row has no increases, so you still have 9 stitches: 3 border stitches, 3 shaping stitches, and 3 border stitches.
Turn to the RS and attach a removable marker to the front so you can spot the right side. You’re ready for shaping Row 1, with 9 stitches and both ring markers in place.
3. Knit the Half-Circle Shaping Rows
Start from the marked setup row and follow the shaping repeats below. Keep the first stitch of each row snug to give the edge a clean finish.
Read and Work Each Row
RS rows shape the shawl; WS rows are plain knit. On each WS row, knit across and slip all markers.
Follow this row-by-row guide:
Setup row (WS):
K3, PM, K3, PM, K3.
9 stitches total.

Row 1 (RS):
K3, YO, SM, [K1, YO] 3 times, SM, YO, K3.
15 stitches total.

Row 2 (WS):
Knit every stitch, slipping markers.
15 stitches total.

Row 3 (RS):
K3, YO, SM, K to the center stitch between the markers, YO, K1, YO, K to last 3, SM, YO, K3.
21 stitches total.

Row 4 (WS):
Knit every stitch, slipping markers.
21 stitches total.

Repeat Rows 3–4 for subsequent shaping repeats.
Each RS shaping row adds six stitches. To help track your progress over longer stretches, place a locking stitch marker every 10 garter ridges.
Check Stitch Counts After Each Repeat
| Repeat | Row numbers | Total stitches |
|---|---|---|
| Setup | - | 9 |
| 1 | Rows 1–2 | 15 |
| 2 | Rows 3–4 | 21 |
| 3 | Rows 5–6 | 27 |
| 4 | Rows 7–8 | 33 |
| 5 | Rows 9–10 | 39 |
Choose a Stopping Point and Knit the Final Rows
Once the shawl reaches your desired depth, stop after a WS row. Knit four more rows without increases, slipping all markers. Set aside enough yarn for these four plain rows and a stretchy bind-off.
For the bind-off, use a stretchy option such as Jeny’s Surprisingly Stretchy Bind-Off or a Picot Bind-Off.
4. Fix Mistakes and Finish the Shawl
Fix Stitch Counts and Marker Placement
Check each repeat with the ring markers as you work. If a marker slips, count the stitches in that section and move it back to the right spot.
If the stitch count is off, rip back to the last correct wrong-side (WS) row before the mistake. Place the stitches back on the needle, checking that each one faces the right way. After completing a repeat or section correctly, you can thread a lifeline through the live stitches. This gives you a safe place to return to if you need to rip back later.
Once the counts are right, move on to the stretchy bind-off.
Work a Stretchy Bind-Off
Use a stretchy bind-off so the edge has room to open up during blocking.
Wash and Block the Shawl
After binding off, wash the shawl according to the yarn label. Use blocking wires and pins to shape its half-circle curve, then let it dry flat.
5. Conclusion: Record Your Shawl's Measurements
Once your shawl is blocked, record its final size. Measure the wingspan from tip to tip along the top edge, then measure the center depth from the middle of that edge to the bottom curve.
Note your blocked gauge, 9-stitch tab, marker placements, increase rows, and total repeats completed. Add the yarn brand and amount used, needle size in both US sizes and millimeters, and bind-off method. Keep these details with the pattern so you can recreate or resize the shawl next time.
FAQs
What yarn and needle size should I use?
Use the yarn weight and needle size your pattern calls for. For example, the Sawtooth Shawl uses fingering-weight yarn and US 4 (3.5 mm) needles. Other patterns may call for US 8 (5 mm) needles with certain wool and alpaca blends.
Before you start, consider knitting a swatch to see how your yarn looks and feels. You can find yarns and knitting needles at Alpaca Direct.
How much yarn will I need?
A simple garter stitch shawl may use about 450 yards, while a more complex lace shawl may need 600–800 yards. Your pattern, knitting tension, and stitch choices all affect how much yarn you’ll need.
Knit and block a swatch to estimate yarn use. Plan for more yarn if you’re adding repeats, making a deeper border, or working at a looser gauge. Before starting the border, check that you have enough yarn for the final rows and the bind-off.
Why does Row 3 add only four stitches instead of six?
Row 3 adds four stitches, not six, to give the shawl its intended shape and proportions. Work the increases exactly as written.
If your stitch count doesn’t match the pattern, check the chart or written instructions for missed yarn overs or extra stitches. Only adjust your stitch count if the pattern tells you to.