
Socks on 9-Inch Circular Knitting Needles

I use 9-inch circular needles for sock cuffs and legs when the stitches fit comfortably. That’s 9 inches from tip to tip - not just the cable. My first steps are to check gauge, make a stretchy cast-on, and join without twisting.
From there, I focus on:
- Even ribbing and tension: Keep a light grip and mark the start of each round.
- Length and fit: Measure as you knit. About 10% negative ease is a common starting point, but follow your pattern.
- Try-ons and fixes: <u>Move stitches to a longer circular needle or waste yarn before trying on.</u> Fix ribbing errors or tightness before continuing.
- Heel setup: Check the stitch groups and switch needles only if the heel needs it.
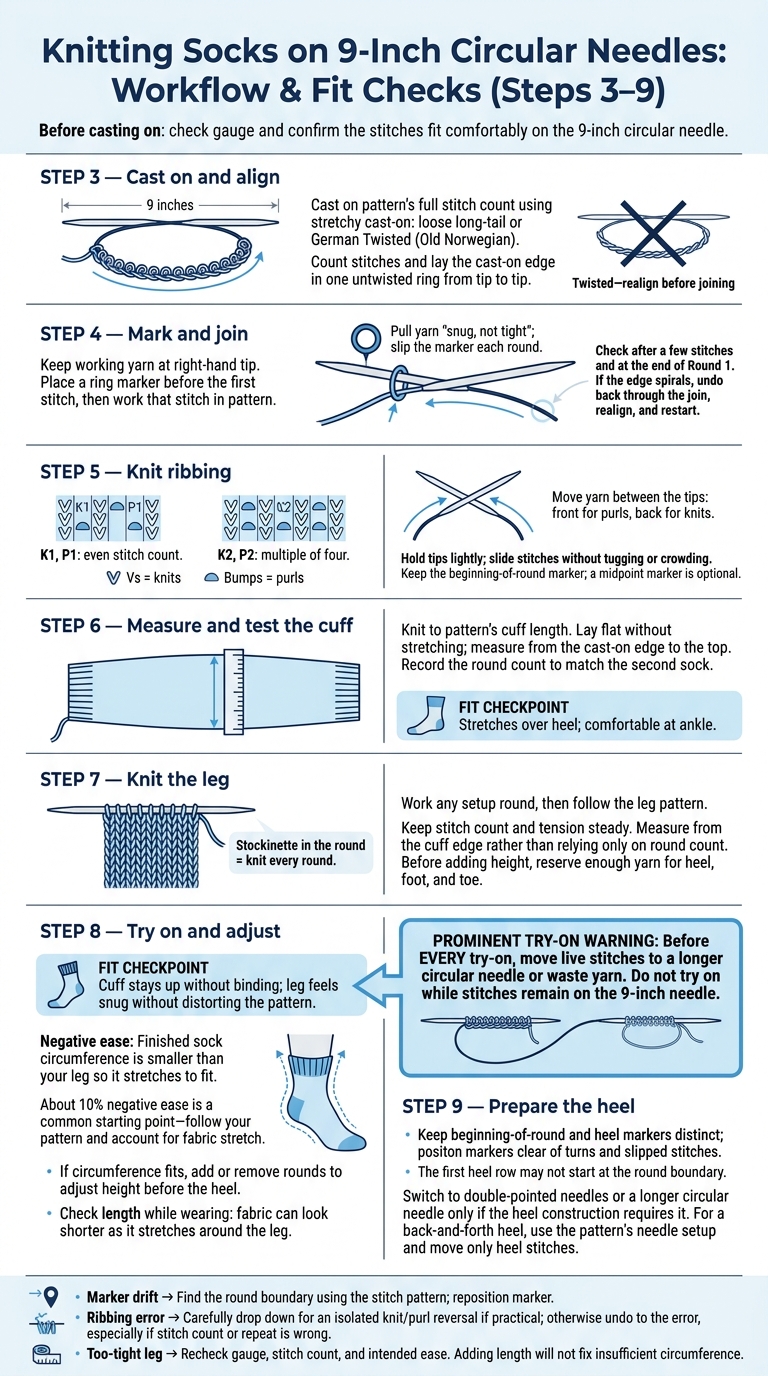
9-Inch Circular Needle Socks: Cast-On to Heel Setup
Cast On and Join Without Twisting
Step 3: Cast On and Align the Stitches
Cast on the full stitch count using a stretchy cast-on, such as a loose long-tail or German Twisted (Old Norwegian) cast-on. Alpaca Direct demonstrates the latter in its YouTube tutorial.
Lay the stitches flat, checking that the cast-on edge forms one untwisted ring from tip to tip. Count your stitches before joining. Once the ring lies flat, you're ready to join in the round.
Step 4: Mark the Round and Join
Keep the working yarn at the right-hand tip. Place a ring marker before the first stitch, then work that stitch in pattern. Pull the yarn snug, not tight, and slip the marker each time you reach it.
Check the edge after a few stitches and again at the end of Round 1. If it spirals, undo your work back through the join, realign the stitches, and start again. Once Round 1 stays even and untwisted, move into the cuff ribbing.
Knit the Ribbed Cuff
Step 5: Work Ribbing and Use Markers
Once you’ve joined the round, work the pattern’s ribbing: K1, P1 on an even stitch count or K2, P2 on a multiple of four. Read the stitches as you go: Vs are knits, and bumps are purls. Bring the yarn between the needle tips to the front for purls and to the back for knits.
Hold the short tips lightly, and slide stitches along the cable without tugging the yarn or crowding the tips. Slip the beginning-of-round marker every round. If it helps you track repeats, add a midpoint marker to track stitch repeats.
Step 6: Measure the Cuff and Test Its Stretch
When the cuff reaches the pattern’s length, lay it flat without stretching it. Measure from the cast-on edge to the top, and record your round count so you can match the second sock.
Move the live stitches to a longer circular needle or waste yarn before trying on the cuff. Don’t try it on while it’s still on the 9-inch needle. It should stretch over your heel and sit comfortably at your ankle.
If the cuff fits, continue into the leg, keeping the same tension and marker setup.
Knit the Leg and Check Fit
Step 7: Knit the Leg to the Pattern’s Length
Once the cuff fits, switch to the leg pattern, working any setup round first. For stockinette in the round, knit every round. For texture or colorwork, follow the instructions or chart and keep the stitch count steady. Aim for even stitches as the leg grows.
Measure from the cuff edge rather than relying only on your round count. Changes in tension affect length. Before adding extra height, make sure you have enough yarn left for the heel, foot, and toe.
Step 8: Try On the Leg and Adjust the Fit
Move the live stitches onto a longer circular needle or waste yarn, then try on the sock. The cuff should stay up without binding. The leg should feel snug without stretching the pattern out of shape.
Negative ease means the finished sock is smaller than your leg, so it stretches to fit. About 10% negative ease is a common starting point, but follow your pattern’s sizing, adjust for wide or narrow feet, and account for the fabric’s stretch.
If the circumference fits, add or remove rounds to adjust the height before starting the heel. Check the length while wearing the sock, too. It can look shorter on your leg because the fabric stretches around it.
Once the leg length and fit are right, confirm the heel stitch count before moving on.
Fix Common Cuff and Leg Problems
| Problem | What to do |
|---|---|
| Marker drifted out of place during the leg | Use the stitch pattern to find the round boundary, then move the marker back into place. |
| Ribbing error | If practical, carefully drop down to fix an isolated knit/purl reversal. Otherwise, undo your work back to the error, especially if the stitch count or repeat is wrong. |
| Too-tight leg | Recheck your gauge, stitch count, and intended ease. Adding length won't fix a circumference that's too small. |
Get Ready to Knit the Heel
Step 9: Check the Heel Stitch Setup
Once the leg reaches the right length, move from checking fit to placing the heel. Read the heel section before moving any stitches. Identify the heel construction, then separate the heel and instep stitches as directed. Recount after transferring the heel stitches, keeping track of stitch groups rather than needle position.
Keep the beginning-of-round marker separate from the heel markers. Place them where they won’t interfere with turns or slipped stitches. The first heel row may start somewhere other than the round boundary. Once the markers are in place, follow the pattern’s heel setup.
If the heel is worked back and forth, use the needle setup the pattern calls for and move only the heel stitches.
Conclusion: Review Your Cuff and Leg
Check the fit one last time before starting the heel. Switch to double-pointed needles or a longer circular needle only if the heel construction requires it. Once you’ve checked the setup, begin the heel exactly as written in the pattern.
Changing Sock Patterns To Fit Your Foot + Free Giveaway
FAQs
How do I calculate my sock’s cast-on stitch count?
Wrap a flexible tape measure around the widest part of your foot, usually the ball. Subtract 10% from that measurement for negative ease, which gives the sock a snug fit.
Knit a gauge swatch with your yarn and needles to find your stitches per inch. Then multiply that number by your reduced foot circumference in inches to calculate your cast-on stitch count. Adjust the count as needed for a tighter or looser fit.
What if my stitches won’t fit around a 9-inch needle?
If your stitches feel cramped on a 9-inch circular needle, try double-pointed needles (DPNs) or the Magic Loop method.
Magic Loop uses a 32- to 40-inch circular needle. You split the stitches into two sections, with cable loops on either side. With DPNs, you spread your stitches across three or four needles for more control.
How can I prevent hand cramps with short needle tips?
Take short, regular breaks when using 9-inch circular needles. Their tiny tips can leave your hands feeling cramped during long knitting sessions.
If your hands get tired, try switching to double-pointed needles or the Magic Loop technique. A different setup can change how you hold your work and may feel more comfortable.
Alpaca Direct offers needles and tools to help you find a setup that suits your hands.