Your Cart is Empty



If your DPN setup twists before round 1, the whole project starts wrong. I keep the process simple: cast on, split the stitches across 3 or 4 holding needles, check that the edge lies flat, then knit the first stitch and pull the next 2 stitches snug to limit gaps.
In plain terms, here’s what matters most:
Most small-circumference projects - like socks, mittens, sleeves, and hat crowns - use DPNs because a circular needle can get too large once stitch counts drop. In this guide, I walk through the setup, the join, the extra-stitch join option, and the first-round fixes that help with gaps, twists, and loose columns between needles.
| Step | What I do | Why it matters |
|---|---|---|
| 1 | Cast on | Starts the edge cleanly |
| 2 | Split stitches | Keeps the load even across needles |
| 3 | Check for twists | Stops a bad join before it starts |
| 4 | Knit round 1 with even tension | Helps limit ladders and gaps |
The short version: if I set up the needles well and keep the first round snug - but not tight - the rest of the tube is much easier to knit.
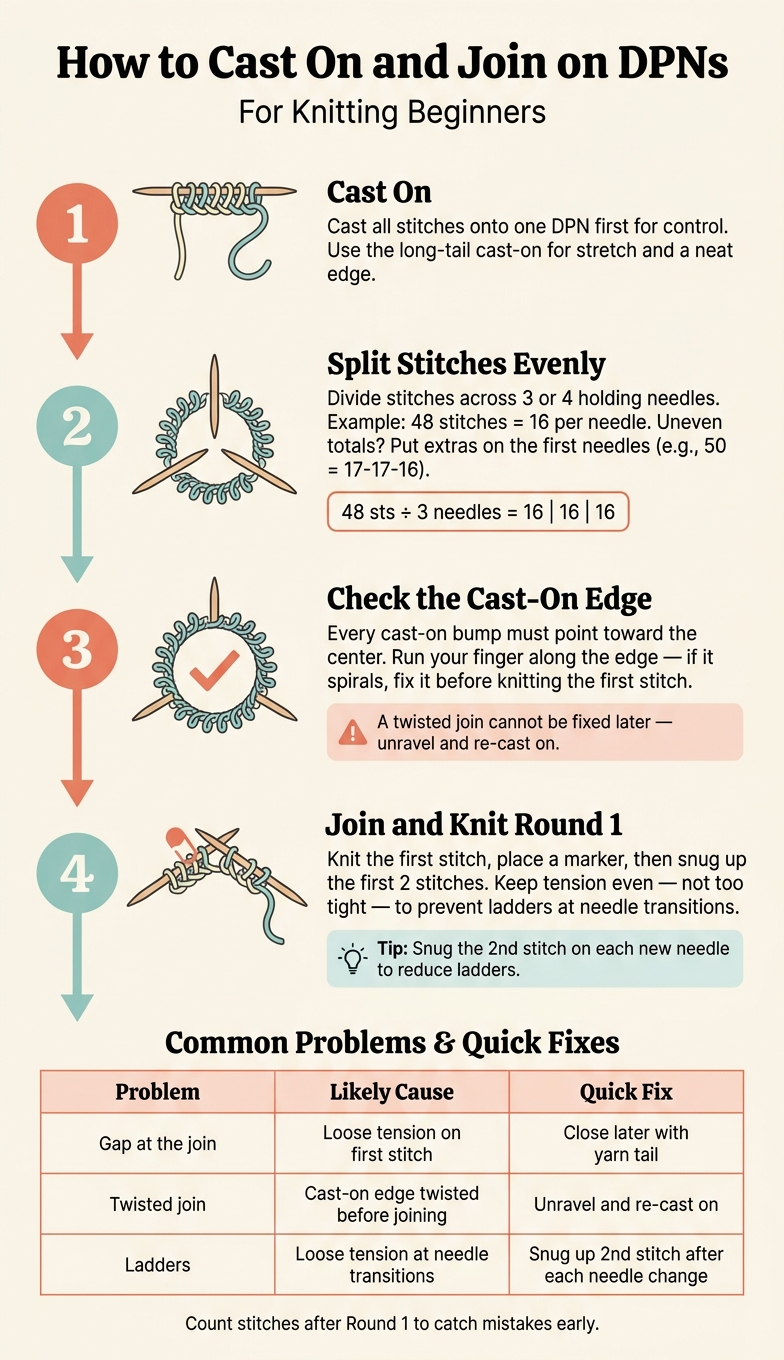
How to Cast On and Join on DPNs: 4-Step Setup Guide
Use the U.S. needle size listed in your pattern. Needle size affects gauge, and gauge affects fit. If the size is off, the finished tube can end up too tight or too loose.
Pick a smooth, light-colored yarn in the recommended weight. Light yarn makes it much easier to see each stitch and catch a twist along the cast-on edge before it turns into a headache. Dark or fuzzy yarn can hide stitch direction, which makes setup harder than it needs to be.
It also helps to keep a few small tools nearby:
If you'd like to see the setup in action, check out Alpaca Direct's YouTube tutorials.
The long-tail cast-on is a good starting point for most beginners. It has some stretch, leaves a neat edge, and gets faster once your hands settle into the motion. That stretch matters on small-circumference projects. On something like a sock cuff, a firm cast-on edge can tug at the join and throw off the shape.
You can get stitches onto your DPNs in two main ways. The easier option is to cast all the stitches onto one needle first, then move them onto the other needles after that. This keeps the process simple: one motion first, then setup. It also makes counting less messy.
Casting straight onto multiple DPNs can work just fine, but it asks for more control. If you're still getting used to DPNs, the single-needle method is usually the smoother path.
After the stitches are on, split them evenly across your needles.
Before you cast on even one stitch, decide how you'll divide the total number. Most knitters use 3 or 4 holding needles plus 1 working needle. With 3 holding needles, divide by 3. So 48 stitches becomes 16 stitches per needle. If the number doesn't divide evenly, put the extra stitches on the first needles. For example, 50 stitches across 3 needles becomes 17-17-16.
| Setup | Holding Needles | Working Needle | Best For |
|---|---|---|---|
| 3-needle setup | 3 holding needles + 1 working needle | 4th needle | Beginners, fewer joins to manage |
| 4-needle setup | 4 holding needles + 1 working needle | 5th needle | Finer-gauge projects, less risk of laddering |
Once you've planned the stitch split, you're ready to cast on and place the needles for joining.
Cast your full stitch count onto one DPN first. Then slide the stitches toward the middle of the needle so they won’t fall off either end while you move them around.
Next, take a second DPN and slip stitches purlwise - as if to purl - so they stay mounted the right way. Keep going until the stitches are divided based on the split you planned.
This approach gives you the most control as you spread the stitches out. Once the stitches are split evenly, arrange the needles and get ready to join.
You can also cast on straight across several DPNs, moving from one needle to the next in sequence. As you switch needles, keep the yarn snug so the gaps don’t get loose.
This method works well if you want to cast directly onto the full set from the start.
Set the needles in a triangle if you’re using 3 holding needles, or a square if you’re using 4. Then flatten the work, check that the cast-on edge isn’t twisted, and place the working yarn at the right-hand edge so the first join starts cleanly.
Now the needles are ready for a clean join in the round.
Once you've split the stitches and set up the needles, pause before you knit. Check the cast-on edge first.
Look at the base of the stitches. Each cast-on bump should point the same way, toward the center of the needle setup. Then run your finger along the edge and make sure it sits flat in a circle. If the edge starts to spiral, the join is twisted, and you need to fix it before that first stitch.
Join in four steps:
If you want a cleaner start on hats, sleeves, or cowls, try the extra-stitch join.
Cast on one extra stitch. Slip the first stitch to the right needle, pass the extra stitch over it, return the remaining stitch to the left needle, and knit. This locks the join and helps hide it in the fabric. Give the working yarn and tail a light tug to take out any slack.
After the join is set, keep the first round snug and even.
Once the join is set, the first round tells you a lot. It sets the tension for the whole tube, and it often decides whether the fabric looks smooth or starts showing trouble right away.
One of the most common issues is ladders. These are loose vertical columns that show up where you switch from one needle to the next.
A couple of small moves can help:
If ladders keep showing up in the same spot, shift the transition point by a few stitches every few rounds. That helps break up the line before it settles into the fabric.
Check for these issues as soon as you finish round 1.
| Problem | Likely Cause | Quick Fix |
|---|---|---|
| Gap at the join | Loose tension on the first stitch | A small gap is normal; close it later with the tail |
| Twisted join | Cast-on edge twisted before joining | Unravel and re-cast on |
| Ladders | Loose tension at needle transitions | Snug up the second stitch after each needle change |
Keep the yarn snug, but not tight. Pull too hard and the fabric can distort.
Also, count your stitches after round 1. It's a simple check, and it can save you from finding a mistake much later.
The whole process comes down to four things:
Watch the technique on the Alpaca Direct YouTube channel.
Spread the stitches evenly across your needles and lay the work flat. Then check the cast-on edge. It should form one continuous line facing the same direction, usually toward the inside of the circle.
If the edge spirals or flips around the needle, your stitches are twisted. Straighten them before you knit the first round.
Yes. Using 3 or 4 double-pointed needles (DPNs) is a standard way to knit small-circumference projects like socks, mittens, and hat crowns.
Just divide your stitches as evenly as you can across three or four needles. Some knitters like the control that DPNs give them. Others prefer circular needles with Magic Loop, since it cuts down on juggling extra needles and can help with laddering.
Ladders are loose vertical columns that can appear where you switch from one needle to the next. To help stop them, pull the second stitch after each needle change a bit tighter than usual.
It also helps to move your division points now and then so the tension gets spread out more evenly. If ladders still keep showing up, methods like Magic Loop or flexible DPNs such as FlexiFlips can help cut down on those gaps.

Comments will be approved before showing up.










