Your Cart is Empty



You can knit this blanket with one simple repeat: 8 stitches across and 8 rows tall, plus a 6-stitch garter border on each side. I’d use worsted yarn, US 8–10 needles, and check gauge at 16 stitches and 22 rows = 4 inches in pattern before I cast on.
If I wanted the short version, here it is:
This pattern is built around a woven-look texture made from knit and purl blocks. That means no cables, no hard charts, and no extra tools beyond basic knitting supplies. The key thing I’d watch is consistency: purl stitches often come out tighter, so checking the fabric every 2–3 inches helps keep the blocks even.
A few details matter before starting:
If I wanted to change the size, I’d keep the same border and add or remove only full repeat sections. That keeps the pattern lined up and the blanket shape clean.
So if you want a blanket that looks textured but uses basic stitches, this pattern gives you the full setup: yarn, gauge, cast-on counts, repeat structure, sizing, border notes, and finishing steps.
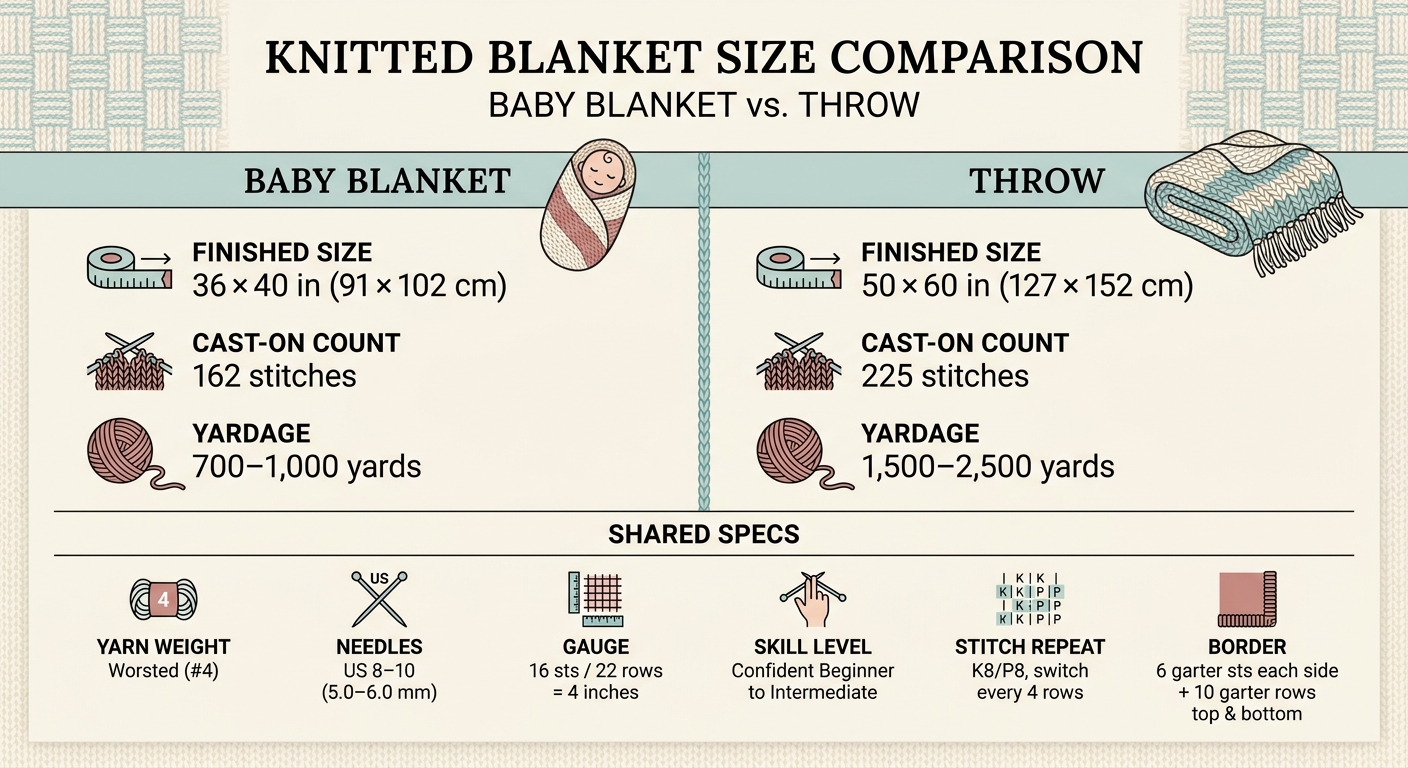
Basketweave Blanket Pattern: Baby vs Throw Size at a Glance
This pattern uses worsted weight (#4 medium) yarn. It gives the basketweave enough body while still letting the blanket hang nicely. For yarn amounts, plan on about 700–1,000 yards for a baby blanket and 1,500–2,500 yards for a throw, depending on your gauge and the final size.
For needles, go with US 8 to US 10 (5.0 mm to 6.0 mm) straight or circular needles. Circular needles are often the easier option here because they can hold a large number of stitches more comfortably, even if you're knitting flat. You’ll also want a few basics on hand:
Alpaca Direct carries alpaca and alpaca-blend worsted yarns, needles, and notions for blanket projects.
Once you’ve picked your yarn and needles, check your gauge in the actual basketweave stitch. That part matters. A plain stockinette swatch won’t tell you how this fabric will behave.
Gauge: 16 stitches and 22 rows = 4 inches (10 cm) in basketweave.
A looser gauge gives you more drape. A tighter gauge makes the fabric firmer. Measure your swatch after a light block, since basketweave can relax and spread a bit after washing.
| Size | Finished Dimensions | Approx. Yardage |
|---|---|---|
| Baby blanket | 36 × 40 in (91 × 102 cm) | 700–1,000 yards |
| Throw | 50 × 60 in (127 × 152 cm) | 1,500–2,500 yards |
The written pattern below uses the 50 × 60 in throw. If you want to go bigger, add only full repeat units.
Use the cast-on count that matches your size before you start the stitch pattern.
Keep cast-on counts in full repeat units so the basketweave stays balanced. Cast on 162 stitches for the baby blanket and 225 stitches for the throw.
| Size | Cast-On Count |
|---|---|
| Baby blanket | 162 stitches |
| Throw (main pattern) | 225 stitches |
If you make a larger size, add full repeat units only.
Once your cast-on count is set, the pattern falls into a simple 4-stitch block repeat. Work the center section in 8-stitch units: 4 knit, 4 purl. Then switch the block placement every 4 rows to make that woven look appear.
On the right side, knit blocks look smooth, while purl blocks look textured. That makes the repeat easier to spot at a glance. After a few rounds of the pattern, you’ll start to read the fabric naturally and know when it’s time to switch, without counting every single row.
The next step is setting up the garter border so the center texture stays framed and flat.
Use a 6-stitch garter border on each side, plus full garter rows at the top and bottom, to help the blanket lie flat and give the texture a clear frame. For a clean border line, place stitch markers at each border edge. Those markers make the shift between border and center section much easier to follow.
With the border in place, follow the row-by-row instructions below.
Now that the border and size are set, you can work the blanket body with the repeat below.
For the main throw size, cast on 225 stitches. That gives you a 6-stitch garter border on each side, with a center panel worked in 8-stitch knit and purl blocks. Place a stitch marker after the first 6 stitches and before the last 6 stitches.
Work 10 rows of garter stitch across all stitches for the bottom border.
After the bottom border, start the center basketweave repeat. Keep the 6 stitches at each edge in garter stitch the whole time, which means knitting those border stitches on every row.
Work the center section like this:
Rows 1–4 (Right Side starts on Row 1):
Rows 5–8:
Rows 1–8 make one full basketweave repeat. After each repeat, the knit and purl blocks switch places, which creates that woven look. Keep going until the blanket measures 60 inches from the cast-on edge, and finish after a full basketweave block.
Once the blanket reaches the target length, switch back to garter-stitch border rows. Work 10 rows of garter stitch across all stitches so the top matches the bottom.
If the top edge flares, decrease evenly on the last row before bind-off. Then bind off loosely so the edge stays stretchy. Weave in all ends securely. If your yarn responds well to blocking, lay the blanket flat, shape it to size, and let it dry.
Once the repeat is set, the big job is keeping the tiles even. Purl stitches often tighten more than knit stitches, so it helps to loosen them a bit to keep the blocks the same shape.
Every 2–3 inches, lay the blanket flat and check the knit and purl tiles. They should look close in both height and width. If you notice tight bands or wavy columns, tweak your tension over the next few rows instead of waiting until the end.
Markers between repeats can help you catch drift early. It also helps to count stitches at the end of each row so mistakes don't pile up.
Use a row counter or a simple tally to track the repeat. And read the fabric as you go: knit-looking stitches stay knit, and purl-looking stitches stay purl.
To resize the blanket, keep the same border and change only the repeat count.
For width, follow one rule: cast on full multiples of the stitch repeat, then add the border stitches. To estimate the stitch count you need, multiply your gauge by your target width in inches. Then round to the nearest number that fits the repeat-plus-border setup. For example, at 4 stitches per inch, a 40-inch-wide throw needs about 160 stitches. If your pattern uses an 8-stitch repeat with 8 border stitches, 160 stitches is a good fit.
For length, add or remove full repeats. Stop a few inches before your target length so you still have room for the top border. Use the row repeat to change the length in full block units.
Before you cast on, go through this short checklist:
Match your stitch count to the repeat-plus-border formula before you cast on. With that sorted, you can start with the repeat lined up correctly.
Your cast-on count works when the total number of stitches divides evenly by the stitch repeat. For example, with a 4-stitch repeat, 64 stitches works because 64 ÷ 4 = 16.
If the number doesn’t divide evenly, you’ll end up with extra stitches, and that can throw off the texture. When that happens, add or remove stitches from your cast-on until you reach a number that fits the repeat.
Keep your tension even by moving the yarn between your needle tips when you switch stitches, not over the needles. Pulling it over the top can tighten things up too much or leave you with extra loops.
It also helps to knit at a relaxed, steady pace. If your gauge still looks uneven, wooden needles can make things easier because they add a bit of grip and help your stitches form more evenly.
Yes. Circular needles work well for knitting a blanket flat.
The cable helps spread the weight of the fabric across the needle, which can make a big difference with a large or heavy blanket. You just knit back and forth across the needle tips and turn your work at the end of each row, the same way you would with straight needles.

Comments will be approved before showing up.










