Your Cart is Empty



If you want a soft lace shawl with drape, this pattern gives you the key numbers up front: fingering-weight alpaca or alpaca-silk yarn, 400–450 yards, US 4 (3.5 mm) needles, a blocked gauge of 22 stitches × 32 rows = 4 inches, and a finished size of about 18 x 60 inches. I’d treat this as a rectangular lace shawl for knitters who already know yo, k2tog, SSK, and simple repeat counting.
Before I cast on, I’d focus on four things: blocked gauge, a 6-stitch lace repeat plus edge stitches, 3-stitch garter borders, and wet blocking at the end. That matters because alpaca is warm and drapey, but it can stretch more than wool and has less bounce.
In short: I’d use this pattern when I want a clean lace rectangle with soft drape, clear edge framing, and simple repeat math that makes sizing easy.
Use a fingering-weight alpaca or alpaca-silk blend yarn, about 400–450 yards, with US size 4 (3.5 mm) needles. You’ll also need stitch markers, a tapestry needle, and blocking pins.
An alpaca-silk blend gives the shawl more drape and helps it keep its shape after blocking. Once you have your tools ready, use your blocked gauge swatch to line up with the shawl’s final size.
Check gauge after blocking so you can confirm both the fabric’s drape and the final dimensions before you cast on.
Gauge: 22 stitches × 32 rows = 4 inches in lace pattern.
Finished size: about 18 inches wide × 60 inches long.
Abbreviations: k (knit), p (purl), yo (yarn over), k2tog (knit 2 together), ssk (slip, slip, knit), sl (slip), pm (place marker), rep (repeat).
Once your gauge is set, work the stitch sequence below to build the trellis fabric evenly.
The trellis pattern uses a 6-stitch repeat plus 3 edge stitches. Cast on a multiple of 6 stitches, plus 3. For example, 75 stitches gives you a standard width.
Row 1 (RS): K1, *yo, ssk, k1, k2tog, yo, k1; rep from * to last 2 sts, k2.
Row 2 (WS): K1, purl to last st, k1.
Row 3: K1, *k1, yo, sl1-k2tog-psso, yo, k2; rep from * to last 2 sts, k2.
Row 4: K1, purl to last st, k1.
Repeat Rows 1–4 for the trellis pattern. If you want extra width, add more 6-stitch repeats at cast-on. If you want more length, work more 4-row repeats. With the repeat in place, you’re ready to begin the cast-on and setup rows.
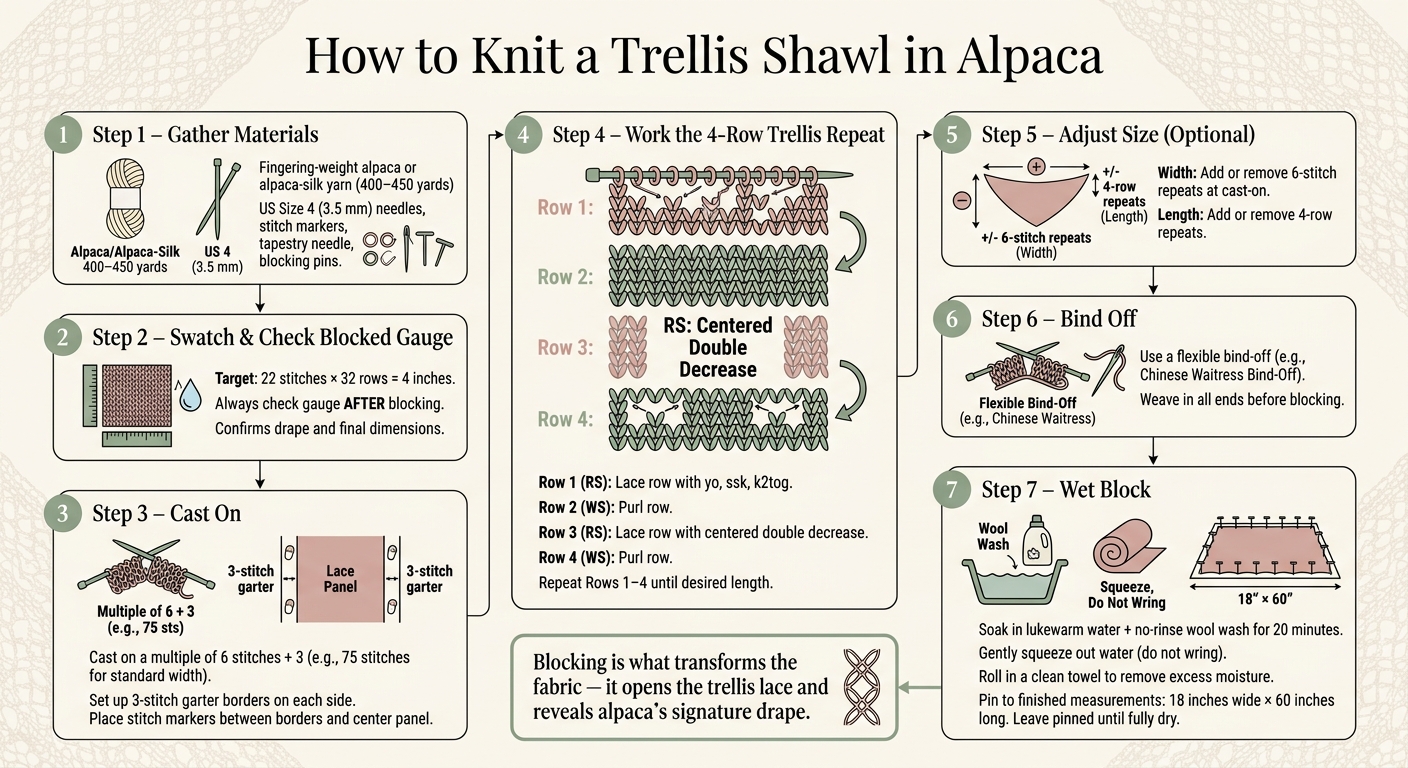
How to Knit a Trellis Shawl in Alpaca: Step-by-Step Visual Guide
Cast on the full stitch count, then work a 3-stitch garter border on each side. This frames the lace and helps the shawl lie flat. Place markers where each garter border meets the center panel.
With the borders set, start the 4-row trellis repeat in the center panel.
Work Rows 1–4 of the trellis repeat across the center panel. Keep the 3-stitch garter borders in place on both edges, and move markers as needed.
Keep repeating those 4 rows until the shawl reaches your target length. Once the body is long enough, move on to blocking so the lace can open up.
You can change the size with the same repeat structure and leave the border as is.
As the shawl gets bigger, the trellis will only stay crisp if you work each repeat the same way every time. Keep your yarn overs loose and even so the lace can open up cleanly after blocking. Paired decreases like k2tog and SSK help keep the trellis lines balanced and clearly defined.
It also helps to check each repeat as you go. Alpaca can hide mistakes, and if you miss one, frogging can be a headache.
Every few inches, lay the shawl flat and make sure the lattice stays even and untwisted across the center panel. If it looks even on the needles, you're in good shape. The final shape will sharpen during blocking.
If any stitch in the repeat feels a little shaky, Alpaca Direct's YouTube channel has quick refreshers for the key lace moves used here: yarn overs, k2tog, and SSK.
After the final repeat, finish with a flexible bind-off, then block the shawl to open the trellis.
Blocking is the step that makes the lace look like lace. Right off the needles, the fabric usually looks bunched up and a bit scrunched. Once blocked, the trellis opens into a clear lattice, and alpaca starts to show the soft drape it's known for.
Fill a basin with lukewarm water and a small amount of no-rinse wool wash. Soak the shawl for about 20 minutes. Then gently squeeze out the water - don't twist or wring it. Roll the shawl in a clean towel to remove extra moisture, and lay it flat on a blocking mat or towel.
Pin or wire the shawl to the finished measurements. Alpaca stretches easily, so pin to size without pulling the lace thinner than intended. Leave it pinned until fully dry.
Use a flexible bind-off, such as the Chinese Waitress Bind-Off, so the lace edge and garter borders open cleanly and lie flat.
Weave in your ends securely before soaking.
These last steps help the shawl keep its shape and let the lace show clearly.
It can be beginner-friendly if you’re comfortable with basic knitting skills. If the trellis pattern uses standard moves like knit two together, slip slip knit, or make one increases, it stays pretty approachable.
For the best result, swatch first. Then check that your stitch count lines up with the pattern repeat, and block the finished shawl so it looks neat and polished.
After blocking, alpaca can stretch quite a bit - about 10–15% in width or length during wet blocking. So when a pattern gives finished measurements, it’s smart to pin the piece to that size, not pull it beyond it.
If you want less risk of stretching the fabric out for good, steam blocking is usually the safer choice than full wet blocking. Alpaca also has very little memory, which means fabric that gets overstretched may not bounce back.
Start with a swatch so you can see how the alpaca yarn behaves. It can grow by 10 to 15 percent when wet, which can throw off your final size if you skip this step. Before blocking, check the pattern schematic for the intended finished dimensions.
Lay the shawl on blocking mats and use a measuring tape to match those measurements. Pin gently from the center outward, and use the tape to confirm the size instead of pulling or stretching the fabric.

Comments will be approved before showing up.










