Your Cart is Empty



Most cable needle problems come from just 4 things: stitches slipping off, uneven tension, gaps near the cross, and crossing stitches the wrong way.
If I want to fix cable knitting fast, I start here:
That covers the main trouble spots in this article. It also explains C4F and C4B, how to spot left- and right-leaning crosses, and how to repair small gaps with a crochet hook or blunt needle.
One useful size tip: a cable needle that is much larger than your working needle can stretch loops and make slipping more likely. In many cases, going the same size - or 1 size smaller - works better.
| Problem | Usual cause | Fast fix |
|---|---|---|
| Stitches slip off | Slick tool, wrong size, rushed transfer | Use bamboo/wood, slow down, center stitches |
| Cable looks uneven | Tension changes at the cross | Keep the first stitch relaxed, smooth slack |
| Gaps next to cable | Loose edge stitches by purl sections | Snug the yarn before the first purl |
| Cable leans the wrong way | Front/back mix-up | Remember: front = left, back = right |
If you’re dealing with messy cables, dropped stitches, or a cross that looks off, this guide gives you the short path to fix it.
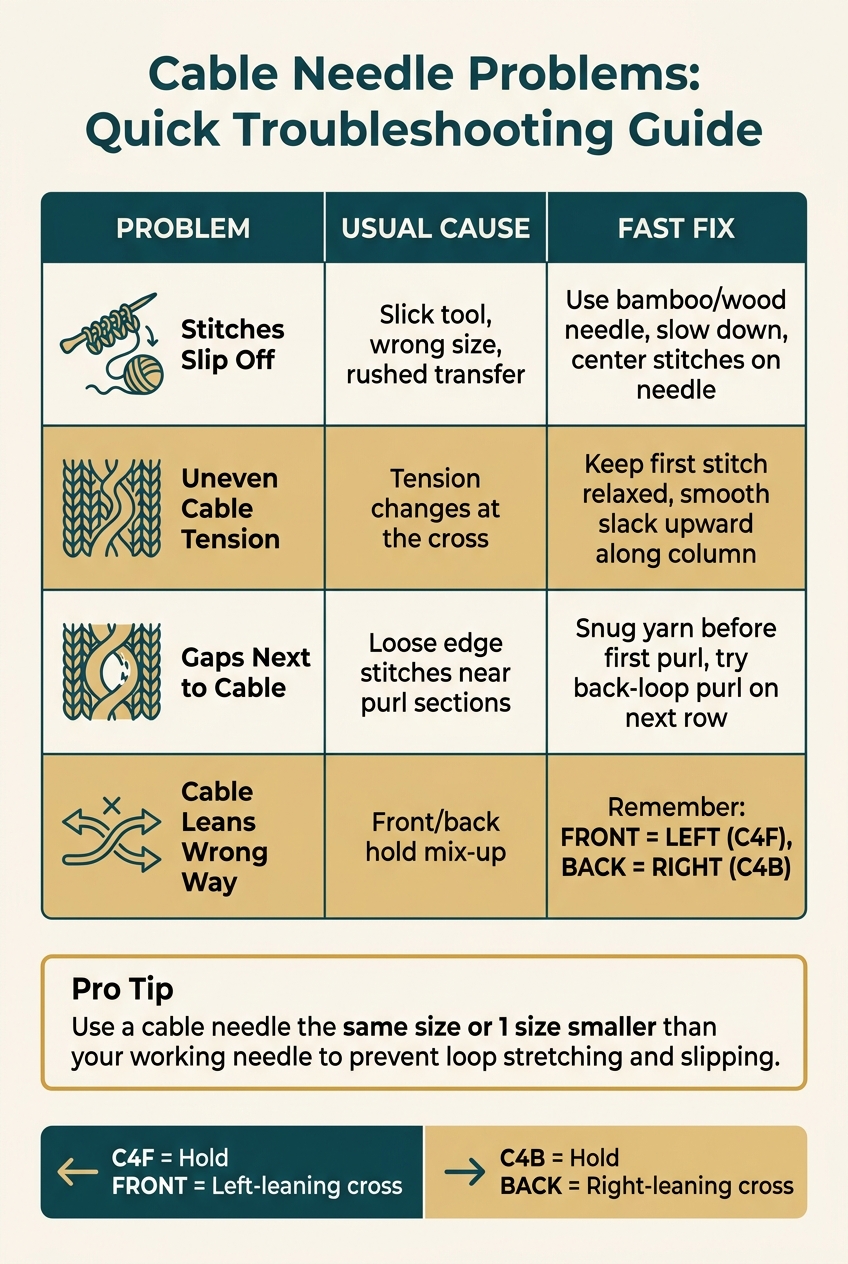
Cable Knitting Problems: Quick Troubleshooting Guide
Dropped stitches during a cable cross usually happen for three simple reasons: the cable needle is too slick, it’s too big for the stitches, or the transfer is rushed. Start by looking at the tool. If stitches still slide off, slow the motion down and handle the transfer more carefully.
Material, shape, and size all play a part in whether stitches stay put.
Wooden or bamboo cable needles tend to hold stitches better because the surface has more grip. That helps a lot with slippery yarns like silk blends or superwash wool. A bent or U-shaped cable needle can also help, since the stitches rest in the curve instead of sitting on a straight shaft. And if the needle has grooves or notches, that extra texture can make a big difference with silky fibers.
For size, use a cable needle that matches your main needle size or goes one size smaller. If the cable needle is much larger than your working needles, it stretches the loops and makes them more likely to slip off.
A lot of dropped stitches come down to speed. When the cable cross feels routine, it’s easy to rush and lose one.
Slip the stitches purlwise. Make sure each loop is fully on the needle. Then slide the stitches toward the middle of the needle before you let go. It’s a small move, but it gives you more control.
Also, check your yarn position before moving the cable needle. If the yarn sits in the wrong place, it can wrap around the work and create false stitches. To keep the cable needle steady while it holds the stitches, brace it lightly against your palm or one finger.
Sometimes the fix isn’t technique. It’s the tool.
If a cable needle still lets stitches slide, switch to something else:
A crochet hook can work especially well with slippery yarn because the hook end helps keep stitches from falling off.
Once the stitches stay on the needle, the next issue is cable tension and gaps.
Once your stitches stay put on the cable needle, the next thing to look at is the finished cable itself. In most cases, two issues show up again and again: the cable looks uneven, or small gaps and holes appear right next to the cross.
Uneven cable tension can make crosses look pinched, flat, or wavy. Most of the time, that starts with a shift in tension right at the cross.
On cable rows, slow down a bit and keep your hands loose. After you slip the stitches back from the cable needle, work the first stitch of the cross without yanking the yarn tight. Then give the cable column a light upward tug to help even out the stitch tension. If the cable area still pulls in more than the fabric around it, try using a slightly larger needle for the cable section or relax your tension on cable rows.
If the cables already look uneven, you may not need to rip anything out. A blunt tapestry needle can often smooth things out. Slip it between the stitches and gently move small bits of slack from looser spots toward tighter ones, working along the cable column. This tends to work best within a few rows of the cable cross, while the fabric still has some give.
If the cross itself looks fine but the fabric beside it opens up, check the stitches at the edge of the panel.
Long vertical spaces usually mean the edge stitches are loose where the cable meets the background fabric. When you move from the cable panel to a purl background, pull the yarn forward with purpose before working that first purl. That small step can make a big difference. You can also try working the purl stitch next to the cable through the back loop on the following row to help tighten the area.
If the pattern gives you room to do it, a buffer stitch can help too. One extra knit column between the cable and the purl background can soak up tension shifts and make small gaps less noticeable.
For small gaps, deal with the slack before you start tearing back rows. Insert a crochet hook through the loose stitch from the right side, pull the slack snug, and work any extra yarn into nearby stitches. If you can see a loose strand but your stitch count is still correct, knit that slack strand together with the next stitch on the following row to close the gap.
For a bigger issue, like a gap running through a full cable column, laddering down only the stitches in that spot usually works better than ripping back the whole project. Drop those stitches with care to just below the mistake. Then use a crochet hook to re-knit the column row by row, using each horizontal ladder strand as your working yarn. Before you start, secure the stitches around the area and check the cable chart so the crossing direction stays correct.
After any repair, a light blocking or steam block over that area helps the reworked stitches blend in with the rest of the fabric.
If a cable leans the wrong way or the stitches get twisted, deal with the stitch direction next. Once you know the visual cues, both fixes get a lot less nerve-racking.
In many standard patterns, stitches held in front make a left-leaning cross (C4F), while stitches held in back make a right-leaning cross (C4B).
A simple memory cue is "Front = Forward = Left" and "Back = Behind = Right." Jot that on your pattern, or mark front-held and back-held cable symbols with different colors. If you're still getting used to cables, knit a small swatch with both C4F and C4B, label each one, and keep it close by for a fast check.
Twisted stitches during a cable cross usually show up when stitches are slipped onto the cable needle the wrong way, or when they're knitted off without a quick orientation check.
Slip the stitches purlwise when moving them to the cable needle. Before you knit from the cable needle, make sure each stitch has the right leg in front. If one is twisted, put it back on the needle so the right leg sits in front before you knit it.
If your hands feel clumsy during the move, the cable needle may be the issue. A shorter needle, or even a short DPN, can sit parallel to your working needle and give you better control, especially on tight fabric.
If the mistake happened a few rows down, you usually don't need to rip back the whole panel. Just fix the cable that went off track. Compare the cable column to your chart or the cables around it to spot the bad cross. Then secure the stitches around it, drop only that cable section, cross it the right way, and ladder it back up.
Once you're back to the current row, smooth out the tension with a blunt-tipped needle. If you'd like to see the process in action, check out Alpaca Direct's YouTube channel.
Most cable needle problems come down to four simple fixes: use a needle with some grip, move stitches slowly, watch your tension at the cross, and repair only the part that went wrong.
Start with the tool, then the transfer.
A grippy cable needle in the right size stops most dropped stitches. Slow, controlled transfers take care of the rest.
Once your stitches stay in place, look at how the cross sits in the fabric.
Tension shows up at every cross. Keep the first stitch relaxed, then snug the cable column just enough to even out the fabric.
If a gap or twist still shows up, fix only the damaged cable section.
When the mistake is local, repair that one column instead of ripping back the whole piece.
For tutorials and project ideas, visit Alpaca Direct's YouTube channel.
Yes. A cable needle is usually seen as a must-have tool for cable knitting, especially when you’re making braided or twisted patterns.
It holds a few stitches off to the side for a moment while you knit the nearby stitches. That small step makes a big difference. It helps you create clean crossings, keep steady tension, and reduce the chance of dropped stitches.
You can use other tools in a pinch, but a dedicated cable needle tends to give you better control and stability.
Look for crossed strands or uneven tension in the fabric. A twisted cable stitch often looks tighter, and it can throw off the stitch pattern you meant to knit.
If you’re knitting in the round, a twist can also make the cast-on edge spiral instead of lying flat. For more help with spotting and fixing mistakes, check out the Alpaca Direct YouTube videos.
Use laddering down when you need to fix one dropped stitch or a mistake in one column of knitting. It’s a handy way to correct a small error without ripping back the rest of your work.
Carefully drop that stitch down to the spot where the mistake happened. Then use a crochet hook to pull it back up, one row at a time. If the fix is more involved, or you want a safe place to return to in cable knitting, use a lifeline.

Comments will be approved before showing up.










