Your Cart is Empty
Summer Sale! Shop Now > |Free USA Shipping On Orders Over $75!


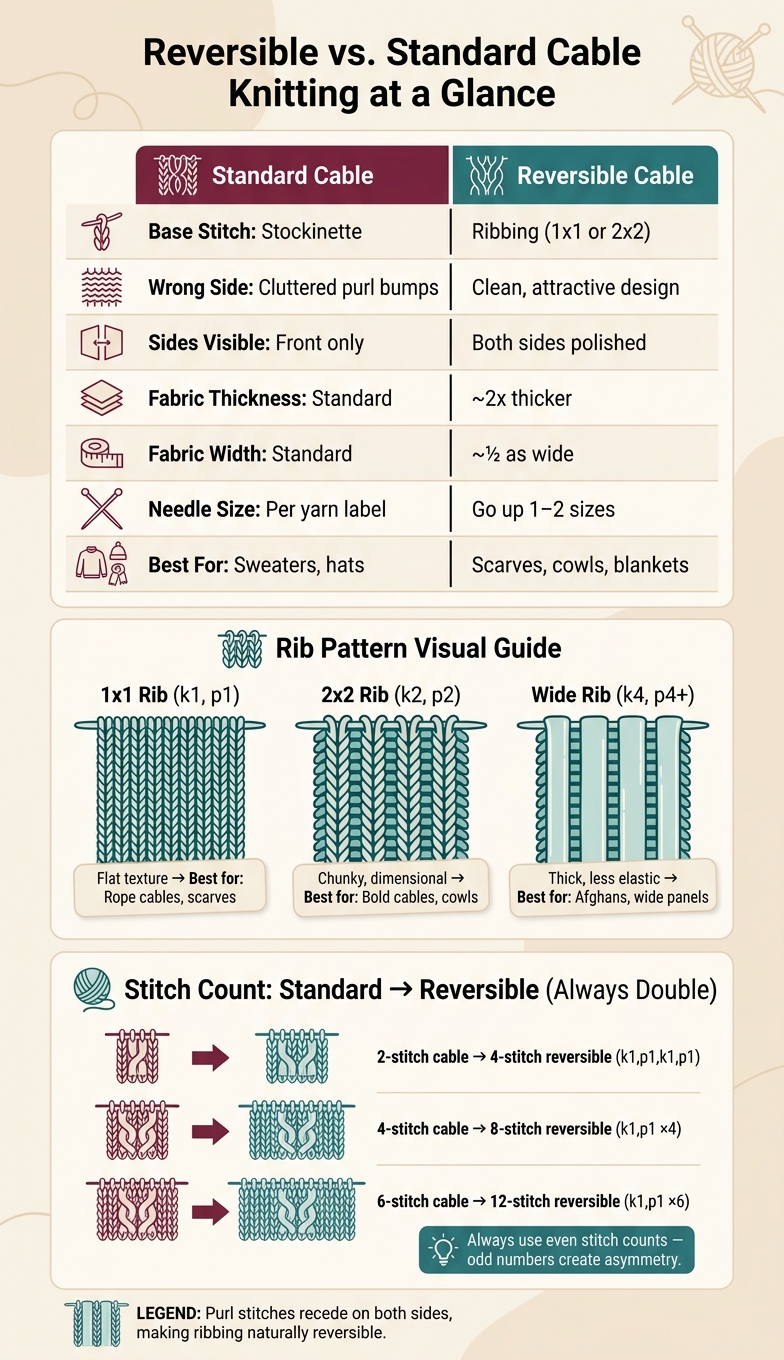
Reversible cable knitting solves the problem of unattractive wrong sides by using ribbing instead of stockinette, making both sides of your project visually appealing. Perfect for scarves, blankets, and cowls, these cables can look identical on both sides or offer two distinct designs. Here's what you need to know:
Reversible cables add texture and sophistication to double-sided projects. With the right yarn, tools, and attention to ribbing, you can create stunning designs that look great from every angle.
Reversible vs Standard Cable Knitting: Key Differences & Stitch Guide
Traditional cables rely on a stockinette base, which creates a polished front but leaves the back cluttered with purl bumps that obscure the cable design. This isn’t ideal for projects like scarves or blankets, where both sides are visible. Reversible cables tackle this issue by using ribbing instead of stockinette as the foundation stitch.
Reversible cables are divided into two types:
As Emily Wessel, a designer, explains:
"Reversible cables are just like regular cables, except... both sides of the work have an attractive cabled pattern." - Emily Wessel, Designer
This design approach is key to achieving polished, reversible cable projects.
Ribbing is what makes reversible cables possible. In ribbed fabric, knit columns pop while purl columns recede, and this effect happens on both sides at the same time. Unlike stockinette - which is smooth on one side and bumpy on the other - ribbing creates a naturally reversible structure.
When you add cables to ribbing, the knit stitches remain prominent as they cross, ensuring the cable design is visible on both faces of the fabric. Lily Chin, a designer, sums it up perfectly:
"Logic tells you to use a reversible stitch instead of stockinette, which isn't reversible... What you want is a reversible stitch that looks smooth on both sides. What's the answer? Ribbing!"
Ribbing also compresses the fabric horizontally, creating a thicker, denser texture. This results in a fabric that’s about twice as thick and half as wide as a stockinette-based cable. Keep this in mind when choosing your needle size - denser fabric may require adjustments. For more guidance, check out the Tools and Materials section.
Grasping the role of ribbing is the first step toward mastering reversible cable techniques.
Creating reversible cables requires the right combination of tools and materials to ensure a smooth and enjoyable knitting experience. The ribbed structure of these cables results in a denser, more compact fabric, meaning your choice of yarn and tools can make or break the final result.
The fiber you select plays a bigger role here than in many other knitting projects. Since reversible cables are often featured in items like scarves, cowls, and blankets - where both sides are visible - you’ll want a yarn that not only looks great but feels comfortable from every angle. A top choice is 100% alpaca. It’s naturally soft, warm, and itch-free, making it perfect for items that touch the skin. Plus, alpaca's wrinkle-resistant properties add to its appeal for reversible projects.
When it comes to yarn weight, worsted or bulky yarns are ideal. These weights provide excellent stitch definition, which is essential for making the cable patterns pop on both sides. Once you’ve chosen your yarn, it’s time to focus on the tools that complement the dense nature of reversible cables.
One critical adjustment for reversible cable knitting is the size of your needles. As designer Lily Chin explains:
"Cables and ribbing together really thicken the fabric. Increase needle size to avoid stiff, cramped fabric." – Lily Chin
To achieve the right balance, go up one needle size from what the yarn label recommends and knit a swatch to check the drape and flexibility. You’ll also need a cable needle for holding stitches during turns, and stitch markers can help you keep track of where each cable panel begins and ends within the ribbed pattern.
Blocking supplies are equally important. Foam mats and rust-proof pins will help you block the finished piece, ensuring the fabric lies flat and the cable design remains crisp after washing. If you’re looking for quality tools, Alpaca Direct offers a range of alpaca yarns, circular needles from trusted brands like Addi, ChiaoGoo, and Knitter's Pride, along with cable needles, stitch markers, and blocking supplies tailored for reversible cable projects.
To make your knitting process even smoother, consider adding a few optional tools to your setup. A row counter is invaluable for tracking progress across multiple cable panels, while a needle gauge ensures your upgraded needle size is correct before diving too far into the project. These small tools can save you from headaches later on, and Alpaca Direct stocks a wide variety of these handy accessories to round out your kit.
Reversible cables rely on ribbing as their base instead of stockinette, ensuring that knit stitches stand out on both sides while purl stitches recede into the background. This approach creates a clean, double-sided design. Lily Chin explains it best:
"Ribs have the advantage of vertical ridges that define the stitches. Knit stitches stacked in columns alternate with purl stitches stacked in columns... Cabling these stitches results in a reversible cable."
The two most common ribbing patterns for reversible cables are 1x1 rib (k1, p1) and 2x2 rib (k2, p2). Each offers a distinct look:
For larger cables, you can simply widen the ribbing base. For instance:
However, it’s best to stick to even-numbered ribbing patterns. Odd-numbered combinations, like k3, p3, can look uneven since the knit and purl columns don’t align symmetrically.
| Rib Pattern | Visual Effect | Common Use |
|---|---|---|
| 1x1 Rib (k1, p1) | Flat; resembles stockinette | Rope cables, scarves |
| 2x2 Rib (k2, p2) | Chunky; more dimensional | Bold cables, cowls |
| Wider Ribs (k4, p4+) | Thick; less elastic | Afghans, wide panels |
Once you’ve chosen your ribbing pattern, consistency is critical during cable crossings.
To achieve a fully reversible cable, it’s essential to maintain the ribbing pattern throughout every row - even during cable crossings. This means working stitches exactly as they appear to preserve the rib structure. Designer Kerry Bullock-Ozkan offers this advice:
"The trick is to make sure that you always knit the knits and purl the purls, in order to maintain the ribbing pattern."
When crossing cables, slip the stitches onto a cable needle and work them in the established rib sequence (like k1, p1) rather than defaulting to plain knitting. To keep the knit-purl pairing intact, ensure you always have an even number of stitches on the cable needle. Using stitch markers on either side of the cable panel can help you clearly separate the cable section from the background, keeping things organized.
For the background, choose inherently reversible textures like garter stitch or seed stitch rather than reverse stockinette. These options complement the ribbing and enhance the overall symmetry of the design.
Reversible cables require careful attention to the ribbing sequence, even when slipping stitches. Emily Wessel, co-founder and designer at Tin Can Knits, explains:
"Essentially, reversible cables are not AT ALL different from regular cable patterns, except that the stitches you knit out of order will include both knits and purls."
This approach ensures that every stitch contributes to the reversible effect, keeping both sides of your project looking polished. By focusing on maintaining a consistent rib background, you can create reversible cables that look seamless from every angle.
To create a cable turn, slip the specified stitches onto a cable needle. For a left-leaning cross, hold the cable needle to the front; for a right-leaning cross, hold it to the back. Next, work the stitches remaining on the left-hand needle in the established rib pattern (knitting the knits and purling the purls). Finally, work the stitches from the cable needle, making sure to continue the rib sequence without interruption.
Because ribbing and cabling compress the fabric horizontally, the resulting cable will appear twice as thick and half as wide as a cable worked in stockinette stitch. If the fabric feels too dense, consider using a needle one or two sizes larger to achieve the desired flexibility.
Once you’ve mastered cable turns, you’ll find it easy to control the direction of your cable crosses.
The direction of a cable cross depends entirely on where you position the cable needle:
| Cable Direction | Cable Needle Position | Visual Result |
|---|---|---|
| Right-Leaning | Hold to the back | Stitches slant toward the right |
| Left-Leaning | Hold to the front | Stitches slant toward the left |
For example, in a 4x4 cable worked with a 1x1 rib, you would slip 4 stitches onto the cable needle, work (k1, p1) twice from the left-hand needle, and then work (k1, p1) twice from the cable needle. Maintaining the ribbing sequence is critical - any disruption will cause the columns to misalign, spoiling the symmetry of the fabric.
Once you've got the basics of reversible cable construction down, it's time to dive into specific motif styles that can take your knitting projects to the next level. With cable turns under your belt, you can explore a variety of reversible designs that add texture and personality to your work.
Rope cables are among the easiest reversible motifs to master. These involve working a group of stitches in a 1×1 ribbing pattern and crossing half the stitches over the other half at regular intervals. Designer and author Lily Chin explains it best:
"Single-rib cables are twice as thick and half as wide. Any simple rope cable pattern can be made reversible by working it in single rib."
Thanks to the way purl stitches blend into the fabric, an 8-stitch ribbed rope cable (a 4-over-4 cross) looks like a 4-stitch cable on both sides, creating a neat, symmetrical design. For the most balanced look, stick to even stitch counts like 4/4 or 6/6, as odd-numbered crosses can appear uneven.
Rope cables are a straightforward way to achieve a reversible design, but ribbed cables take this concept a step further, offering added texture and depth.
Ribbed cables, sometimes called "Ribbles", combine the structure of ribbing with the visual appeal of cables to create a reversible texture. Kristen McDonnell, an author and teacher, describes them as follows:
"Ribbles combine ribbing with cables to create a reversible texture that integrates purl stitches within knit columns."
To make Ribbles stand out, you can either match the cable's ribbing to the surrounding fabric or use a contrasting reversible background like seed stitch or garter stitch. Seed stitch, for instance, makes the cable pop, while garter stitch provides a flatter, more stable surface. These reversible cables are a great choice for projects like scarves and blankets, where both sides are visible.
If you're up for a more intricate design, interlocking cable panels are a fantastic way to add complexity and visual interest.
Interlocking panels represent the pinnacle of reversible cable motifs. Rather than a single cable moving back and forth in one column, these designs feature traveling ribbed stitches that weave across the fabric, interlacing with neighboring cables to create a Celtic knot–like texture.
Maintaining the rib pattern while shifting stitches frequently requires extra precision. Ann Shayne from Modern Daily Knitting captures the beauty of these designs perfectly:
"The familiar rib stitch becomes a field of sinuous cables with subtly beautiful differences depending on which side of the fabric you're looking at."
This "fraternal" quality - where both sides look appealing but slightly different - is a hallmark of complex traveling cables. Interlocking panels work best for statement pieces like wraps, shawls, or scarves, where their intricate textures can truly stand out.
| Motif Type | Stitch Foundation | Best Background | Difficulty |
|---|---|---|---|
| Rope Cables | 1×1 Ribbing (even counts) | Garter or Seed Stitch | Beginner |
| Ribbed Cables (Ribbles) | 1×1 or 2×2 Ribbing | Matching Rib or Seed Stitch | Intermediate |
| Interlocking Panels | Traveling Ribbed Stitches | Garter or Seed Stitch | Advanced |
Now that you've got a handle on the motifs, it's time to dive into reading and tweaking reversible cable patterns to suit your project. While reversible cable patterns might look similar to standard ones, there are a few distinctions you need to grasp before you start. This section builds on earlier discussions about reversible cable construction and shows you how to interpret and modify these patterns effectively.
In reversible patterns, abbreviations take on new meanings. For instance, a standard C4F typically means slipping 2 stitches to the front, knitting 2, and then knitting the stitches from the cable needle. But in reversible patterns, this changes. As Emily Wessel, Co-founder and Designer at Tin Can Knits, explains:
"Reversible cables are not AT ALL different from regular cable patterns, except that the stitches you knit out of order will include both knits and purls."
So, in a reversible pattern, a C4F might mean slipping 4 stitches to the front, working (K2, P2) from the left needle, then (K2, P2) from the cable needle. Another example is c8f-rib, which involves slipping 4 stitches to a cable needle, then working (K1, P2, K1) from the left needle and repeating the same from the cable needle. These examples emphasize how the ribbing structure shapes every cable cross, making it crucial to always check the pattern legend to understand how abbreviations are used.
Reversible cable charts also differ. The cable cross symbols represent columns of ribbing instead of plain knit stitches. Background symbols shift too - you'll often see garter or seed stitch symbols instead of reverse stockinette. This matters because they impact how you follow row-by-row instructions. Additionally, reversible cable patterns often feature long row repeats - sometimes up to 20 rows - where cable crosses occur on just two rows, while the rest are worked in ribbing.
Adapting stitch counts is another key aspect of working with reversible cables. Here's the rule: reversible cables require twice as many stitches as standard stockinette cables to achieve the same visual width. This is because the purl stitches in 1×1 ribbing naturally pull into the fabric. Norman, a knitting instructor at Nimble Needles, explains:
"The basic idea is knitting your cables across twice as many stitches, but since the 1×1 rib stitch easily contracts, it will appear similar to stockinette stitch."
| Standard Cable | Reversible 1×1 Rib Equivalent | Stitch Count Change |
|---|---|---|
| 2-stitch (1 over 1) | 4-stitch (k1, p1, k1, p1) | Double |
| 4-stitch (2 over 2) | 8-stitch (k1, p1 × 4) | Double |
| 6-stitch (3 over 3) | 12-stitch (k1, p1 × 6) | Double |
When adjusting, stick to even stitch counts. Cables worked over an odd number of ribbing stitches can look uneven since knit columns stand out more than purl columns. Also, remember that increasing stitch counts causes horizontal compression. Lily Chin recommends using larger needles - one or two sizes up - to prevent the fabric from becoming too stiff. Lastly, adding a selvage stitch on each edge (slipping the first stitch of every row purlwise) helps keep edges neat and symmetrical as you scale the pattern.
Perfecting your reversible cable project doesn’t end with knitting. Proper finishing ensures that both sides of your work look equally polished and professional. This final touch can transform your project from uneven to stunning.
When working with reversible cables, the key to a seamless finish is binding off in pattern. This means knitting the knits and purling the purls as they appear. This method keeps the edge consistent with the ribbing, avoiding an abrupt, mismatched look.
One common issue with binding off cables is flared edges. Brooklyn Tweed explains:
"When binding off a cabled project, your bound off edge may look wavy and flare out – this happens because the stitches are compressed within the cables, but expand at the edge of the fabric, making it wider than the rest of your work."
To avoid this, reduce flaring by working a decrease - such as k2tog or p2tog - every four stitches across cable sections during the bind-off. Use removable stitch markers to identify the edges of each cable panel, limiting decreases to the compressed areas.
For smoother results, switch to a larger needle size for the bind-off row. Designer Lily Chin advises, "Cables and ribbing together really thicken the fabric. I recommend going up in needle size unless you like knitted cardboard."
Once you’ve bound off, the next step is blocking, which enhances the overall look and highlights the reversible design.
Wet blocking is essential for refining the appearance of your cables and ribbing. It helps even out the fabric and brings out the crispness of your reversible design. Here’s how to do it:
Pay close attention to the horizontal spreading step. Since cables and ribbing tend to compress the fabric, your piece might look narrower than expected at first. Blocking to the correct width helps open up the ribbing and sharpens the cable details on both sides of the fabric.
For sharp, defined cables, wool is an excellent choice. If you prefer a softer, textured finish, consider an alpaca blend from Alpaca Direct.
Need extra guidance? Check out our YouTube tutorials for step-by-step instructions on finishing and blocking reversible cable projects.
Even seasoned knitters run into challenges with reversible cables. The good news? Most problems can be fixed without undoing an entire project.
One of the most frequent issues with reversible cable knitting is rib misalignment. This typically happens when you lose track of the knit/purl sequence - especially during a cable cross - or accidentally mix background stitches into the cable's ribbing zone.
The solution is less daunting than it seems. Instead of unraveling the whole piece, focus only on the affected stitches in that specific cable column. Drop them down to the row where the mistake occurred, then use a crochet hook to ladder back up, carefully knitting the knit stitches and purling the purl stitches as they appear.
To avoid this problem in the future, placing stitch markers on either side of the cable panel can be a game-changer. As 10 Rows a Day suggests:
"To make sure you clearly see the group of stitches that form the cable, place a stitch marker at each side of it. This way you will remember to work the stitches between the stitch markers in ribbing pattern, and won't mix them up with the stitches worked in seed stitch."
Another helpful habit is flipping your work periodically to inspect both sides. Since reversible cables need to look polished on both faces, catching any misalignment early can save hours of work.
Directional mistakes - like crossing a cable front instead of back (or vice versa) - are another common hiccup. Thankfully, you can fix this without unraveling everything. Drop the affected stitches to the error row, re-cross them in the correct direction using a cable needle, and then ladder back up while maintaining the ribbing sequence.
If you're correcting from the wrong side of the fabric, remember to hold the cable needle to the same side (front or back) as you would on the right side to maintain the correct directional lean. Designer Kate Atherley explains:
"the lean is the same whether you are working from the front or the back. This makes things so very simple."
While making these adjustments, ensure the ribbing sequence stays intact by reversing the cable needle placement and adjusting knits and purls as needed.
Building on the basics of reversible cables, these advanced methods allow you to refine your designs and expand your knitting repertoire. Once you’ve mastered the foundational techniques and learned how to fix common errors, you’re ready to experiment with more intricate patterns. These advanced techniques build directly on the ribbing principles you’ve already practiced.
Multi-stitch cable turns operate on the same principles as simpler cable crosses: slip half the stitches to a cable needle, work the remaining stitches in the established rib pattern, then work the held stitches in the same rib. However, the larger scale of these cables introduces some unique challenges.
Because of the receding nature of purl stitches, multi-stitch reversible cables tend to look narrower. For instance, an 8-stitch cable worked in a 1×1 ribbing pattern (a 4×4 cross) visually resembles a 4-stitch cable in stockinette stitch.
Larger cable crosses, such as 6×6 or even 12-stitch cables, compress the fabric significantly and increase tension. To maintain the fabric’s drape and avoid stiffness, it’s a good idea to use needles that are one or two sizes larger. Additionally, odd-numbered cable crosses like 3×3 or 5×5 may appear slightly asymmetrical due to the uneven distribution of knit and purl columns.
For added versatility, you can enhance reversibility by incorporating ribbing directly into your cable panels.
A highly effective way to create a fully reversible panel is by using a technique called the "ribble", which replaces the stockinette stitches inside a cable with 1×1 or 2×2 ribbing. This approach results in panels with clearly defined, reversible cables.
Maintaining the ribbing sequence is essential for achieving a uniform look on both sides. Even-numbered cable crossings, such as 2/2, 4/4, or 6/6, are particularly important because they keep knit and purl pairs aligned during complex multi-panel crosses. Knitwear designer Kerry Bullock-Ozkan emphasizes this point:
"The trick is to make sure that you always knit the knits and purl the purls, in order to maintain the ribbing pattern. On the cable cross rows, be sure that you keep the knit stitches and their corresponding purl stitches together."
The background of your cable design is just as important as the cable itself. Pairing a ribbed cable with a reversible background - such as garter stitch, seed stitch, or continued 1×1 ribbing - ensures that the entire panel looks polished on both sides. For those ready to tackle more intricate designs, traveling cables over a seed stitch background can create stunning Celtic knot–style patterns that are equally striking from either side.
The table below highlights different reversible constructions and their visual effects:
| Standard Cable | Reversible Construction | Visual Result |
|---|---|---|
| 2×2 Rope (4 sts) | 8 sts in 1×1 ribbing | Appears as 2×2 on both sides |
| 3×3 Rope (6 sts) | 12 sts in 1×1 ribbing | Appears as 3×3 on both sides |
| Reverse stockinette background | Garter or seed stitch | Fully reversible panel |
Choosing the right reversible cable pattern depends on your skill level, the yarn you're using, and the type of project you're planning.
The width of the cable is a good clue to its complexity. Narrow cables, like 1×1 or 2×2, are easier to work with, while wider cables, such as 5×5 or 6×6, require more precision and can tighten the fabric significantly, making them more challenging.
If you're just starting, try a basic "ribble" pattern, which is a 1×1 rib cable on a garter stitch base. Jolie Elder, the designer behind the Legerdemain Reversible Cabled Scarf (featured in Cast On magazine in August 2018), created this pattern specifically for knitters with some experience but who are still building confidence. You can find the pattern on Ravelry for $3.00 USD, and it's often made with sport-weight alpaca/wool blends.
"It is hardly more difficult or work than regular cables. Once you know the technique, you will be able to alter existing patterns to make them reversible." - Jolie Elder, Designer
Chart reading is another skill to consider. While simpler patterns might only need written instructions, more intricate designs with interlocking panels often require familiarity with charts. If charts seem intimidating, start with written patterns and work your way up.
Once you’ve assessed the difficulty, think about how the pattern fits your specific project.
After gauging the complexity, align the cable size with your project's purpose. Smaller cables create elastic, flexible fabrics, making them perfect for scarves, sweaters, and cowls. On the other hand, wider cables result in stiffer fabrics, which work well for blankets, afghans, or stoles.
Reversible cables are particularly useful for items where both sides will be visible. Think of scarves that drape around the neck, shawls casually tossed over furniture, or blankets folded on display. A great example is Tin Can Knits' Nest sweater pattern, released in September 2022. It features a reversible cable panel (c8f-rib) that allows the sweater to be worn inside out, showcasing either the stockinette or reverse stockinette side.
The background stitch also plays a big role in the final look. A seed stitch background makes the cables stand out visually, while a 1×1 rib background helps the cables blend into the overall texture. For beginners, a garter stitch background is the easiest to handle and still looks polished on both sides.
Reversible cable knitting might sound tricky at first, but it's built on a straightforward idea: swap the traditional stockinette structure in your cable for a rib-based pattern, and pair it with a reversible background stitch. The result? A fabric that's polished and double-sided.
These cables can turn everyday pieces - like scarves, baby blankets, and sweaters - into designs that look intentional from every angle. If you're looking for beginner-friendly patterns, check out Alpaca Direct's free Kisses and Hugs Reversible Baby Blanket or Claire's Baby Hat by Kelley Hobart. The baby hat, for instance, uses reversible cables on the brim, ensuring the design stays consistent even when folded. Both patterns work beautifully with 100% baby alpaca yarn, offering a soft and luxurious finish.
Every successful project with reversible cables starts with simplicity. By choosing the right yarn and learning foundational techniques, you set yourself up to create fabrics that look stunning on both sides. This guide has covered the steps to help you build confidence and master these techniques.
When you're ready to start, you can find everything you need at Alpaca Direct. Their YouTube channel offers helpful tutorials on skills like cabling without a needle and fixing mistakes. Plus, their Technique Tuesday sessions on Facebook, live every Tuesday at 9:30 am PST, provide real-time tips and project demonstrations.
Start small, enjoy the process, and soon you'll create double-sided designs that truly impress.
When deciding between identical reversible cables and fraternal reversible cables, it all comes down to the style you're aiming for. Identical reversible cables feature the same pattern on both sides, giving a uniform and symmetrical appearance. On the other hand, fraternal reversible cables offer a different design on each side, giving you two distinct textures in a single piece. Your choice depends on whether you value symmetry or the flexibility of having two unique looks in one.
To create a reversible cable, you’ll need to double the stitches used for the cable. For instance, a 4-stitch cable would require 8 stitches. Instead of using stockinette, switch to a reversible pattern like 1×1 ribbing. This ensures the cable looks identical on both sides, maintaining the design’s symmetry while making it fully reversible.
To keep reversible cables from feeling rigid, try to avoid making them too wide, as this can restrict the fabric's stretch and flexibility. For projects that need more stretch, like sweaters or socks, opt for smaller cable crossings. If your knitting feels overly tight, focus on adjusting your tension and maintaining consistent ribbing to improve the fabric's flexibility.

Comments will be approved before showing up.


