Your Cart is Empty



If you want ribbing, basketweave, waffle stitch, or cables, post stitches are the skill that makes those textures happen.
I’d sum it up like this: post stitches are just regular crochet stitches worked around the vertical post instead of into the top loops. In U.S. terms, that usually means FPdc and BPdc, and the difference between them is simple: one sits to the front, and one sits to the back. That one change gives you ridges, grooves, stretch, and depth.
Here’s the short version:
A few points matter most when I work these stitches:
| Stitch or setup | What it does | Common use |
|---|---|---|
| FPdc | Makes a ridge on the front | Ribbing, cables, waffle |
| BPdc | Makes a groove on the front | Ribbing, basketweave background |
| FPdc + BPdc alternating | Builds vertical ribs | Hat brims, cuffs, scarf edges |
| FPdc/BPdc in blocks | Builds a woven look | Blankets, pillows, dishcloths |
| Offset post stitches + dc | Builds a grid texture | Washcloths, blankets |
| Crossed FP stitches | Builds rope-like columns | Scarves, cowls, panels |
One fact that stands out: post stitches are worked most often with hdc, dc, and tr because those taller stitches have enough height to wrap around cleanly. That’s why dc-based post stitches show up so often in U.S. patterns.
If you understand where to place the hook, the rest works much like a normal stitch.
Before you try post stitches, you need to know the basic parts of a crochet stitch.
The top of the stitch is the sideways V made by two horizontal strands: the front loop (closest to you) and the back loop (farther away). Most standard stitches go under both loops. FLO and BLO use just one loop, and they work in those top loops, not around the post.
The post is the vertical part below the top loops. With post stitches, you skip that top V and move your hook around the vertical post instead. That’s what gives the fabric its raised or recessed look. It also helps to know your right side (RS) and wrong side (WS), because many post-stitch patterns tell you which side should be facing you.
Post stitches are most often worked with taller stitches like half double crochet (hdc), double crochet (dc), and treble crochet (tr). Why? Their height gives you enough space to wrap the hook around the post cleanly. Single crochet has a much shorter post, so it shows up less often in this kind of texture work.
Once you can spot the post, the abbreviations make a lot more sense.
In U.S. patterns, post stitch abbreviations use a direction prefix - FP for front post or BP for back post - plus the base stitch abbreviation.
Here are the ones you’ll see most often:
| Stitch Name | Abbreviation | Base Stitch |
|---|---|---|
| Front Post Single Crochet | FPsc | sc |
| Front Post Half Double Crochet | FPhdc | hdc |
| Front Post Double Crochet | FPdc | dc |
| Front Post Treble Crochet | FPtr | tr |
| Back Post Single Crochet | BPsc | sc |
| Back Post Half Double Crochet | BPhdc | hdc |
| Back Post Double Crochet | BPdc | dc |
| Back Post Treble Crochet | BPtr | tr |
In written U.S. patterns, post stitches show up right in the row instructions. You might see something like this: Row 3: *FPdc around next dc, BPdc around next dc; repeat from * across, dc in last st, turn. The part to watch is around next dc. That tells you to work around the post of the finished double crochet from the row before, not into the top loops.
Asterisks and brackets show repeats. If there’s a plain stitch at the end of the row, that usually means a standard stitch worked into the top loops so the row ends neatly.
In crochet charts, post stitches use modified versions of the usual stitch symbols. Check the chart key or legend first. Charts are read from the bottom up. RS rows usually go right to left, and WS rows go left to right. The symbols show where the hook goes around the post, so you can see the FPdc and BPdc path before you even start stitching.
Next, use these labels and chart symbols to work the hook around the post.
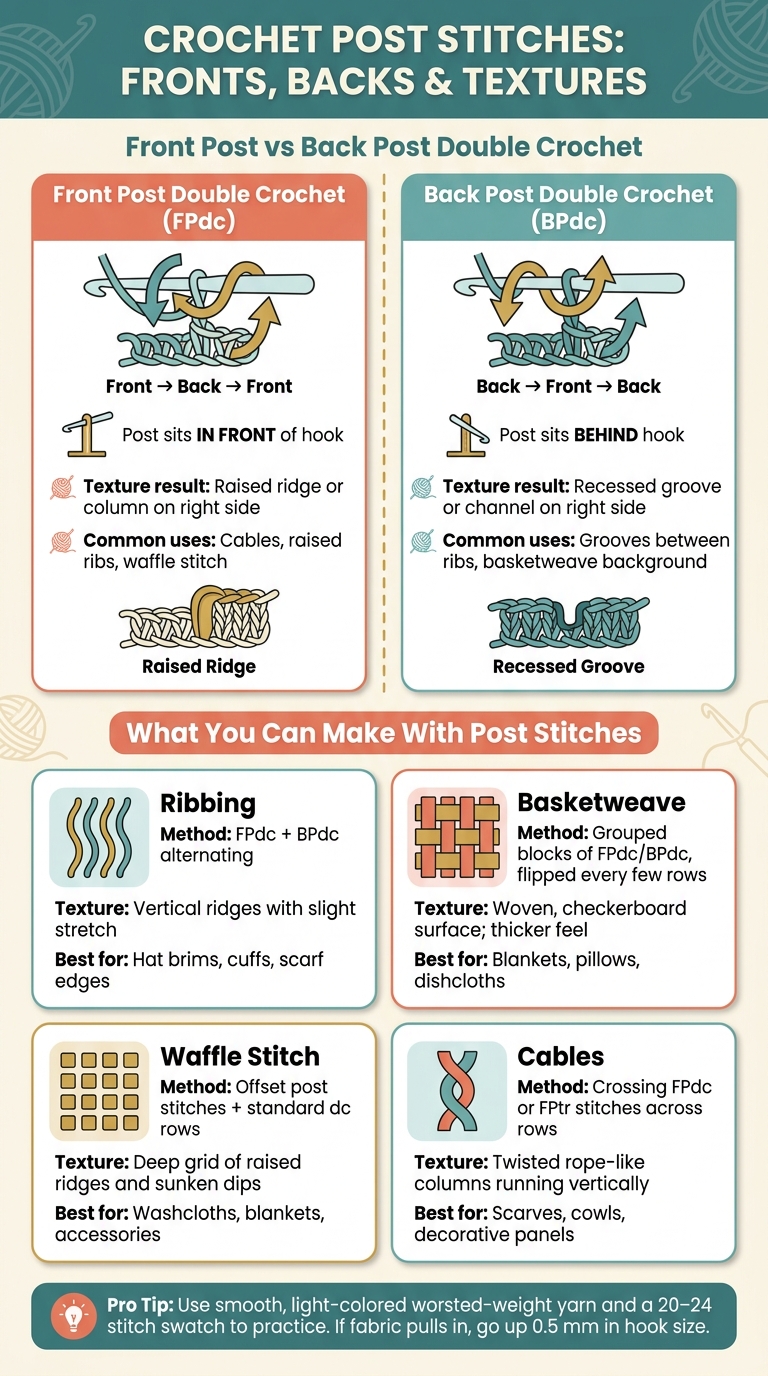
Post stitches are pretty simple once you see what changes: you wrap the hook around the post below the top loops, then finish the stitch as usual. FPdc and BPdc use the same basic move, just from opposite sides.
To make a front post double crochet (FPdc), begin with a yarn over, just like you would for a regular dc. But instead of putting your hook into the top loops of the stitch, skip those loops. Look for the vertical post in the row below.
Insert your hook from the front of the fabric to the back on one side of the post. Then swing the hook behind the post and bring it back out to the front on the other side. At that point, the post should sit across the front of your hook. Yarn over, pull up a loop, and finish the stitch exactly like a standard dc: yarn over and pull through two loops, then yarn over and pull through the last two loops.
FPdc makes a raised ridge on the right side.
FPhdc and FPtr follow the same hook path. The only thing that changes is the stitch height, the yarn overs, and how you finish the stitch.
BPdc works the same way, just reversed.
A back post double crochet (BPdc) starts with a yarn over. Then insert your hook from the back of the fabric to the front on one side of the target post. Move the hook across the front of the post, then push it back to the rear on the other side. Yarn over, pull up a loop, and finish the stitch the same way you would a regular dc.
BPdc creates a recessed groove on the right side. BPhdc and BPtr use the same hook path, with changes only for stitch height.
A small tip that can save you some frustration: if you pull the loop too tight as you draw it around the post, your texture can come out uneven. Keep the loop height close to a regular dc, and your columns should line up neatly.
The table below shows the main differences.
| Feature | Front Post (e.g., FPdc) | Back Post (e.g., BPdc) |
|---|---|---|
| Hook insertion path | Front → back → front | Back → front → back |
| Where the post sits | In front of the hook | Behind the hook |
| Texture on right side | Raised ridge or column | Recessed groove or channel |
| Common uses | Cables, raised ribs, waffle stitch | Grooves between ribs, basketweave background |
Ribbing alternates FPdc and BPdc. Basketweave groups them into blocks, then swaps those blocks in the next section to mimic woven fabric.
These two motions are the building blocks for ribbing, basketweave, waffle stitch, and cables.
Crochet Post Stitches: FPdc vs BPdc & Texture Patterns Explained
Now that you know how FPdc and BPdc work on their own, this is where things start to click. The big shift happens when you combine them.
The way you place those two stitches changes the whole surface of the fabric. A small switch in stitch path can turn the fabric into ribbing, a woven look, a waffle grid, or cable-like twists. Change the path, and you change the texture.
Because FPdc sits in front of the fabric and BPdc sits behind it, each repeat changes what stands out and what sinks back.
Ribbing alternates FPdc and BPdc to make vertical ridges with a bit of stretch. That's why it works so well for hat brims, cuffs, and sweater hems.
Basketweave uses groups of FPdc and BPdc, usually 3 or 4 at a time, and then flips those groups every few rows. That block-based setup gives the fabric a woven look. It also feels thicker and more shaped than ribbing, which makes it a good fit for blankets, pillows, and dishcloths.
Waffle stitch mixes offset post stitches with dc in an offset layout, along with standard dc rows, to build a deep grid. That raised-and-sunken texture makes it a strong pick for washcloths and blankets.
Cables use taller front post stitches, most often FPdc or FPtr, that cross over each other across rows. The result is a twisted, rope-like column that runs up the fabric. Cables tend to show up best in smooth yarns, where the crossing lines stay crisp and easy to see.
| Stitch Pattern | Texture Effect | Best Project Types | Yarn Behavior |
|---|---|---|---|
| Ribbing (FPdc/BPdc alternating) | Vertical ridges, slight stretch | Hat brims, cuffs, scarf edges | Smooth yarn |
| Basketweave (grouped blocks) | Woven, checkerboard surface | Blankets, pillows, dishcloths | Medium-weight yarn with good stitch definition |
| Waffle stitch (offset post + dc) | Deep grid of ridges and dips | Washcloths, blankets, accessories | Smooth yarn with clear stitch definition |
| Cables (crossing FPtr/FPdc) | Twisted rope-like columns | Scarves, cowls, decorative panels | Smooth yarn with clear stitch definition |
A good place to start is with hat bands, scarf panels, cowls, washcloths, or small squares. These projects repeat the same stitch pattern without shaping, so you can focus on the motion instead of juggling too many things at once.
Crochet squares work well too. They give you a small space to practice, and after you make a few, you can join them into a larger project. That makes practice feel a lot less like practice.
Smooth, medium-weight yarn shows texture most clearly. If the yarn is too fuzzy or heavily textured, it can hide the raised pattern and make mistakes harder to spot. Alpaca and alpaca-blend yarns show post-stitch texture well and feel soft against the skin, so they work nicely for cowls, hats, and blankets.
A simple way to learn is to watch the stitch path first, then swatch it with a smooth yarn. Alpaca Direct also offers yarn, hooks, patterns, and technique videos on its YouTube channel for visual practice. Next, focus on the mistakes that flatten or distort that texture.
Once FPdc and BPdc start making sense, the next step is getting the texture to look even from row to row.
The mistake people make most often is working around the wrong post, or only part of the post. It’s easy to catch just one side of the post, or slip into the space next to it by mistake. When that happens, the texture shifts and your columns can start to lean, split, or look broken.
Tension is another big issue. If you pull too tight, the stitch gets compressed and the fabric turns stiff and puckered. If you work too loosely, the posts can sag and leave gaps. In ribbing, that usually means some ribs look neat while others look flattened. A good rule: keep the loop a little taller than a standard dc, but not so loose that it opens up.
It also helps to keep close track of the RS and WS. If those get mixed up, FPdc and BPdc can end up reversed, which throws off the pattern. Mark the RS after your first post-stitch row, then check it each time you turn your work.
A swatch makes practice much easier because it lets you focus on the three things that shape the result: yarn, tension, and RS/WS tracking.
Start small with smooth, light-colored worsted-weight yarn. Dark, novelty, or fuzzy yarn can hide the stitch posts, which makes mistakes harder to spot. Chain 20–24 stitches, work 2–3 rows of regular double crochet as your base, and then begin your post-stitch rows on top of that setup.
After your first post-stitch row, mark the RS with a locking stitch marker. Then work 8–10 rows of simple FPdc/BPdc ribbing. As you go, check that the raised columns are stacking in straight lines. If one of those raised columns drops back, rip out a few stitches and fix it right away. It’s a lot easier than trying to sort it out later.
When ribbing starts to feel steady, try a basketweave swatch. Work groups of 4 FPdc and 4 BPdc, then switch the blocks every 4 rows. If the edges start pulling inward, move up one hook size. For example, go from a 5.0 mm (H-8) to a 5.5 mm (I-9). Alpaca Direct's YouTube channel has technique videos that can help when written instructions alone aren’t clicking.
Post stitches are worked around the stitch post, not into the top loops. By alternating FPdc and BPdc, you can build textures like ribbing, basketweave, waffle, and cables. For yarn, hooks, patterns, and video help, Alpaca Direct has tools to support more practice.
Use FPdc when you want the stitch to stand out on the front of your work. It creates a raised ridge and adds extra texture.
Use BPdc when you want the stitch to sit more toward the back. That gives you a recessed ridge instead.
For visual demonstrations, see the tutorials on the Alpaca Direct YouTube channel.
Tight or uneven post stitches usually happen when your tension shifts as you work. If the yarn gets tighter or looser from one stitch to the next, you can end up with accidental yarn-overs or loops that vary in size. That changes the texture and can make the finished piece look a bit off.
For a smoother, more polished finish, keep the yarn moving at a steady pace and try to hold the same tension in every stitch.
The search results here are about knitting techniques like garter, stockinette, and ribbing. They don’t cover crochet post stitches.
If you need crochet help, check out Alpaca Direct’s learning content and YouTube videos. They also sell crochet hooks, patterns, and alpaca-based yarns for your projects.

Comments will be approved before showing up.










