Your Cart is Empty



I make this garter stitch headband from one flat strip: knit every row, then sew the short ends together. No purling or shaping needed.
My main rule: <u>use your own gauge and head measurement</u> rather than relying on stitch count alone.
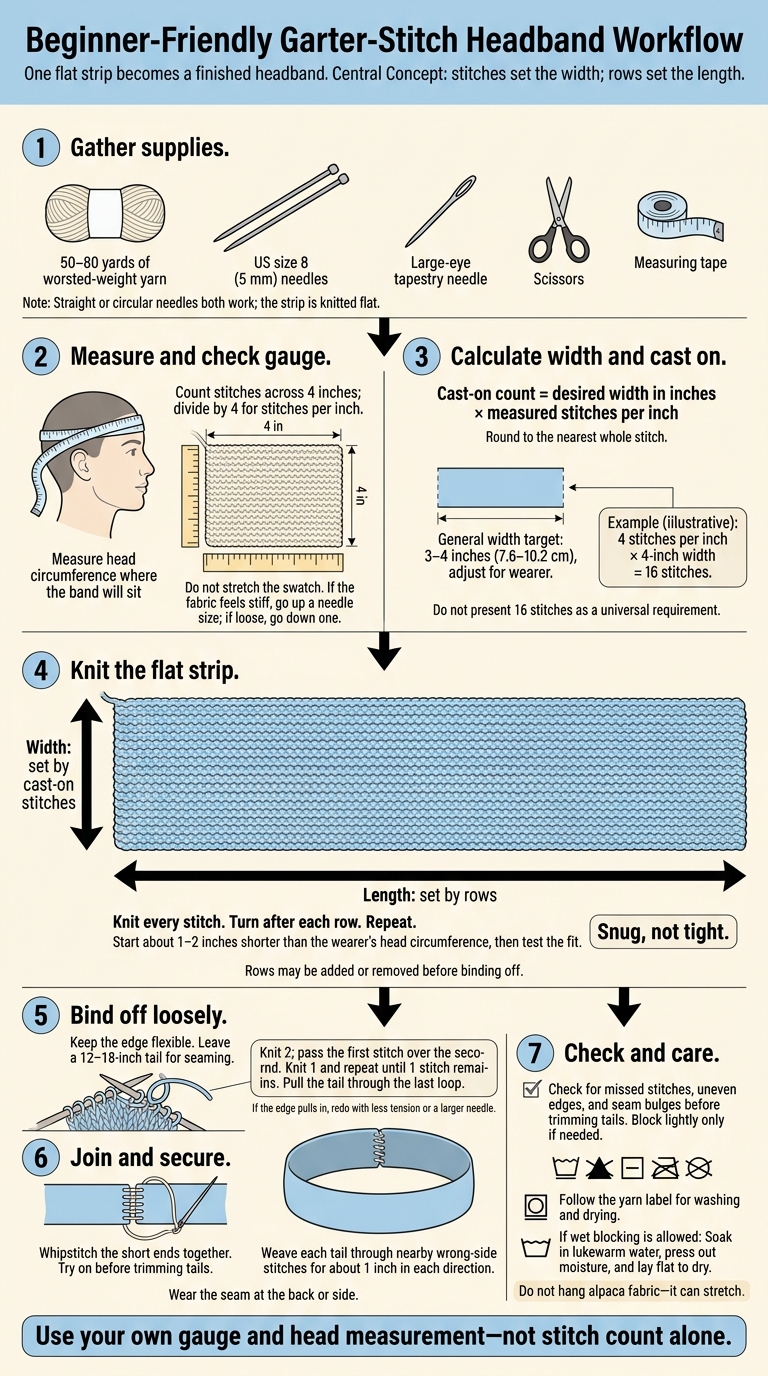
Garter Stitch Headband: Measure, Knit, and Finish
Before you cast on, gather 50–80 yards of worsted-weight yarn, US size 8 (5 mm) needles, a tapestry needle, scissors, and a measuring tape. Straight or circular needles both work. Check the yarn label for yardage, since your headband’s size and gauge affect how much yarn you’ll need.
A smooth, light-colored yarn makes stitches easier to see. Alpaca or an alpaca blend feels warm and soft, while a wool blend offers more stretch and recovery.
Next, knit a swatch to work out your cast-on count.
Aim for a finished band width of 3–4 inches (7.6–10.2 cm). A narrower band gives you a slimmer fit; a broader band covers more of your ears. Measure the wearer’s head where the band will sit, then knit the strip slightly shorter than that measurement so it fits snugly.
Knit a garter-stitch swatch with your chosen yarn and needles. Let it relax, then lay it flat without stretching. Count the stitches across the center over 4 inches and divide by 4 to get your stitches per inch. If the fabric feels stiff, go up a needle size. If it feels loose, go down one.
Cast-on count = desired width in inches × measured stitches per inch. This count sets the band’s width. You’ll set its length by knitting until the strip fits snugly.
At an illustrative gauge of 4 stitches per inch, a 4-inch width needs 16 stitches.
Use your own gauge and round to the nearest whole stitch.
With your cast-on count ready, start the band. Keep the cast-on edge relaxed so the finished band stretches comfortably.
Free Pattern
Cast on: 16 stitches, or your gauge-based count for the desired width.
Row 1: Knit every stitch.
Repeat: Turn after each row and knit every stitch until the strip reaches the planned length.
Check fit: Try the strip around the wearer’s head before binding off.
Finish: Compare loose bind-off methods before finishing, leaving a yarn tail long enough to sew the short ends together.
Stitches set the width; rows set the length. Cast on more or fewer stitches to change the width. Add or remove rows to change the circumference. Start with a strip about 1–2 inches shorter than the wearer’s head circumference for a snug fit that doesn’t pinch.
Use these measurements as starting points, then adjust for fit.
| Estimated wearer size | Estimated head circumference | Estimated starting strip length | Estimated width |
|---|---|---|---|
| Infant | 13–15 in. | 12–13 in. | 1½–2 in. |
| Child | 18–20 in. | 16–18 in. | 2–2½ in. |
| Average adult | 21–22 in. | 18–20 in. | 2–2½ in. |
| Larger adult | 23–24 in. | 20–22 in. | 2½–3 in. |
Once the strip wraps snugly around the head, pause before binding off. Check the fit and overlap: add rows if it’s too short, or remove rows if it’s too long.
When the strip reaches the right length, bind off and sew the ends together.
Keep your bind-off loose so the edge stays flexible. Knit 2 stitches, pass the first stitch over the second, then knit 1 and pass the previous stitch over it. Repeat until 1 stitch remains.
Leave a 12–18-inch tail for seaming. Pull it through the last loop and tighten gently. If the edge pulls in, undo the bind-off and try again with less tension or a larger needle.
Before joining the short ends, check that the strip still matches your cast-on stitch count.
Lay the strip flat, line up the short ends, and whipstitch them together using the tail. Keep the seam snug enough to close the gap.
Try on the headband before trimming any tails. Weave each tail through nearby wrong-side stitches for about 1 inch in each direction. Wait to trim until you've completed the checks below. Wear the seam at the back or side.
Once the seam is secure, check for missed stitches, uneven edges, or seam bulges before trimming the tails. Shape the fabric lightly if needed.
Block only to smooth the band and set the seam. If the yarn label allows wet blocking, soak the headband in lukewarm water, press out the moisture, and lay it flat to dry. Do not hang alpaca fabric - it can stretch.
Once your headband is assembled, check that it feels snug, not tight. Keep the edge loose, the seam flat and secure, and the yarn tails tucked in.
Save the yarn label and follow its washing and drying instructions to keep your headband comfortable and ready to wear.
Yes, but you’ll need to adjust your project. Knit a gauge swatch first to check the headband’s size and structure. For the fit you want, you may need to change your needle size or cast on a different number of stitches. Choose a yarn weight that suits your project - it affects both the headband’s drape and warmth.
Choose a bind-off that keeps the edge secure and helps it hold its shape. The easy sewn bind-off gives garter stitch an elastic, durable edge. For a fast option with a clean finish, try the Icelandic bind-off, which also works well with garter stitch.
For help with either method, check out the knitting tutorials on the Alpaca Direct YouTube channel.
Choose a low-profile bind-off that suits garter stitch. The Easy Sewn Bind-Off gives you an elastic edge and helps reduce bulk at the seam.
For a fast, clean finish, try the Icelandic Bind-Off. It also works well with garter stitch and creates a tidy purl-bump edge.

Comments will be approved before showing up.










