Your Cart is Empty
Winter Sale! Shop Now > |Free USA Shipping On Orders Over $75!


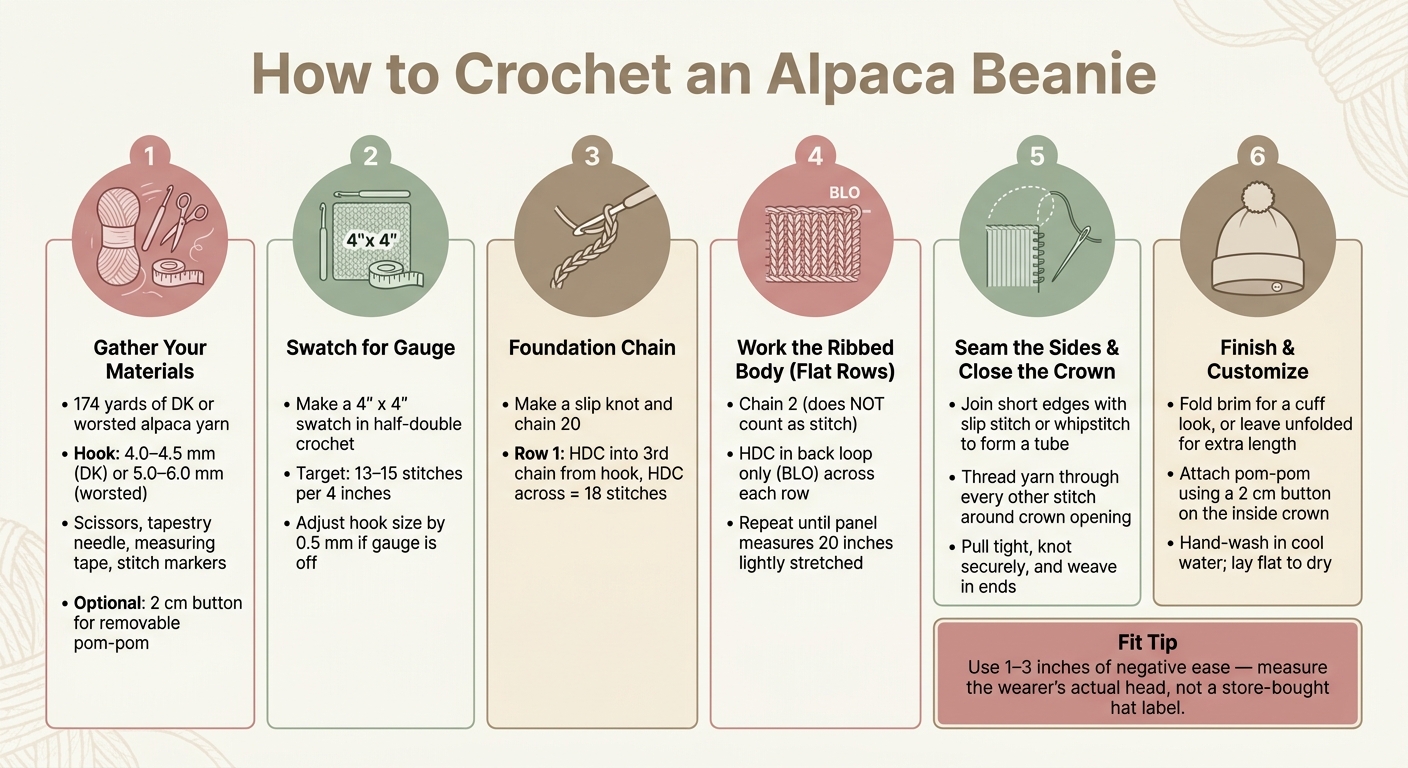
You can make this alpaca crochet beanie with one flat rectangle, one side seam, and one gathered crown. The adult size in this pattern is about 20 inches around and 8.5 inches tall, uses about 174 yards of yarn, and starts with a chain of 20 for height.
If I want this hat to fit well, I need to focus on just a few things:
Here’s the short version: worsted alpaca gives me a thicker, warmer beanie, while DK gives me a lighter hat with more drape. The build is simple, with no increases and no decreases, which makes it a good pick if I want a clean, easy project.
| Yarn Weight | Hook Size | Feel | Approx. Yardage |
|---|---|---|---|
| DK | 4.0 mm–4.5 mm | Lighter, softer, more fluid | 200+ yards |
| Worsted | 5.0 mm–6.0 mm | Thicker, warmer, more structured | 160–174 yards |
I can also tweak the finished look without changing the basic steps: add rows for slouch, stop earlier for a close fit, fold the brim for a cuff, or add a removable pom with a 2 cm button. After that, I just hand-wash in cool water and lay it flat to dry.
If I want a ribbed alpaca beanie that is warm, soft, and simple to make, this pattern keeps the process easy from start to finish.
For one adult beanie, plan on about 174 yards (160 m) of DK or worsted-weight alpaca or alpaca-blend yarn. Pair your hook with the yarn weight: 4.0 mm to 4.5 mm for DK and 5.0 mm to 6.0 mm for worsted, based on your swatch. One small but helpful tip: check the hook’s millimeter marking instead of relying only on the brand label, since sizing can differ from one maker to another.
You’ll also need scissors, a tapestry needle, a measuring tape, and stitch markers. If you want a removable pom, add a 2 cm button.
Before you jump into the hat itself, swatch first. It saves a lot of guesswork later and helps you dial in the fit.
For quick technique demos, use Alpaca Direct's YouTube channel for gauge, seaming, and finishing tips.
Both yarn weights work for this pattern, but the finished beanie won’t feel quite the same. Worsted alpaca makes a thicker, warmer hat with bolder ribbing. DK gives you a lighter fabric with more movement, which is nice for milder days or layering.
| Feature | DK Alpaca Yarn | Worsted Alpaca Yarn |
|---|---|---|
| Fabric Thickness | Thinner; lightweight | Thicker; plush and substantial |
| Warmth | Moderate; good for layering | High; excellent for cold weather |
| Drape | High; more fluid and flexible | Moderate; provides more structure |
| Stitch Definition | Fine, delicate details | Bold, highly textured ribbing |
| Typical Hook Size | 4.0 mm – 4.5 mm | 5.0 mm – 6.0 mm |
| Approx. Yardage | 200+ yards | 160–174 yards |
"This hat turned out to be so squishy and super cute! It uses the 'Raised Ripple' stitch... a stunning stitch that is full of texture and warmth." - Jessica, Designer and Founder, Mama In A Stitch
Fit comes down to stretch, so don’t skip the swatch. Make a 4" x 4" swatch in your chosen stitch and aim for about 13 to 15 stitches per 4 inches. In plain terms, a slightly tighter gauge helps the ribbing keep its shape and sit snugly on the head.
If your swatch is too wide, go down by half a hook size - for example, from 5.0 mm to 4.5 mm - and test again.
For sizing, use 1 to 3 inches of negative ease. That means the band should measure a bit smaller than the wearer’s actual head measurement. And yes, measure the person’s head, not the size label on a store-bought hat.
Once the gauge looks right, you’re ready for the foundation chain and the ribbed body.
How to Crochet an Alpaca Beanie: Step-by-Step Visual Guide
Start with a slip knot, then chain 20. This chain sets the hat height.
For Row 1, work a half-double crochet (hdc) into the third chain from the hook, then hdc across. You should have 18 stitches at the end of the row. Turn your work.
Row 2 is where the ribbing begins. Chain 2. That chain does not count as a stitch. Then work hdc in the back loop only (BLO) across the row, and turn.
Repeat Row 2 for every row after that.
Keep going until the flat panel measures about 20 inches when lightly stretched for a snug adult fit. In plain terms, work the panel to 20 inches lightly stretched. It also helps to count your stitches in every row, since alpaca yarn can make missed stitches hard to spot.
Once the panel is long enough, you're ready to seam the sides and close the crown.
Join the short edges with either a slip stitch or a whipstitch to make a tube, then gather the top to form the crown. If you want a neat seam, insert your hook through the matching stitches on both edges at the same time and slip stitch across.
Turn the tube so the beginning chain sits at the crown opening. Using a length of yarn and a tapestry needle, sew through every other stitch around the opening. Pull it tight, then knot it securely. Weave in the tail well.
If the brim feels loose, work one round of slip stitches around the edge. That tightens it without adding bulk.
Next, finish the brim and clean up the edges.
Once the crown is closed, you’re at the fun part: shaping the final look. Fold the brim once for a classic cuff, or leave it unfolded if you want a bit more length.
If you want to add a pom-pom, the button method makes life easier. Sew a small button to the inside top of the hat, then use a crochet hook to pull the loop through the top and fasten it to the button. That way, the pom-pom comes off easily when it’s time to wash the hat.
Alpaca yarn can split while you work. If that starts happening, switch to a hook one size larger. Sometimes that small change is all it takes.
To wash the beanie, hand-wash it in cool water with a gentle detergent. Press out extra water, then lay it flat to dry. Don’t wring, twist, or hang it up, since that can stretch the hat and throw off the shape. If you want help with alpaca-fiber care, Alpaca Direct’s YouTube tutorials are worth a look.
After care and finishing, you can tweak the length to change how the hat fits.
For a slouchier beanie, add more rows. For a closer fit, stop a little earlier. The easiest way to dial it in is to try the hat on as you go.
You can also make a color-block version by changing yarn colors during the body section. Keep those color changes in the body so the brim stays clean and polished.
A good beanie fit comes down to three things: gauge, head size, and a small bit of negative ease. Match your yarn weight and hook size to your swatch, then use the wearer’s head measurement to set the hat’s length and circumference. Once those pieces are in place, the pattern is pretty straightforward.
"You've got to measure whoever's head you're going to do it for and chain accordingly to fit the pattern needs." - Jessica, Pattern Designer, Mama In A Stitch
From there, the process is simple: work the rectangle, seam it, and close the crown. Keep the rectangle just a little smaller than the head so the beanie feels snug instead of loose. Then weave in the ends, add a pom if you want, and tweak the brim tightness or length to dial in the fit.
Measure the wearer’s head circumference first. Then use the pattern gauge to adjust the starting stitch count so the beanie fits the way it should.
For reference, adult sizes are usually 20–22 inches, while child sizes are often 18–20 inches.
You can also make the beanie shorter or longer by adding or removing rounds. Before you start, make a gauge swatch. It takes a little extra time, but it helps you get a fit that feels comfortable and comes out as planned.
Yes, you can use 100% alpaca yarn for this pattern. It’s a common pick for similar projects because it feels soft and gives you plenty of warmth.
If your beanie feels too loose, add a row of slip stitches around the bottom edge for a snugger fit.
Do this after tying off and weaving in the ends. It helps tighten the edge and keeps the beanie from stretching out too much.

Comments will be approved before showing up.


