Your Cart is Empty
Summer Sale! Shop Now > |Free USA Shipping On Orders Over $75!


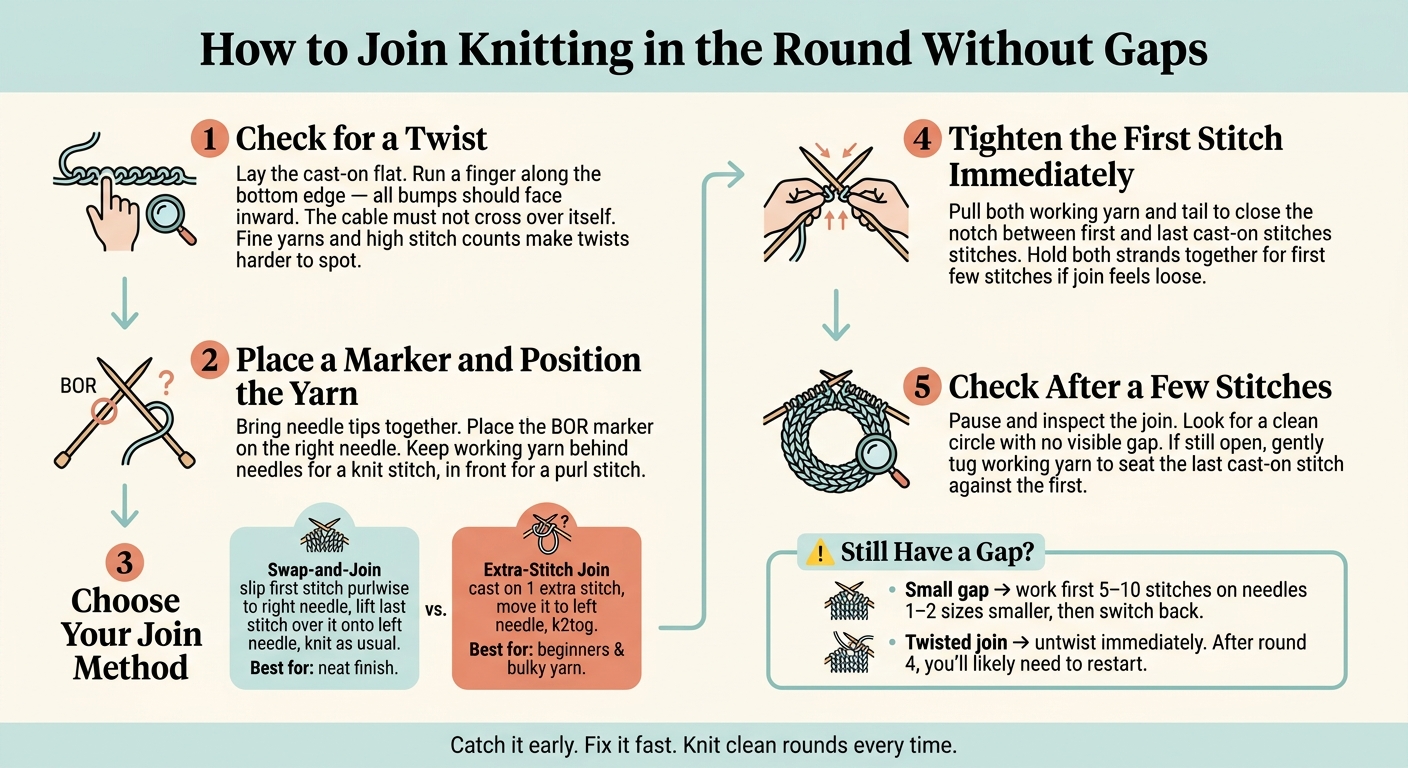
Most round-join gaps come from just 3 things: a twisted cast-on, a loose first stitch, or a weak join. In this guide, I’d focus on the fix right away: check the cast-on edge, use a join that locks the first and last stitches together, and tighten the first stitch at once.
Here’s the short version:
One detail matters a lot: that small notch between the first and last cast-on stitches is common, and it often shows up before the fabric settles. But if I catch it in the first few rounds, it’s usually simple to deal with.
| Problem | Main cause | What I’d do |
|---|---|---|
| Small gap at join | First and last stitches not locked well | Use swap-and-join or extra-stitch join |
| Loose first stitch | Uneven tension at round start | Pull working yarn and tail after first stitch |
| Spiral/twisted join | Cast-on edge flipped before joining | Untwist at once or restart |
| Gap after round 1 | Slack near join | Work first 5–10 stitches tighter or with smaller needles |
Bottom line: if the cast-on lies flat, the join is set cleanly, and the first stitch is tightened right away, the round usually starts clean and stays that way.
How to Join Knitting in the Round Without Gaps
Check the cast-on before joining so you don't end up with a twist or a gap. A flat, untwisted cast-on helps keep that first stitch from opening up. It also gives the stitch a steady base, which makes the join much cleaner.
Lay the work flat. Then run your finger along the bottom edge of the cast-on and make sure the bumps all face inward and the edge sits flat. Also look at the cable and make sure it hasn't crossed over itself. If it has, the cast-on edge will start to spiral once you begin knitting.
Fine yarns and high stitch counts can make twists much harder to catch.
Jackie E-S of Heartstrings Fiber Arts says it well:
"You probably heed the advice to check, and then re-check once more, to make sure stitches are not twisted before joining into your round."
Set everything up before you knit the first round. With the edge lying flat, bring the two needle tips close together. Put the first cast-on stitch on the left needle tip and the last cast-on stitch on the right needle tip.
Before you knit the first stitch, place a beginning-of-round (BOR) marker on the right needle. Keep the working yarn behind the needles if the first stitch is knit, or in front if the first stitch is purl. This helps stop the first stitch from pulling open.
With the edge lined up and the yarn in place, you're ready to move to the join method that gives you the best tension.
Once your cast-on is lying flat and your marker is set, the next step is picking a join that helps stop that annoying first-round gap. Two methods work especially well here. One gives you the neatest look. The other gives you a firmer start.
The swap-and-join does exactly what the name suggests: you swap the first and last cast-on stitches before you knit. Slip the first cast-on stitch purlwise to the right needle, lift the last cast-on stitch over it onto the left needle, and then knit the round as usual.
That small move locks the cast-on ends together and gives you a cleaner starting point. It works especially well for hats, cowls, and sleeves.
If that first stitch still loosens up, the extra-stitch join gives you a bit more security.
The extra-stitch join is a solid pick if you're new to circular knitting or working with bulky yarn. Cast on one extra stitch beyond what your pattern calls for. Move that last stitch from the right needle to the left needle, then knit two together (k2tog). This brings your stitch count back to the right number and joins both ends of the cast-on edge in one move.
For beginners, it often feels more secure.
| Method | Difficulty | Appearance at Join | Tension Control |
|---|---|---|---|
| Swap-and-Join | Moderate | Very tidy and seamless | Good |
| Extra-Stitch Join | Easy | Clean and sturdy | Excellent |
Use swap-and-join if you want the neatest finish. Use extra-stitch join if you want the most forgiving start. Either way, the first few stitches still need immediate tension control.
Right after you join, tighten the first stitch. If you leave that start loose, the slack can creep up through the next several rows. It’s much easier to fix it on the spot than later.
Once you make the first stitch, pull the working yarn and tail to close the notch between the first and last cast-on stitches. If the join still seems a bit loose, hold both strands together for the first few stitches to give the join extra security. Keep those early stitches firm so the gap stays shut.
After you’ve worked a few stitches, pause and look at the join. You want to see a clean circle with no visible gap or loose loop where the round begins. If it still looks open, give the working yarn a gentle tug to seat the last cast-on stitch against the first before you keep going.
If the join still looks a little open after the first round, don’t rip back just yet. In many cases, the gap cleans itself up once you knit 5–10 more rounds and the slack works its way into the fabric. If that doesn’t do it, try one simple fix: work the first 5–10 stitches of the next round on needles one or two sizes smaller, then switch back.
That said, a loose gap and a twist are NOT the same thing. They may look similar at first glance, but they need different fixes.
A small opening at the join often settles down on its own after a few rounds. Give the fabric a little time before you start over.
If the gap is still there, use smaller needles for just the first 5–10 stitches of the next round, then go back to your usual size. That little change can pull the join together without changing the rest of your project.
If the first stitch still looks open, re-seat it by snugging the working yarn and the tail, then knit the next few stitches firmly. Sometimes that’s all it takes.
A twisted join is a different issue. Instead of lying flat, the join starts to spiral. If you spot that spiral, untwist it right away. After the first few rounds, it gets much harder to fix, and by round 4 you’ll usually need to restart.
A clean circular join usually comes down to three steady habits:
Alpaca Direct carries circular needles, stitch markers, and alpaca yarns, and its YouTube channel shows join techniques.
For beginners, the Slip over method is often the best place to start. It’s simple, and it helps avoid gaps or loose stitches, which gives you a neater join in the round.
Here’s how it works: cast on the number of stitches you need, move the first cast-on stitch to the end of the needle, then slip the last stitch over the first before you begin knitting.
It also helps to make sure your stitches are arranged properly and to place a stitch marker so you can keep track of the start of the round.
Yes. Small gaps can often be fixed later when you weave in the yarn tail, so you usually don’t need to start over.
If you want to avoid gaps from the start, make the join a bit tighter. Two common ways to do that are:
That small tweak can make the join look much cleaner.
A gap usually looks like an open space or small hole between stitches. A twist happens when the yarn crosses over itself, which can change the stitch pattern or make that area feel tighter.
To spot a gap, look for a visible opening. A twist usually shows up as crossed strands or uneven tension.

Comments will be approved before showing up.


