Your Cart is Empty



Loose yarn tails can undo hours of crochet work. If I want my project to stay neat after wear and washing, I need to secure those ends the right way.
Here’s the short answer:
The right choice depends on fiber type, stitch pattern, and how much the item will be used. Dense stitches hold ends better. Open or lacy fabric gives me fewer spots to hide and lock the tail.
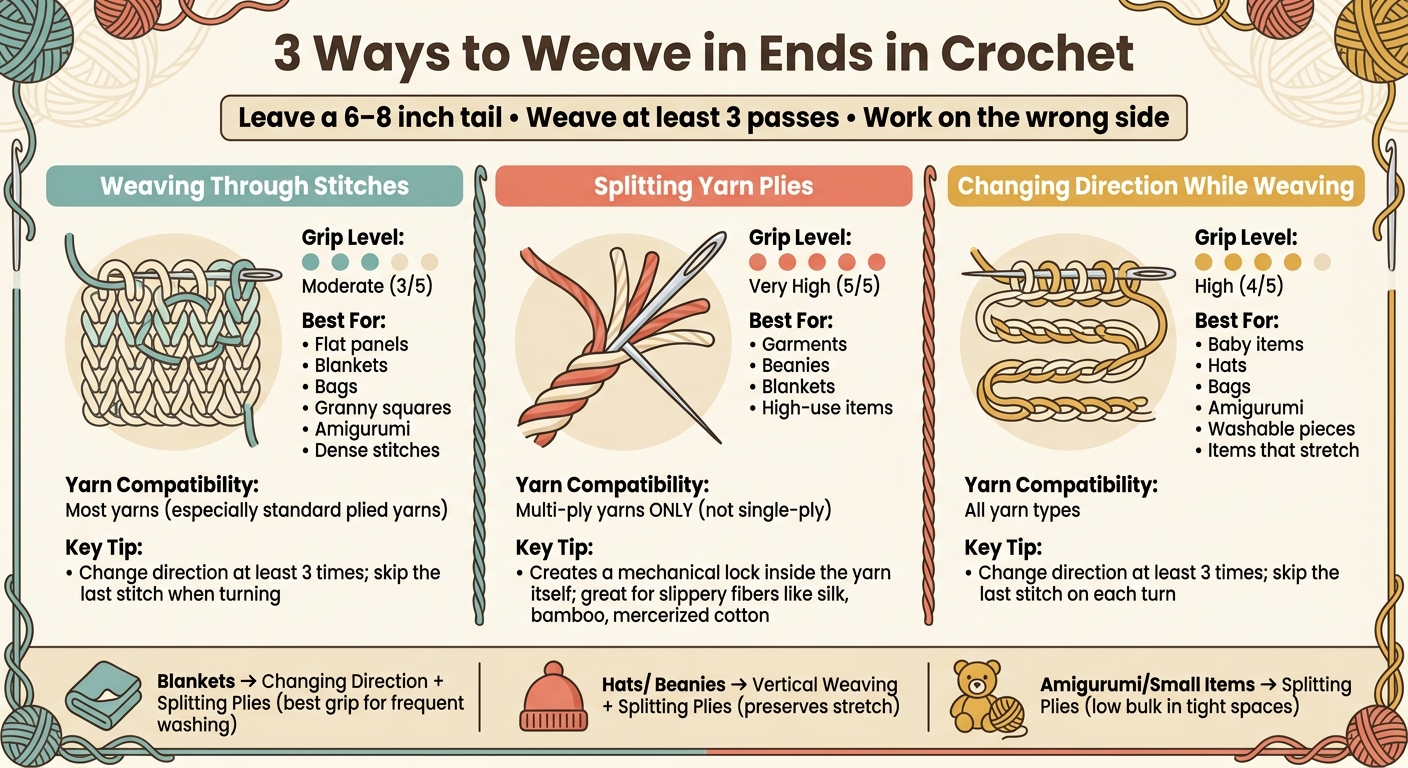
3 Ways to Weave in Ends in Crochet: Method Comparison Guide
| Method | Hold | Best For | Yarn Notes |
|---|---|---|---|
| Weaving through stitches | Medium | Blankets, bags, flat panels, granny squares | Works with most yarns |
| Splitting yarn plies | Very high | Garments, beanies, blankets, high-use items | Multi-ply yarn only |
| Changing direction | High | Baby items, hats, bags, amigurumi, washable pieces | Works with all yarns |
A few rules stand out. I keep the yarn snug, not tight, work on the wrong side, and check the front often so nothing shows. For hats, I avoid weaving straight across if it cuts down stretch. For blankets, I want more grip because they get washed a lot.
If I’m unsure, I use the strongest option my yarn can handle and add more direction changes for slick fibers.
Before you weave in ends, grab the right tools and leave yourself a long tail. It makes the whole job easier and helps the finish stay neat.
Use a tapestry needle and sharp scissors. Work on the wrong side so the tail stays out of sight, and check the right side as you go to make sure nothing is showing.
A bent-tip metal needle is especially handy when you're working with tight stitches. It slips through the fabric with less fuss.
With your tools set, you can start with the most direct method: weaving through the stitches.
Leave a 6–8 inch tail. That gives you enough length to thread the needle, weave the yarn in, and trim it cleanly without fighting for every inch.
"Always leave a long tail, at least 6″. When cutting the yarn, it is no time to be stingy." - Kj Hay, Technical Editor and Yarncrafting Expert, Lion Brand
Tails shorter than 6 inches are tougher to thread and more likely to slip out after washing. If the tail is too short to get through the needle, there’s a simple workaround: pass the needle through the stitches first, then thread the tail and pull it through.
Not all yarn behaves the same way. Slippery fibers like silk, bamboo, or mercerized cotton can slide around more, so they may need 5 or 6 passes. They also tend to hold better if you split the plies as you weave.
The stitch pattern matters too. Dense stitches like single crochet grip the tail more firmly, which makes hiding and holding the end easier. Lacy or openwork patterns are trickier because there are fewer solid spots to anchor the yarn. In those cases, weave along the structural lines of the stitches instead of dragging the tail across open gaps.
These details affect how firmly each method stays in place.
Thread the tail onto a tapestry needle and weave it through the back of the stitches. Change direction as you go so the tail stays put. This is the go-to method for most crochet fabric.
Pass the needle through the backs of several stitches, then turn and weave in a new direction. Do this at least three times, using different stitches for each pass. That change in direction helps hold the tail in place through friction.
One small detail matters here: when you turn, skip the stitch you just came out of before weaving back. If you go straight into that same stitch, the tail can slip more easily.
This method works well for dense fabrics, including:
Standard wool, acrylic, and cotton usually hold well with three passes. Slippery fibers are a different story. They often need extra passes and a bit more grip to stay secure.
Weave the tail snugly, not tightly. That way, the fabric stays flat and the tail can settle into the stitches instead of pulling them out of shape.
If the yarn still seems slippery, the next method adds more grip by splitting the yarn plies.
If standard weaving feels a little loose, split the plies for a firmer lock. Thread a sharp tapestry needle, pierce the center of the plies, switch direction, and repeat at least three times.
This gives the strongest hold. When you split the plies, you create a mechanical lock inside the yarn itself.
This is a good fit for pieces that see heavy use or frequent washing, like blankets, beanies, and garments. It’s less suited to tiny motifs or small accessories, where the extra handling can feel fussy.
Splitting yarn plies is especially useful with slippery fibers like silk, bamboo, and mercerized cotton. It also works well with plied wool and acrylic. Skip single-ply yarns since there are no plies to split.
Keep the tail snug, not tight. Pull too hard and you can cause puckering or create a stiff ridge. After each pass, lightly stretch the fabric so the finish stays flat.
If you want a flatter finish on small or delicate pieces, use the directional method next.
If a straight weave feels a bit loose, switch to directional weaving. This method holds the tail in place with friction, which gives you a much safer finish. The key is simple: change direction at least three times. Each pass should move through a different group of stitches, so the tail doesn’t have one straight route to slide back out.
Start on the wrong side and weave the tail through several stitches. Then turn 180 degrees, skip the last stitch you came out of, and weave back through a new path. Repeat that one more time to lock it down.
This is the safest option and the best pick for items that will go through the washing machine or get used a lot. Once the tail is woven in, the hold comes down to how many times you change direction.
"Weaving in at least two directions significantly reduces the chances that the yarn tails will work loose when the piece is used and laundered." - Kj Hay, Technical Editor at Lion Brand
Use this method for blankets, hats, baby items, amigurumi, bags, and other pieces that stretch, get tugged, or need frequent washing. For tall stitches like double crochet, weave up and down along the post instead of across the row. That helps prevent bunching.
Next, compare all three methods so you can match the right one to your project.
This method works with all fiber types, but it matters most with slippery yarns like silk, bamboo, and mercerized cotton. In those cases, add more direction changes for extra grip.
Keep the tail loose enough to lie flat. After each pass, lightly stretch the fabric so the finish stays smooth and flat.
The best method depends on the project. Stretch, wash frequency, and stitch density are what matter most. If you want the shortest route to a secure finish, use the guide below.
For blankets, change direction as you weave and split the plies for extra grip. Blankets need the firmest hold, and they go through frequent washing. Using both methods together gives you the most durable finish.
For hats and beanies, don’t weave across the row. That can cinch the stitches and cut down on stretch. Instead, weave vertically into the posts. Hats need elasticity, and this method helps keep the shape. As you weave, split the plies to hold the tail in place without making the fabric feel tight.
For amigurumi and other small items, splitting the plies is the least bulky choice. Space is tight, so this keeps the finish flat and neat.
| Project Type | Best Method | Why It Works |
|---|---|---|
| Blankets | Changing direction + splitting plies | Best grip for frequent washing |
| Hats/Beanies | Vertical weaving + splitting plies | Preserves stretch |
| Amigurumi/Small Items | Splitting plies | Low bulk in tight spaces |
This table gives you a fast way to compare grip, fit, and fiber limits.
| Method | Grip | Best Project Types | Yarn Compatibility |
|---|---|---|---|
| Weaving Through Stitches | Moderate | Flat panels, dense stitches, standard rows | Most yarns, especially standard plied yarns |
| Changing Direction | High | Blankets, hats, heavy garments | All yarn types |
| Splitting Yarn Plies | Very High | High-wear items, blankets, garments | Multi-ply yarns only |
Splitting plies gives the strongest hold, but it only works with multi-ply yarn.
A simple rule: use the strongest method your yarn and project can handle, then trim the tail close.
Once you’ve picked a weaving method, use tools that fit your yarn and stitch size. A metal tapestry needle is the go-to choice. For worsted-weight yarn, size 18 usually works well. For lighter yarn, go with size 20 or 22. A curved metal needle tends to slip through stitches with less drag, which makes it a good fit for most projects. If you’re working with super bulky yarn that won’t fit through a needle eye, use a small crochet hook, such as a US G/6 (4.25 mm), to pull the tail through.
A needle threader can also save you some hassle, especially if the yarn is thick or starting to fray. These tools work well across all three weaving methods.
Smooth alpaca-silk and alpaca-bamboo blends often need more passes than fuzzy alpaca yarn. That extra weaving can make a big difference.
If you want to see the process instead of just reading about it, a quick video can help. Alpaca Direct's YouTube channel has short technique videos that show these methods in action.
After looking at all three methods, the choice comes down to fiber, stitch pattern, and wear. There isn't one method that works for every project. The best option depends on the yarn, the fabric, and how the piece will be used.
Weaving through stitches is the standard place to start. Splitting plies gives the strongest grip. Changing direction helps lock the tail in place.
If you're not sure which route to take, go with the strongest method your yarn and fabric can handle. For slippery fibers, add extra direction changes to help keep the tail secure.
Choose the method based on your project and the fiber you’re using. For most projects, the Rule of Three - weaving the tail in three directions - is the most flexible and secure option.
With tall stitches, weave the tail vertically so the fabric doesn’t pucker. If you’re working with slippery yarn, make five or six passes and split the plies to add friction. Work on the wrong side, use a matching yarn color, and leave at least 6 inches.
It’s best to weave in ends on the wrong side of your project so they stay hidden and secure. If you do it on the right side, the tail can peek through or leave little bumps that show.
Keeping the ends on the back of the fabric - like under the back bumps or tucked inside the stitches - helps the front stay clean and neat.
If your yarn tail is too short to thread a needle, switch to a smaller crochet hook. Slide the hook along the path where you plan to weave in the end, catch the short tail, and pull it through the stitches.
Another option is to pass an unthreaded needle under the stitches first. Then thread the tail and pull it through. If you want a bit more hold, add a small dab of fabric glue first, or undo a little yarn so you can join a longer strand.

Comments will be approved before showing up.










