Your Cart is Empty
Winter Sale! Shop Now > |Free USA Shipping On Orders Over $75!


If I want a shoulder seam that looks flat on the outside and stays firm in wear, I use mattress stitch. It works best when I sew under the stitch bars just below the bind-off edge, line up both pieces from armhole to neckline, and tighten the yarn every 1 to 2 inches.
Here’s the full idea in plain English:
In other words: the goal is a clean outside, a steady inside, and less shoulder stretch over time. For many knitters, this is the go-to shoulder join because it hides the seam on the public side while adding structure where it counts.
A few details matter most: where I place the needle, how often I tighten, and whether both sides stay matched as I sew. Get those right, and the seam usually comes out neat without puckers, gaps, or drag.
One quick note: if the bind-off was shaped in steps, I sew each step in order instead of forcing the edge into one straight line.
That’s the whole method in a short version.
How to Sew a Mattress Stitch Shoulder Seam: Step-by-Step
A little prep makes the seaming part much easier.
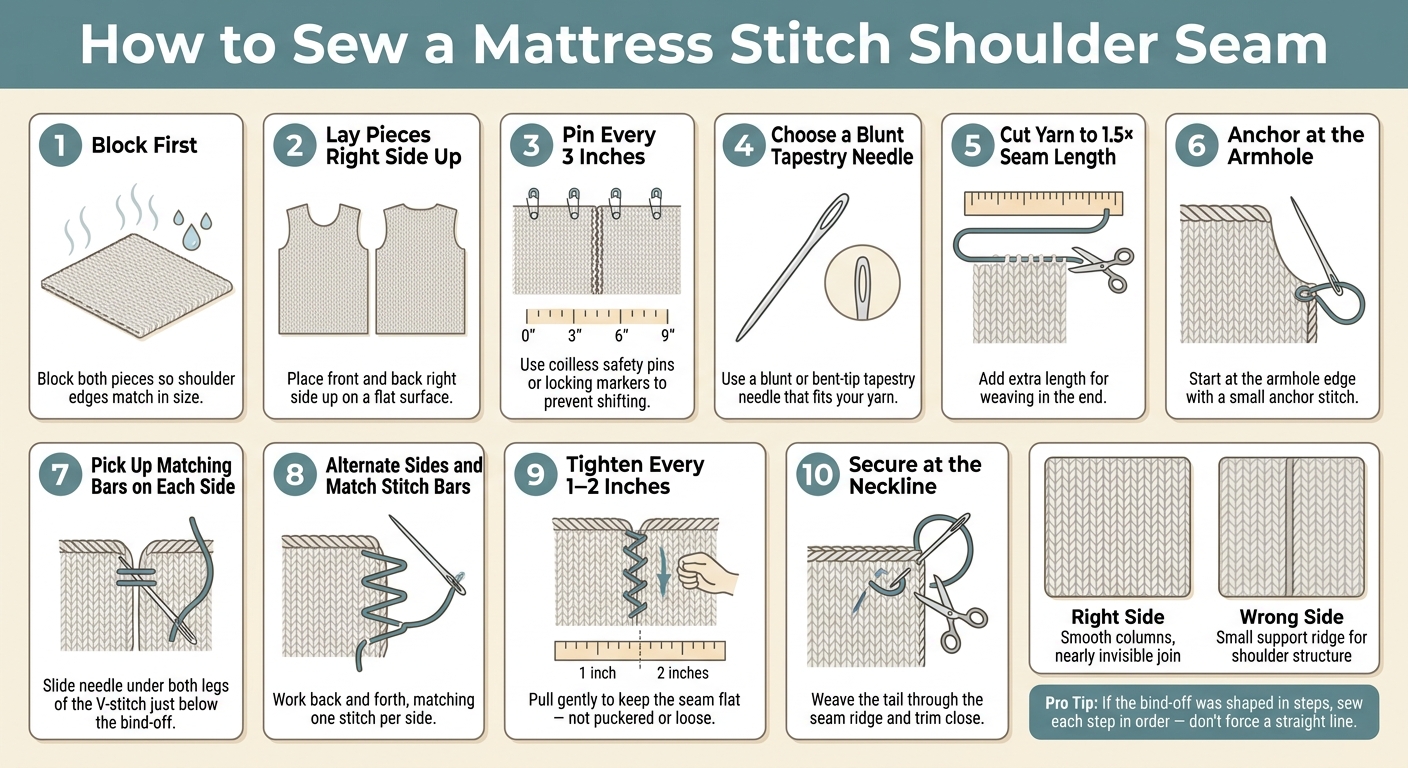
Block both pieces first. Then place them right side up on a flat, well-lit surface, with the shoulder edges lined up and parallel. Pin the edges every 3 inches with locking markers or coilless safety pins so nothing shifts while you work.
Use a blunt tapestry or darning needle. If you have one, a bent-tip needle can make it easier to slide under the bars.
Cut a length of yarn that's about 1.5 times the seam length, then add a bit extra for weaving in.
Gently stretch the bind-off edge and look for the row of V-shaped stitches just below it. Slide the needle under both legs of each V, not through the bind-off chain.
With the edges pinned and the bars picked out, you're ready to start seaming from the armhole up to the neckline.
With the pieces pinned and lined up, begin at the armhole and sew toward the neckline. Insert the needle at the armhole edge. Slip it under both legs of the first stitch just below the bound-off edge on one piece, then into the matching stitch on the other piece. Make a small anchor stitch to secure the start.
After that, work back and forth between the two sides, matching one stitch on each side as you sew. If the shoulder was shaped with stepped bind-offs, sew each step in order. As you move up the seam, keep the same alignment so both pieces stay even.
Tighten the yarn every 1 inch to 2 inches so the seam doesn’t pucker or put too much strain on the yarn. The seam should lie flat and blend into the fabric. If it starts to feel stiff, ease the tension by stretching both sides lightly. As you get closer to the neckline, check that both sides still match and adjust if needed.
When you get to the neckline edge, make one last securing stitch through the edge so the yarn stays firmly anchored in place. Before you tie off, give the seam a gentle stretch from end to end to make sure the tension feels even.
After that, check both sides of the seam. Then weave the tail back and forth through the seam ridge for a few inches, and trim it close once it’s secure.
Now look at the right side. The seam should look smooth on the outside and steady on the inside. The front and back stitch columns should line up cleanly, without puckering, gaps, or visible yarn.
On the wrong side, you should see a small, neat ridge where the edge stitches were joined. That ridge helps support the shoulder and helps it hold its shape.
The right needle, yarn, and tutorial support make this finish easier.

Once your seam is lined up, the right tools can make the whole job smoother and neater.
Use a blunt tapestry needle that fits your yarn. It moves between stitches without splitting the strands. Pins help too, especially when you want to keep the front and back pieces lined up before you start sewing.
For seaming yarn, your project yarn is often the best pick if it’s smooth and strong. Matching the color, weight, and fiber helps the seam blend in so it’s hard to spot. If that yarn is delicate or has a novelty texture that could catch while you sew, switch to a plied alpaca or wool-blend yarn in a close color match instead.
If you want to see the process instead of just read about it, Alpaca Direct offers seaming tutorials on YouTube. Alpaca Direct also carries alpaca yarns, blunt tapestry needles, and seaming notions.
The Technique Tuesday series on the Alpaca Direct YouTube channel includes instructor Kelley Hobart showing mattress stitch variations and joins made for shoulders.
Watch Alpaca Direct's mattress-stitch videos on YouTube for a visual refresher.
Yes. You can use mattress stitch on sloped shoulders, including shoulders shaped with stepped bind-offs or short rows.
Line up the matching steps on the front and back pieces, then seam them the same way you would a standard horizontal shoulder seam. It helps to pin or mark the shaped edges first so the steps stay matched. Also keep your tension even across each step, or the shoulder can end up a bit lopsided.
You can ease the pieces together by taking your needle through two stitches at once on the longer side now and then. Do it every few stitches, not on every stitch, so the lengths line up better.
If the size difference is large, it’s better to adjust your knitting or re-bind the pieces so they match. An eased seam can help, but it won’t look perfect when the lengths are far apart.
Usually, it’s best to use the same yarn as your project. That way, the seam matches the weight and color, so it blends in more naturally.
If your yarn is delicate or loosely spun, a more firmly spun yarn in a similar color can help the seam hold up better. But if you want the most invisible finish, the standard pick is still the project yarn.

Comments will be approved before showing up.


