Your Cart is Empty



If your yarn keeps tangling in colorwork, the fix is usually simple: keep your yarn order the same, spread stitches so floats stay loose, catch long floats every 5 stitches or about 1 inch, and twist strands at color changes to stop gaps.
I see most colorwork issues fall into 4 main problems:
Here’s the short version:
| Problem | What to do |
|---|---|
| Twisted yarn | Keep each color in the same position and untwist as soon as yarn starts pulling |
| Uneven tension | Spread stitches often on the needle before carrying yarn across |
| Long floats | Catch them every 5 stitches |
| Color gaps | Cross the yarns once at the color switch and snug the first stitch |
The big idea: small tension problems turn into puckering, snags, and loose spots fast. I’d fix them as soon as I feel extra pull in the yarn or see the fabric drawing in.
That means you can check your work every few repeats, adjust early, and keep your colorwork looking smooth and even.
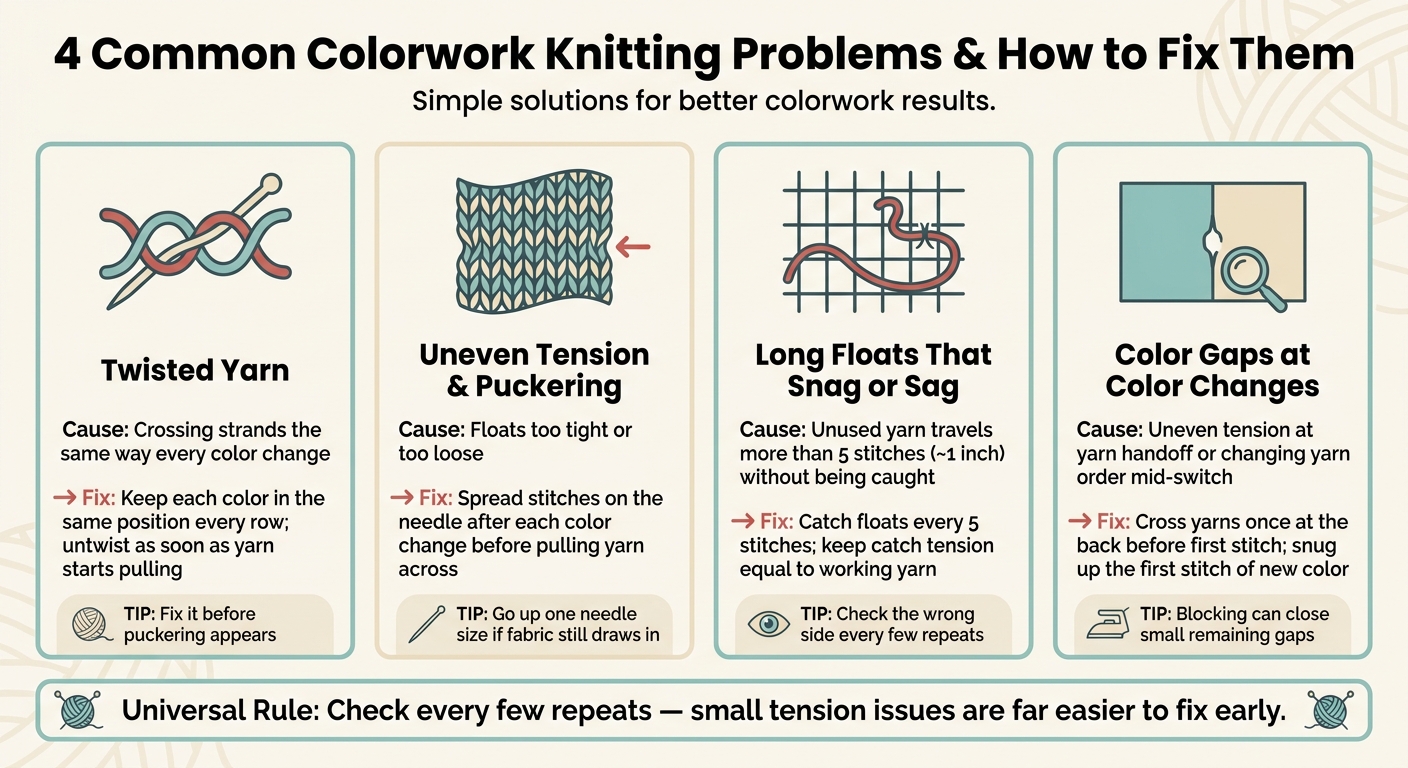
4 Common Colorwork Problems & Quick Fixes

You reach for your working yarn, and suddenly both strands are wound into a tight twist. One ball pulls harder than the other, and your tension starts to slip. It’s a small thing, but it can throw off the whole row.
Each time you switch colors, one strand passes either over or under the other. If you always grab the new color from the same side, the strands cross in that same direction every single time. Bit by bit, that repeated crossing builds twist.
In two-color stranded knitting, especially when color changes happen often, that twist can stack up fast.
The simplest fix is also the one that works best: choose one color and keep it in the same position for the whole row. For example, hold the main color over and the contrast color under every time you pick them up. That steady setup keeps the yarn path cleaner and cuts down on tangling.
A few small setup changes help too:
If you untwist the strands and the fabric still feels uneven, the issue usually isn’t twist anymore. At that point, it’s tension.
Stop and untwist as soon as the yarn starts pulling hard or the strands begin winding around each other. Don’t wait for puckering to show up. By then, the tension is already uneven and harder to fix.
Untwist before the fabric starts to distort.
Once the strands are moving freely again, take a second to check your floats too. They should still be lying even and not pulling tight.
If the yarn has stopped twisting but the fabric still looks off, check the floats next.
After a few rounds, lay the piece flat and take a close look. If the colorwork section looks narrower than the plain fabric beside it, or the fabric ripples or feels stiff, you're dealing with puckering. In most cases, that means the floats are too tight.
Tight floats pull stranded fabric inward. That can make it feel stiff, look narrower, or develop a wavy surface. Short floats also reduce stretch, which makes the fabric draw in even more.
A small habit can help a lot: after each color change, spread the stitches apart on the right needle before pulling the new yarn across. That gives the float more room and helps it stay loose instead of cinching the fabric.
For knitting in the round, the aim is simple: keep the floats long enough to stay relaxed. If you're using Magic Loop, try working inside out. That makes the floats travel a longer path, so they're less likely to pull tight.
If the colorwork section still looks narrower than the plain fabric beside it, go up one needle size for the stranded part.
Sometimes the problem starts with twisted strands and then shows up as tight fabric. If that's happening, fix the twist before the puckering spreads.
And if the fabric keeps drawing in, pause and check the strands. They may have twisted tightly enough to affect the floats.
If untwisting didn’t solve the problem, look at the floats next. Long floats can snag, droop, or pull the fabric inward when one color travels too far without being caught.
A float is usually too long if it stretches across more than 5 stitches. Loose floats may dangle on the wrong side or catch on fingers or jewelry. Tight floats do the opposite: they pull the fabric in.
Catch floats every 5 stitches to keep them secure. The key is to catch the unused yarn without pulling it too snug. It should sit with about the same tension as the working yarn. If your catches are unevenly spaced, the wrong side can look messy and your gauge can shift.
Take a look at the wrong side every few repeats. In the round, watch the join points a little more closely, since floats often tighten there. A quick check now can save you from spotting the issue on the front later.
Once float length is even, check for gaps at the color change.
If your floats look fine but you still see a color change gap, the issue is usually the handoff itself. These gaps show up as tiny holes or loose columns where one color switches to the next. In most cases, that happens because the working yarn was pulled unevenly at the switch, or the unused yarn wasn’t secured well and loosened a bit. Changing yarn order at the switch can also leave the first stitch loose and create a visible gap.
Most color-change gaps come from uneven tension at the handoff. The working yarn may have been pulled too tightly or too loosely, or the unused yarn may not have been held in place well enough. Another common cause is changing yarn order during the switch, which can make the first stitch of the new color sit loose and leave a visible gap.
Cross the yarns once at the back before working the first stitch in the new color. That simple move locks the colors together and helps stop gaps from forming. If you’re carrying yarn, trap the unused yarn under the next stitches so it stays secure. Then snug up the first stitch after the switch so it matches the stitches beside it. If a small gap is still there, blocking can help close it.
If you want to see the motion in action, video demos help a lot. The Alpaca Direct YouTube channel and the weekly Technique Tuesday live show both offer stranded colorwork demos and troubleshooting.
Use this final checklist to catch the four issues before they throw off your gauge. Twisted strands, puckered fabric, snagging floats, and color gaps usually trace back to the same few causes, and the fixes are simple.
Keep the yarns in the same order every time you change colors. That one habit goes a long way toward stopping repeat twists. Every few stitches, spread the stitches on your right-hand needle so the floats have enough space to lie flat instead of pulling tight.
Catch long floats every 5 stitches. That helps keep them secure and makes the fabric more even. If the knitting starts to tighten up, stop right there and fix it before going on. A small issue is much easier to correct early than after a full round.
Your colorwork fabric should look as even as stockinette in one color. If it starts to feel tight or look uneven, pause, untwist, and reset your float tension before you keep knitting. These small check-ins help keep colorwork smooth and even.
Your floats may be too tight if the fabric looks puckered, bunched, or distorted. Another clue: it gets harder to insert your needle or hook into stitches on later rows.
As you work, spread the stitches across the needle every few stitches so the floats don’t pull the fabric in. If you spot distortion, adjust your technique or try knitting the project inside out.
It depends on the float length and the item you’re making. Catching floats can help stop long strands from snagging, and it can also help keep your tension even.
Some knitters catch floats every 3 to 5 stitches. Others only do it when a float goes past 5 to 6 stitches. The best approach comes down to personal preference and the kind of fabric consistency you want.
Yes. Wet blocking or steaming can help yarn fibers bloom and fill in gaps. It can also smooth uneven stitches, which makes the fabric look more even.
Use caution with steam on alpaca-wool blends. Uneven heating can cause a puckered, seersucker-like effect. Blocking works best for improving tension and texture, not for fixing structural mistakes or pattern errors.

Comments will be approved before showing up.










