
Free Teddy Bear Lovey Knitting Pattern: Step by Step

To knit a teddy bear lovey, I follow 3 main steps: make the blanket, shape and stuff the bear head, then embroider the face and sew it on. I use quality yarn and the official Red Heart/Yarnspirations PDF for stitch counts, shaping, and finishing - not a separate bear pattern.
Before starting, I check my gauge over 4 inches (10 cm). From there, I focus on secure seams, embroidered features instead of buttons or plastic eyes, and washing and drying as the yarn and stuffing labels direct.
My final check? No loose threads, open seams, or exposed stuffing. I include care instructions and label the lovey <u>for supervised, awake use only</u> - never for sleep in a crib, bassinet, or play yard.
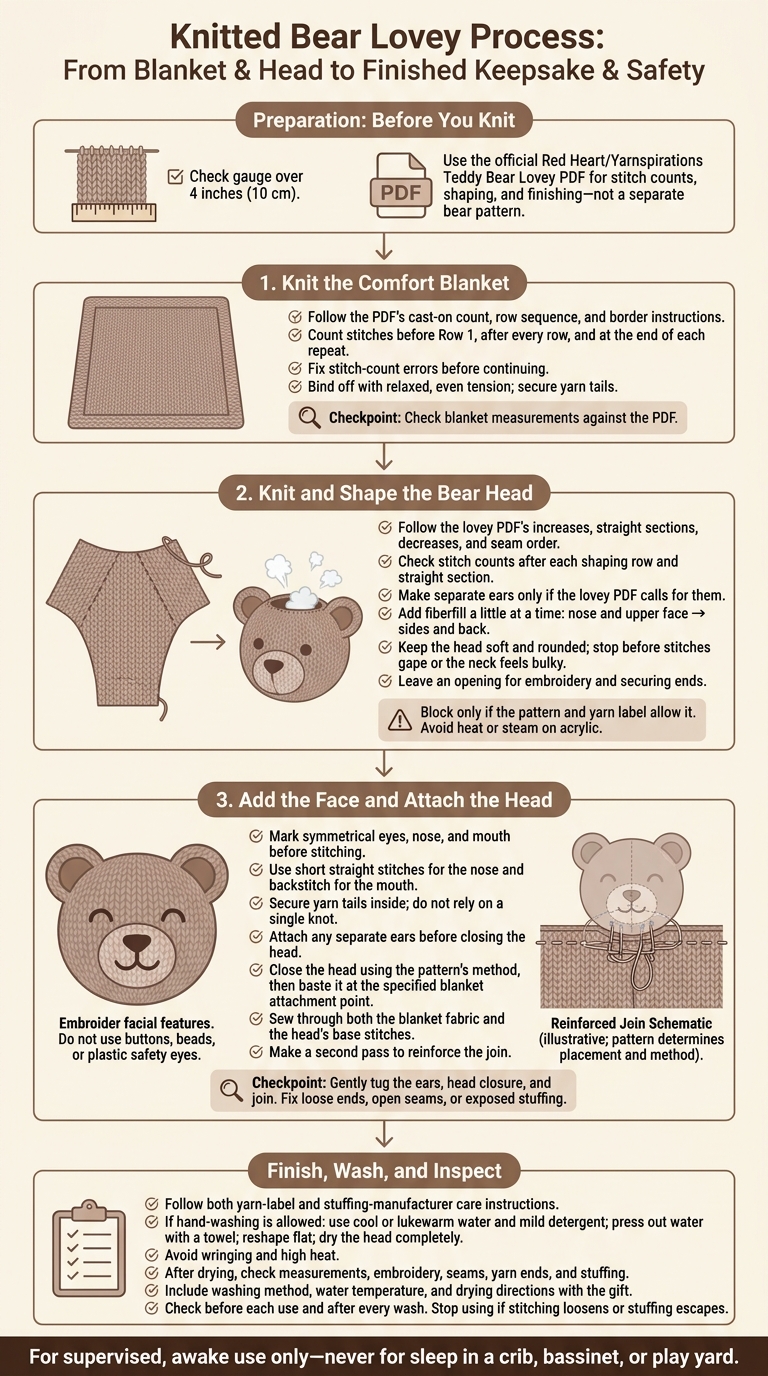
Teddy Bear Lovey Knitting and Finishing Guide
How to Knit: The Whip Stitch Knitting Technique
Step 1: Knit the Comfort Blanket
Once you’ve confirmed your gauge, use the official Red Heart Teddy Bear Lovey PDF for the blanket’s cast-on count, row sequence, and border instructions.
Cast On and Knit the Blanket
Cast on the number of stitches listed in the PDF, then count your stitches before starting Row 1. Knit the rows in the printed order, working the edge stitches exactly as written.
Use a row counter or checklist to track completed rows. Check your stitch count after every row and at the end of each repeat. If the count is off, find and fix the mistake before continuing. Don’t add or remove a stitch just to make the numbers match.
Complete the Border and Bind Off
Work the PDF’s finishing rows, then bind off with the method named in the pattern. Keep your tension relaxed and even so the edge doesn’t pull inward.
Weave the cast-on and bind-off tails through several nearby stitches on the wrong side. Change direction once or twice to secure each tail without adding bulk, and trim the ends only when they’re secure.
Lay the blanket flat and fix any loose ends or dropped stitches. Check its measurements against the PDF before starting the bear head.
Step 2: Knit and Shape the Bear Head
Follow the lovey PDF’s head instructions, not a separate teddy bear pattern. Write down the cast-on count, shaping rows, straight sections, and final stitch count for the lovey bear head.
Shape the Head and Ears
Work the increases, straight rows, and decreases in the order given. Mark the right side and any shaping points named in the pattern. After each shaping row and straight section, check your stitch count and compare the left and right sides before moving on.
Only make separate ears if the lovey PDF calls for them. Some Red Heart instructions shape the ears directly into the head, so stick with the lovey pattern. Block only if both the pattern and yarn label allow it, and avoid heat or steam on acrylic.
Seam the Head and Add Stuffing
Follow the pattern’s seam order once the shaping is complete. If it calls for separate ears, position and tack them as directed before closing the head.
Pull the fiberfill into small wisps and add a little at a time. Start with the nose and upper face, then fill the sides and back. After each addition, use your fingers to shape the head.
Aim for a soft, rounded head. Stop before the stitches gape or the neck feels bulky. Shaping it now helps the face sit evenly and keeps the attachment secure. Leave an opening large enough to embroider the face and secure the remaining ends inside.
Step 3: Add the Face and Attach the Head
Embroider the Face and Close the Head
Use removable chalk or waste yarn to mark the eyes, nose, and mouth, following the pattern illustration. Check that the placement is symmetrical from the front and sides before stitching.
Embroider all facial features. Do not use buttons, beads, or plastic safety eyes. Choose smooth, colorfast yarn or floss. Stitch the nose with short straight stitches and the mouth with backstitch. Keep stitches snug, but don’t pull so tightly that the knitting puckers.
Before closing the head, weave in the yarn tails through several interior stitches. Secure them under nearby stitches, then trim. Don’t rely on a single knot.
Attach any separate ears before closing the head. Clear stray fiberfill from the opening, then close it using the method specified in the pattern. Hide the remaining yarn tail inside and check for gaps or loose loops.
Sew the Head to the Blanket
With the head closed, baste it to the blanket at the attachment point shown in the pattern. Check that the face points outward and the blanket hangs evenly.
Sew through both the blanket fabric and the head’s base stitches, rather than catching only surface loops. Make a second pass to reinforce the join, then secure the yarn tail.
Gently tug the ears, head closure, and join to check that they hold. Fix any shifted seams, exposed fiberfill, or loose ends before use.
Finish and Care for the Lovey
Once your teddy bear lovey is assembled, check it against the pattern before gifting. Review the gauge, size, shaping, embroidery, and head attachment.
Wash and Check the Finished Lovey
Secure all yarn tails before trimming them. Follow both the yarn label and the stuffing manufacturer’s care instructions. If hand-washing is allowed, use cool or lukewarm water and mild detergent. Press out excess water with a towel, reshape the lovey flat while damp using blocking mats and pins, and let the head dry completely. Avoid wringing and high heat.
Once it’s dry, compare the blanket and head measurements with the pattern. Look for shifted embroidery, loose ends, gaps in seams, or exposed stuffing. Fix any problems before gifting, and include the care instructions.
Include Care and Safe-Use Instructions
Send washing instructions with your gift, including the washing method, water temperature, and drying directions. Ask the caregiver to check the lovey before each use and after every wash. If stitching loosens or stuffing escapes, stop using it.
Label the lovey for supervised, awake use only. Keep it out of cribs, bassinets, and play yards during sleep.
Find Knitting and Finishing Videos
For a quick look at finishing techniques for this lovey, watch Alpaca Direct’s knitting videos on YouTube.
FAQs
What should I do if my gauge doesn’t match?
Adjust your needle size until your gauge matches the pattern. The listed needle size is just a starting point - use whichever size gives you the specified gauge. Check before casting on to help your project turn out the right size.
For help with techniques or tools, visit the Alpaca Direct website or browse our YouTube tutorials.
How do I choose washable yarn and stuffing?
Choose easy-care or machine-washable yarn so your teddy bear lovey is easy to use and clean every day. Match the stuffing and firmness to the recipient: loosely stuff the head for a child’s soft, cuddly toy, or use a firmer fill for display. For extra stability, add weighted materials, such as Poly-Pellets, to the base.
How can I keep the bear’s head from flopping?
Adjust the stuffing’s firmness to suit the bear’s use. For an adult’s display bear, stuff the head firmly to give it structure and support. For a child’s bear, add enough filling to hold its shape, but keep it soft and cuddly.
Attach the head securely to the body with a joining method such as Kitchener stitch or whip stitch.