Your Cart is Empty



I check the stitch count, row repeat, and fabric side before undoing any stitches. Blocking can help mild curl, but it won’t fix a misplaced row or missing shaping.
Here’s how I choose the repair for your shawl:
My rule: <u>use the smallest repair that restores the pattern</u>. Before continuing, I check both sides, recount the stitches, and record the next row. A lifeline and a washed, blocked swatch help me avoid repeating the same mistake.
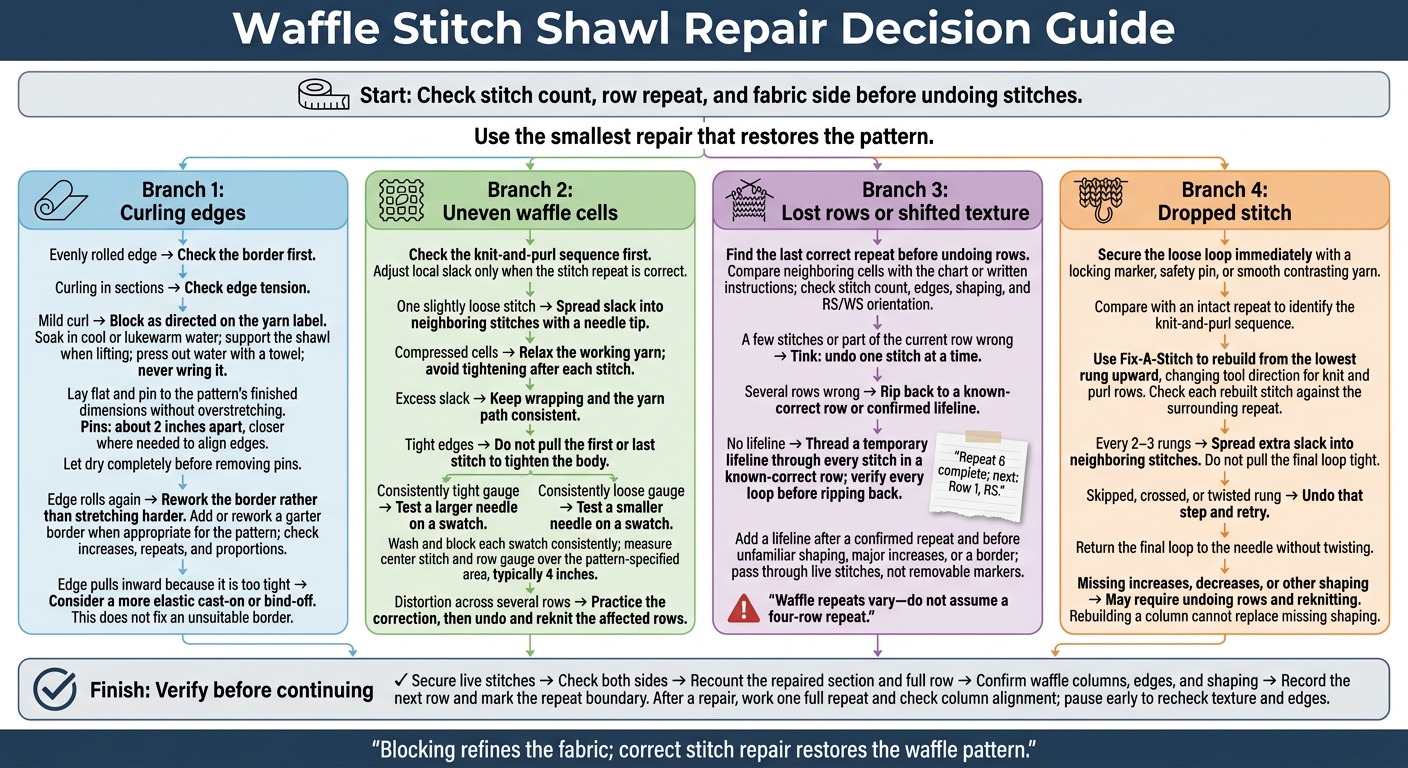
Waffle Stitch Shawl Repair Decision Guide
An evenly rolled edge usually points to the border. Curling in sections, tight columns, or loose purls points to tension. Fix the border first when the edge rolls evenly. Work on tension when the texture looks distorted in sections.
Wet block as directed on the yarn label. Soak the shawl in cool or lukewarm water, support it as you lift it, and press out the water with a towel - never wring it. Lay it flat and pin it to the pattern’s finished dimensions without overstretching. Alpaca has relatively little elasticity.
Place pins about 2 inches apart, moving them closer together where needed to align the edges. Let the shawl dry completely before removing the pins. Then check whether the edge stays flat and the waffle cells hold their shape. If the edge rolls again, rework it instead of stretching harder.
| Repair | Best use | Stitch counts and shaping | Limits |
|---|---|---|---|
| Blocking | Mild curl or small surface irregularities | Keeps stitch and row counts unchanged; sets finished dimensions | Structural curl needs an edge repair. |
| Add or rework a garter border | Persistent curl from a narrow or unsuitable border | May add or replace stitches and rows; check increases, repeats, and proportions | Must work with the pattern; may require undoing stitches |
| Rework the edge with a more elastic cast-on or bind-off | An edge that pulls inward because it’s too tight | Usually keeps the stitch count unchanged while adding flexibility | Does not fix an unsuitable border |
If the border lies flat but the waffle cells still look uneven, check stitch tension next.
Knit a swatch with several waffle repeats using the shawl’s yarn, needles, and knitting style. Wash and block it, then measure stitch and row gauge in the center over the area specified by the pattern - typically 4 inches. Check the cells’ shape, too.
Keep the yarn path steady, and avoid tightening the yarn after each purl. If gauge is consistently too tight, test a larger needle. If it’s too loose, test a smaller one. Wash and block each swatch the same way before comparing them.
| Tension symptom | Likely cause | Practical fix |
|---|---|---|
| Compressed cells | Tightening the yarn after each stitch | Relax the working yarn and practice on a swatch |
| Excess slack between stitches | Inconsistent wrapping | Keep the yarn path consistent; redistribute small amounts of slack |
| One slightly loose stitch | Extra yarn in that stitch | Use a needle tip to spread slack into neighboring stitches |
| Tight edge stitches | Pulling the first or last stitch after turning | Handle edges consistently; don’t use edge stitches to tighten the body |
| Distortion across several rows | A repeated tension habit or gauge mismatch | Undo the affected rows and reknit after practicing the correction |
Adjust local slack only when the stitch repeat is correct. Use a needle tip to move slack into adjacent stitches rather than pulling one loop tight. Repeated distortion needs reknitting; blocking won’t fix changes in waffle-cell size.
If the stitch count no longer matches, stop and check the last correct row.
If your stitch count is right but the texture has shifted, find the last correct repeat before undoing rows.
Shallow squares, broken columns, or a band that looks like ribbing usually point to a skipped row, a repeated row, or a flipped fabric side. Don’t assume the repeat has four rows unless your pattern says so - waffle repeats vary.
Lay the shawl flat without stretching it. Compare several neighboring cells with the chart or written instructions. Work backward from the first visible mistake until the texture matches again. Before undoing rows, check the stitch count, edge stitches, and shaping.
Use the pattern to identify the right side (RS) and wrong side (WS), rather than choosing the more textured face. Compare a known edge or increase line with correctly worked fabric. Note the last correct row, repeat number, next row, and fabric side.
Once you’ve found where the mistake begins, choose the smallest repair that restores the repeat.
For recent errors, tink: undo one stitch at a time. If several rows are wrong, rip back to a confirmed lifeline. Don’t have one? First, thread a temporary lifeline through every stitch in a known-correct row. Check that every loop is on the lifeline before pulling out more rows.
| Method | Use it when | Important limit |
|---|---|---|
| Tink | A few stitches or part of the current row are wrong | Follow each loop carefully. |
| Rip back | Several rows are wrong or the repeat restarted on the wrong side | Return to a known-correct row; recheck stitch count and orientation. |
If you’re unsure, stop at the last confirmed row and rebuild from there.
Use a row counter or written note to track the completed repeat and the row to work next:
Repeat 6 complete; next: Row 1, RS.
If the pattern allows it, place a removable marker at the beginning of each completed repeat and count repeats as you work. Keep written notes separate so stitch markers remain available for shaping and edges.
A lifeline marks your last verified row if the texture shifts again. Add one after a confirmed repeat and before unfamiliar shaping, major increases, or a border. Thread smooth scrap yarn through every live stitch on the needle, but not through removable markers. Record the pattern row where you placed it. After a repair, work one full repeat and check that the columns line up before continuing.
If only one stitch has dropped, repair it in place before undoing rows. Fix-A-Stitch lets you rebuild the knit and purl pattern without turning the shawl, keeping the waffle texture intact.
Secure the dropped loop right away with a locking stitch marker, safety pin, or smooth contrasting yarn. Lay the fabric flat, then compare the damaged column with an intact repeat to identify the knit and purl row sequence.
Insert Fix-A-Stitch into the loop and work upward from the lowest rung. Switch the tool’s direction as the rows change between knit and purl. Return the final loop to the needle without twisting it.
Practice both tool directions on a waffle swatch before working on the shawl. Check each rebuilt stitch against the surrounding waffle repeat before moving to the next rung. Every 2–3 rungs, spread extra slack into neighboring stitches rather than pulling the final loop tight. If a rung looks skipped, crossed, or twisted, undo that step and try again.
If the dropped section includes an increase, decrease, or other shaping, you may need to undo rows and rework it. Rebuilding a column can’t replace missing shaping.
For a visual walk-through, watch Alpaca Direct’s Fix-A-Stitch video on YouTube.
Before starting the next repeat, check the repair, secure any live stitches, and use the smallest reliable fix. Tink a recent mistake. If several rows are misaligned, return to a lifeline or the last correct repeat.
Check both sides of the fabric. Count the stitches in the repaired section and the full row, then confirm that the waffle columns and edge stitches match the pattern.
Mark the repeat boundary before moving on. Knit a few stitches, then pause to recheck the waffle texture and edge.
Use a blocked swatch made with the same yarn, needles, stitch pattern, and edge treatment to check the finished fabric and practice Fix-A-Stitch. Blocking refines the fabric, but only correct stitch repair restores the waffle pattern.
Yes. A garter stitch or seed stitch border can help stabilize the fabric, add structure, and keep it from curling.
If the edge is uneven or too tight, undo just the bind-off row. Then pick up the live stitches with a Fix-A-Stitch tool and bind off again with a different finish or a stretchier technique.
Use locking stitch markers to mark pattern repeats and transitions. Place one at each repeat boundary to keep track of your position and spot missing stitches. When you take a break, use the markers to secure live stitches so they don’t drop.
For more guidance, check out the Alpaca Direct blog or our instructional YouTube videos.
Choose a Fix-A-Stitch size that fits your yarn’s thickness or your project’s needs. Sizes include Lace (extra small), 3.5 mm (US 4), 5 mm (US 8), and 7 mm (US 10.75).
Working with brushed alpaca or mohair? Use a smaller hook to help avoid snagging fibers that tend to cling. For more guidance, visit the Alpaca Direct YouTube channel.

Comments will be approved before showing up.










