Your Cart is Empty



You do not need to restart every time you spot a lace mistake. In most cases, I’d make one check first: did the error change the stitch count, and did it change the shape? If the answer is no, I may leave it alone. If the answer is yes, I’d fix it with the smallest safe repair.
Here’s the short version:
A few facts matter here. Lace errors stand out more because the fabric is open and repeated. And blocking can make mistakes more visible, not less. That’s why I’d check the exact repeat, compare it to the chart, and fix only what needs fixing.
If I wanted one simple rule to follow, it would be this: restore the stitch count, keep the shape right, and disturb as little knitting as possible.
Before you touch a single stitch, take a minute to figure out what went wrong. The kind of error tells you which fix makes sense. Once you know the type, use the least invasive repair method.
This chart helps you spot the issue fast:
| Error Type | Visual Cue | Effect on Stitch Count |
|---|---|---|
| Dropped Stitch | Gap in fabric with a live loop and horizontal "ladder" strands | Decreases by 1 per drop |
| Missed Yarn Over | Solid area where an eyelet should be | Decreases by 1 per missed YO |
| Wrong Decrease | Inconsistent or uneven slant in the fabric | May increase or decrease depending on the error |
| Off-count Repeat | Motifs don't align with markers or previous rows | Varies; usually a missed or extra stitch |
Use the chart to sort the problem into one of two buckets: structural or cosmetic. That small step can save a lot of guesswork.
The most dependable way to find an off-count repeat is to count stitches one section at a time, not across the whole row in one sweep. Put markers between repeats, count each section on its own, and compare that number with what the pattern calls for on that row. When one section doesn't match, you've found the trouble spot.
If your repeats aren't marked yet, add markers now. It makes the search much easier and keeps you from scanning the same row over and over.
After you find the problem repeat, trace the columns straight down and compare them with the chart or written instructions. A missed yarn over often shows up as a solid patch where an eyelet should be. A wrong decrease can leave the fabric with a slant that looks uneven or out of line.
Lace charts are usually read from the bottom right. On odd, right-side rows, read from right to left. On even, wrong-side rows, read from left to right.
You don't need a huge toolkit here. Two simple tools handle most of the detective work, and you can see them in action in our knitting video tutorials. If you spot a dropped stitch, slip a locking stitch marker through the live loop right away so it doesn't run farther while you finish the row. A spare DPN is handy too, especially when you want to hold open one section and inspect the stitches below.
If you're working with brushed alpaca or mohair yarns, the fibers tend to cling to each other, which makes stitches harder to separate. In that case, use a smaller crochet hook so you don't snag the yarn.
With the error pinned down, the next step is picking the repair method. See the Alpaca Direct YouTube channel for a visual walkthrough of lifelines and Fix-A-Stitch tools.
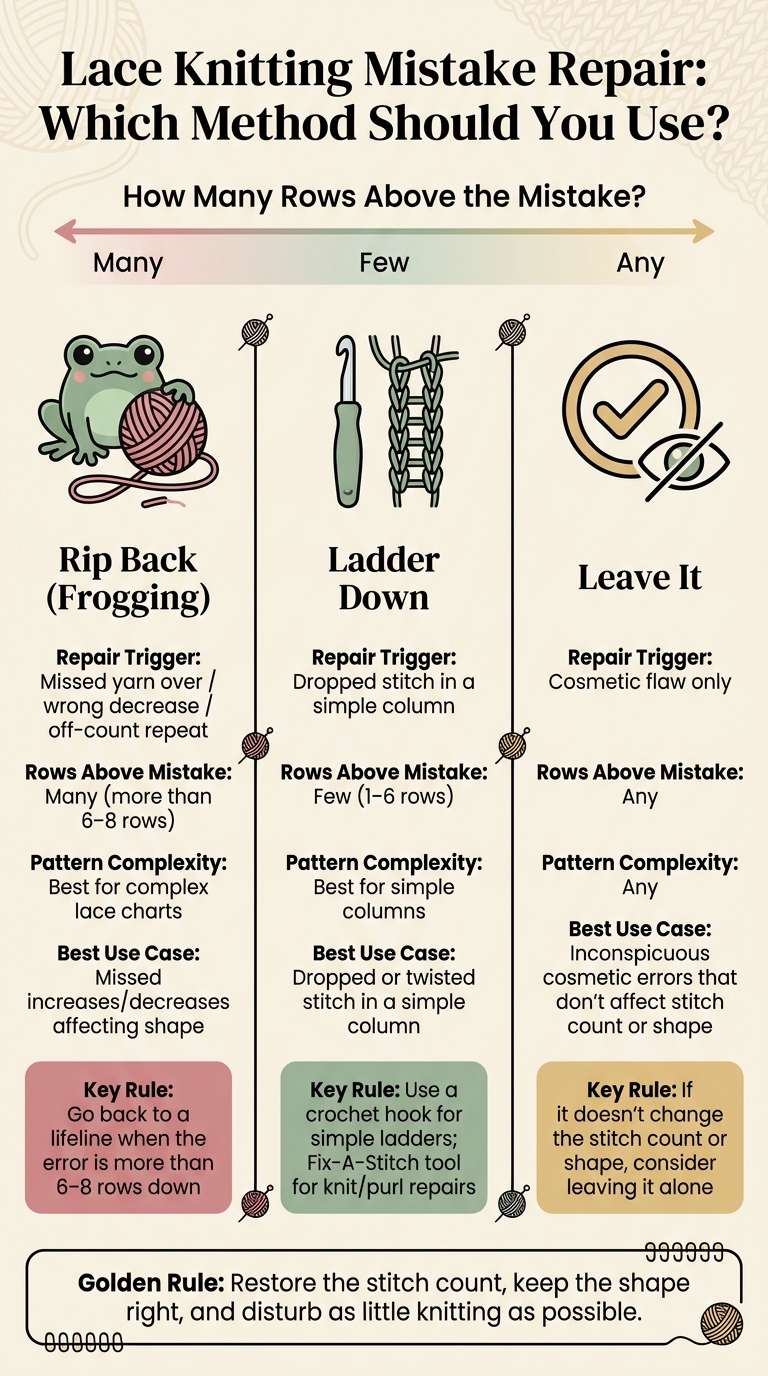
Lace Knitting Mistakes: Rip Back vs. Ladder Down vs. Leave It
Once you've found the mistake, the next call is simple: how much do you want to undo? That choice usually comes down to three things: how many rows sit above the error, whether the mistake throws the pattern off balance, and how easy it will be to spot in the finished fabric.
Some fixes are pretty clear-cut. Missed yarn overs and wrong decreases often mean ripping back. A single dropped stitch may be a good fit for laddering down. And if it's just a small visual flaw? You might decide to leave it alone.
Rip back when the mistake affects the structure of the lace. If you missed a decrease and the shaping now leans the wrong way, or your stitch count error has knocked several repeats out of line, the safest move is usually to go back to where the issue began.
For mistakes buried more than 6–8 rows down, rip back to a lifeline. That gives you a safer stopping point and helps you avoid making a messy fix even messier.
Laddering down means dropping only the stitches in the problem column, letting them unravel to the row where the mistake happened, and then reknitting that section. It sounds neat in theory, but lace makes it trickier than plain knitting. That's because lace often mixes yarn overs and decreases across several rows.
This method works best when the mistake is small, isolated, and sitting in a simple column just a few rows below the needle. If the error changes shaping or affects more than one repeat, rip back instead.
Sometimes the smartest move is to do nothing. A single twisted stitch in a spot no one will notice may not be worth the risk of a repair that causes a bigger issue. Use the table below to pick the least disruptive option.
| Criteria | Rip Back (Frogging) | Ladder Down | Leave It |
|---|---|---|---|
| Repair Trigger | Missed YO / wrong decrease / off-count repeat | Dropped stitch in a simple column | Cosmetic flaw only |
| Rows Above Mistake | Many (more than 6–8 rows) | Few (1–6 rows) | Any |
| Pattern Complexity | Best for complex lace charts | Best for simple columns | Any |
| Best Use Case | Missed increases/decreases affecting shape | Dropped or twisted stitch in a simple column | Inconspicuous cosmetic errors |
After the repair, check your stitch count before you keep going.
Once you've found the mistake, go with the smallest fix that solves it. If the error affects stitch structure, use a structural repair. If it's just one stitch gone wrong, a local fix is usually enough.
A missed yarn over can often be fixed right where it happened.
If you're still on the same row, look for the strand between the two stitches where the yarn over should be. Lift that strand onto the left needle and treat it as the missing loop.
If the missed yarn over is more than a few rows down, drop that column to the missing eyelet. Then use a crochet hook or Fix-A-Stitch tool to rebuild the column. Make sure the bottom strand forms the eyelet first, then work the rest of the strands back up.
Use this fix when the mistake changes the slant or direction of the lace motif.
For a wrong decrease, ladder down the affected column and remake the decrease so it leans the right way. When you put the repaired stitch back on the needle, keep the right leg in front and the left leg in back so the stitch doesn't twist.
For an off-count repeat, tink back to the first wrong stitch. That helps keep the chart and markers lined up.
Use this only for isolated dropped stitches that can be fixed with a ladder-down repair.
As soon as you notice a dropped stitch, secure the live loop with a locking stitch marker. Then count the horizontal bars above it. Each bar stands for one row you'll need to rebuild.
Insert the hook from front to back, catch the lowest bar, and pull it through. Keep going until you reach the needle. If the dropped stitch is a purl, turn the work and fix it from the knit side.
A Fix-A-Stitch tool helps a lot with purl and garter ladders because the double-ended design lets you repair stitches without turning the work. See Alpaca Direct's YouTube channel for a quick dropped-stitch repair demo.
Use a crochet hook for simple ladders. Use a Fix-A-Stitch tool for knit/purl repairs that are tougher to turn.
Fix lace errors in three steps: spot the mistake, pick the repair that causes the least disruption, and use the right tool. With lace, the aim is simple: restore the stitch count and the shape of the pattern with the smallest fix possible. Those same careful habits that help you avoid damage also make repairs much cleaner.
After the repair, the next move is stopping the same issue from traveling down the row. Mark repeats, count each section as you knit, and check the chart before a small slip turns into a bigger mess.
If prevention doesn’t work, a lifeline gives you a clean reset. Thread a smooth, contrasting lifeline - like dental floss or thin cotton - through a completed row every 10–20 rows or after a complex repeat.
If you’re working with alpaca yarn, use grippy needles and a slightly smaller crochet hook for laddering. For visual walkthroughs, see Alpaca Direct's YouTube channel.
A mistake is structural when it changes the lace pattern or throws off your stitch count. Think a dropped stitch, a missed or extra yarn over, or a decrease worked the wrong way. These usually need a fix. In most cases, that means laddering down to the problem or ripping back to a lifeline.
A cosmetic mistake is more about how the fabric looks than how it’s built. It might be a small tension wobble or a minor visual flaw that doesn’t change the construction. These are often left as-is or softened during finishing.
No. Blocking usually helps, not hurts.
A repair can leave the tension a bit uneven. That’s normal. Blocking helps the fix blend in and smooth out those small differences.
If one spot looks a little tight or loose, gently tug the nearby stitches before or during blocking. That can help spread the yarn more evenly so the fabric looks smoother.
A smooth, contrasting thread works best for lace knitting. Good options include dental floss, thin cotton crochet thread, or a bit of smooth leftover yarn.
Use a yarn needle to run the thread through every live stitch on your needle. It helps to place the lifeline right after a tricky lace chart repeat, so you have a safe spot to return to if you need to rip back.

Comments will be approved before showing up.










