Your Cart is Empty



Intarsia is the right pick when you want big color shapes without floats on the back. If I were starting today, I’d keep it simple: use a 4 x 4-inch swatch, stick to 3–4 colors per row, wind each section onto its own bobbin, twist the new yarn under the old yarn at every color change, and check tension at the first stitch of each new block.
Here’s the short version: this article shows how I’d set up yarn, needles, chart reading, joins, turning, tension, and finishing so my first intarsia piece has fewer holes, fewer tangles, and cleaner edges. It also covers fast fixes for the three beginner trouble spots: joins, turns, and chart mistakes.
What I like about this guide is that it keeps the focus on the few habits that matter most: simple charts, one yarn source per section, steady joins, and small fixes done early.
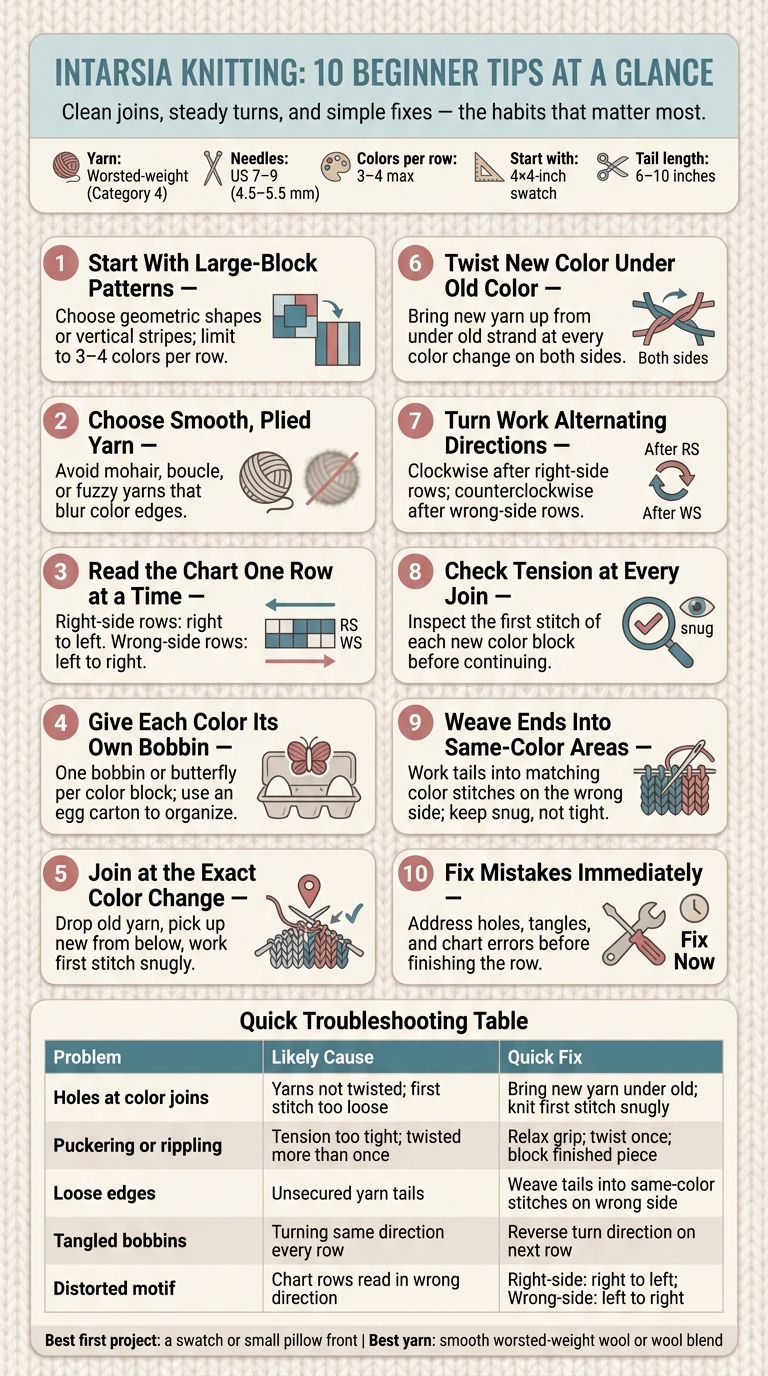
Intarsia Knitting: 10 Beginner Tips at a Glance
Choose your project, yarn, needles, and yarn storage before you cast on.
A 4 x 4-inch swatch or a small pillow front is a smart place to begin. Both give you a flat surface for bold color blocks, which is exactly what you want when you're learning intarsia. Use that swatch to check your tension and practice color joins before you move on to anything bigger. It makes those first charted color changes a lot less messy.
Once you've picked the project, match your yarn weight and needles to it. Worsted-weight yarn (Category 4, Medium) works well for a first intarsia piece because it's thick enough to show clear stitch definition. That helps you catch tension issues early instead of spotting them halfway through the project. Wool or a wool-alpaca blend is a good pick too, since the slight grip helps keep stitches even. With worsted-weight yarn, use US size 7, 8, or 9 needles (4.5–5.5 mm).
Before you start, wind each color into a bobbin or a flat figure-eight butterfly. Full balls can tangle fast when several colors are in play. If you're using four or more colors, keep the bobbins in an egg carton or lay them flat on a board about 1 inch from your work to cut down on dragging and knotting.
That bit of setup pays off right away. Good bobbin management helps you avoid tangles when you join colors and turn the work. And when the yarn is under control, the chart becomes much easier to follow row by row. Once your tools are set, start with a simple pattern made of large color blocks.
Once your yarn and bobbins are set, pick a pattern that keeps joins easy. For your first intarsia project, go with large color blocks like geometric shapes or vertical stripes. Bigger sections mean fewer joins, which gives you fewer chances to end up with holes, uneven tension, or a tangled mess.
Technical editor Jen Arnall-Culliford recommends patterns with vertical color changes and larger blocks. Vertical shifts are easier to join neatly than diagonal lines or curves. For a first project, keep the number of colors in each row to 3 or 4. If you push past five bobbins in a single row, yarn management can get hard to handle.
It’s also smart to skip single-stitch motifs and thin lines. They’re tougher to tension evenly, and they often come out looking jagged. Once you’ve settled on a simple pattern, the next move is choosing yarn and needles that help you make cleaner joins.
Start with smooth, plied yarn that gives you clear stitch definition. That sharp stitch outline helps color edges look clean instead of muddy. If you're buying more than one skein of the same color, check the dye lots too. A mismatch inside one color block can stand out in the finished piece.
Texture matters, but so does how the yarn behaves in your hands. Look for yarn with a bit of grip and stretch. Jen Arnall-Culliford recommends slightly sticky, springy yarns instead of slippery ones. And if your stitches look a little uneven at first, don't panic - blocking can smooth them out after the piece is done. Using the right blocking mats and pins ensures your finished work holds its shape.
It's also smart to skip yarns like:
Their halo blurs the lines between colors, which makes the design harder to read.
For needles, use the right knitting needle size for your yarn weight. If you're working a larger flat piece, circular needles can help support the fabric more comfortably.
Once your yarn and needles are set, read the chart one row at a time.
With your bobbins set, read the chart one row at a time. An intarsia chart works like a grid map: each square stands for one stitch, and the color of that square shows which yarn to use. Each block tells you when to stop one color and start the next.
Pay close attention to row direction. Right-side rows are read from right to left, while wrong-side rows are read from left to right.
Before you knit a row, count the stitches in each color block so you know exactly when a switch is coming. This also helps you catch diagonal color changes from one row to the next, instead of getting surprised in the middle of the row.
As you finish each row, cross it off. You can also place markers where color changes will happen so errors show up early. Losing your place during color changes is a common beginner issue, and row marking helps you stay on track as the piece grows. When you can follow each row cleanly, joining the new color at the exact point gets a lot easier.
Once you know where each color change will land, give each section its own yarn source. In practice, that means one bobbin or butterfly for each color block. You can drop one color, pick up the next right at the edge, and get clean, sharp color changes.
This setup helps you avoid floats and keeps the fabric light and neat. It also helps the wrong side look almost as tidy as the front.
The best option depends on the size of the section. Bobbins are better for larger areas because they hold more yarn and stay put. Butterflies - small figure-eight wraps you make by hand - work well for small motifs when you only need a short strand. Skip full balls if you can. They tend to roll around and tangle in no time.
A simple setup goes a long way:
Why be stingy with the yarn? Because too much hanging from the work adds bulk. And that bulk can throw off your tension and cause puckering where the colors meet.
With your yarn split up and set in order, you can join each new color neatly at the exact change.
Once your color sections are set, make each join right at the chart break. If you join a stitch too soon or too late, your edges can look uneven and the shapes can shift out of place. In colorwork, one small miss can throw off the whole line.
After you place the color change in the right spot, keep the join the same every time. Drop the old yarn, pick up the new color from below, and twist them together. That small move helps keep the edge crisp and the fabric flat. Then work the first stitch in the new color snugly so the join closes cleanly.
Leave a 6–10 inch tail. You can weave it into same-color stitches on the wrong side and use it to close any small gap at the join. Up next: keeping that twist steady every time you switch colors.
Once you join the new color, twist the strands to lock the edge in place. That twist keeps each color change connected. Without it, the color blocks can split apart and leave a slit.
Here’s the move: at each color change, bring the new color up from under the old strand before you make the first stitch. Do this on both knit and purl rows.
On the wrong side, you should see two strands interlocked at each color change. In plain English, that means two linked loops, not two separate edges pulling away from each other. That’s how you know the join is working.
Keep the join firm, but don’t pull it too hard. Too much tension can pucker the fabric. Too little can leave a gap that shows.
After each color join, pay attention to how you turn the work. Every row adds a bit of twist to your bobbins or butterflies. If you turn the same way every time, those strands start winding around each other, and that’s when tangles creep in.
A simple fix: turn clockwise at the end of each right-side row and counterclockwise at the end of each wrong-side row. That cancels out the twist from the row before, so the strands stay lined up without forcing you to stop and sort out a mess. When it’s working, the yarn should look relaxed after each turn, not wound up tight.
This becomes more important as you add more bobbins. More strands means more chances for things to snarl. If you notice the strands pulling tighter after a turn, switch the direction on the next row.
After you make a color join, pause and look at the first stitch before you keep going. This is where tension issues tend to show up first. If the yarn is too tight, the fabric can pucker. If it's too loose, you'll get little gaps.
Pay close attention to the first stitch in each new color section. Knit it snugly enough to close the gap, but not so tight that it pulls the fabric out of shape.
Small loops on the wrong side mean the strands are locked together. If you don't see those loops, the join may not be secure, and a hole can form.
Keep your grip relaxed and check the join right away. It's much easier to fix tension problems now than after the ends are woven in.
This is the last cleanup step after all those color changes. Once the knitting is done, you’ll have loose yarn tails at every color join. Weaving them in is what turns those loose spots into neat, polished fabric.
Work each tail into the stitches of the same color section on the wrong side of the piece. That way, if there’s any slight show-through, it stays hidden. This step can also help close small gaps where one color meets the next.
Keep the weaving snug, not tight. You want the fabric to lie flat, not pucker. If a tail still leaves a gap or starts pulling the fabric out of shape, fix that before you trim it and move on.
Most beginner snags show up at joins, turns, and chart changes. And in knitting, small mistakes are much easier to deal with before you finish the row.
Holes at color joins usually show up as loose stitches or small gaps where two sections meet. If you notice one while you're still knitting, work the next stitch a bit more firmly to pull the join closed. If you don't catch it until later, weave in the tail at that join during finishing to close the gap.
Tangled bobbins usually come down to how you turned the work. If the bobbins start twisting around each other, switch your turn direction on the next row to unwind them.
Misread chart rows need different fixes depending on how big the mistake is. For one wrong-color stitch, use duplicate stitch after knitting to cover it. If the mistake affects a larger color block, un-knit back to the error right away and then continue.
| Problem | Quick Fix |
|---|---|
| Hole at join | Work the first stitch of the new color firmly; weave in the tail during finishing |
| Tangled bobbins | Reverse your turn direction on the next row |
| Single wrong stitch | Use duplicate stitch post-knitting to cover with correct color |
| Wrong color block | Un-knit back to the error immediately before continuing |
Use this table if a mistake pops up mid-project. It gives you the short version of the same fixes.
Use this table when a join, turn, or chart row goes sideways. Most early mistakes happen in just three spots: joins, turns, and chart reading. Match what you see on the fabric to the row below, then try the fix.
| Problem | Likely Cause | Fix |
|---|---|---|
| Holes at color joins | Failing to twist yarns, or the first stitch is too loose | Bring the new yarn up from under the old yarn and knit the first stitch snugly. |
| Puckering or rippling | Tension too tight, or twisting more than once at the join | Relax your grip, twist once, and block the finished piece. |
| Loose edges | Unsecured yarn tails at the start or end of a color block | Weave tails into same-color stitches on the wrong side. |
| Tangled bobbins | Turning the work the same direction every row | Reverse your turn direction on the next row. |
| Motif is distorted | Reading chart rows in the wrong direction | Read right-side rows right to left and wrong-side rows left to right. |
Once you’ve got the basics down, intarsia is mostly about clean joins, steady turns, and fixing small issues as you go.
If the fabric looks messy while it’s still on the needles, that’s normal. Weaving in the ends is what pulls the joins together and helps the fabric settle into place.
For more help, Alpaca Direct's Learning section and YouTube channel offer beginner knitting video tutorials and technique videos. Start small, stay patient, and let the finishing work do the cleanup.
Use intarsia for large, bold, or non-repeating motifs like pictures, logos, or names, especially when you don’t want to carry yarn across the back.
Unlike stranded knitting, intarsia uses separate yarn supplies for each color block. That gives you a single-layer fabric with good drape. Stranded knitting works better for small, repeating geometric patterns.
Yes. Intarsia can work for small details, even thin one-stitch designs. The main catch is shape: curves usually need to be simplified into a stepped, pixel-like form that fits the size of your stitches and rows.
For small sections, you can drop the yarn loosely at the edge or briefly interlock it with the working yarn for a stitch or two to cut down on tangling. In most cases, bold, clear shapes give the cleanest result.
Your intarsia tension is usually on track when the fabric looks even, much like plain stockinette. If it looks puckered, bunched up, misshapen, or feels stiff, it’s probably too tight. If you notice loose stitches, gaps, or holes where the colors meet, it’s too loose.
Every so often, stop and lay your work flat. Check that each color section looks even and consistent. Small uneven spots are normal when you’re starting out, and blocking can often smooth them out.

Comments will be approved before showing up.










