Your Cart is Empty



If you want crochet slippers that stay on without a tight cuff, this X-strap build is the simple answer. I’d focus on 4 things first: make the sole about 0.25–0.75 in shorter than the foot, use a dense hook/yarn combo, keep the side wall shallow, and match both crossover panels so they pull with the same tension.
Here’s the article in plain terms:
A few numbers matter most here. The side wall is usually just 2–4 rounds, woven-in ends should run about 3–4 inches, and toe shaping may only need 2–3 light decreases. Those small choices do a lot of the fit work.
| Part | What to watch |
|---|---|
| Sole | Slight negative ease; dense fabric |
| Side wall | Low height; no heavy shaping |
| Crossover panels | Same anchor height; even tension |
| Edging | Use sc for structure or slip stitch for a flatter edge |
| Sole grip | Add silicone or fabric paint at heel and ball |
Bottom line: I’d treat this pattern less like a fixed formula and more like a fit system. Get the sole shape right early, keep the crossed panels even, and most of the later steps stay simple.
Fiber choice shapes almost everything here: warmth, wear, and how the slippers feel on your feet. Wool and wool blends tend to hold their shape well and spring back after use. Acrylic is easier on the budget, machine-washable, and tough enough for regular indoor wear. Alpaca and alpaca-blend yarns are a strong pick for house slippers because alpaca is softer and warmer than many wools at the same weight, with a smooth feel that works well for barefoot use.
Pure alpaca can stretch, so it helps to pair it with wool or acrylic if you want the slippers to keep their shape better. Alpaca Direct's alpaca and alpaca-blend yarns bring warmth, softness, and enough structure for slippers.
| Yarn Weight | Common Hook Ranges for Dense Slipper Fabric | Pros | Cons |
|---|---|---|---|
| Worsted / medium (#4) | I-9 to K-10.5 (5.5–6.5 mm); size down for soles | Good structure for crossed panels; lighter on the foot; easy to find | Less cushion; takes longer to make than heavier weights |
| Bulky (#5) | K-10.5 to M-13 (6.5–9 mm) | Thick cushion; warm; faster project time | Can stretch if worked loosely |
For crossover slippers, worsted or bulky weight usually hits the sweet spot. Worsted gives you cleaner stitch definition on the crossed panels. Bulky works up faster and adds more cushion underfoot.
Hook size changes the density of the fabric more than many beginners expect. If the hook is too large, the sole can end up open and stretchy. A smaller hook than the yarn label suggests usually works better for the sole. That tighter gauge gives you a denser sole with less stretch and better wear over time.
For the upper and crossover panels, switch back to the standard hook size. That keeps the fabric flexible enough to cross over the instep without feeling stiff. It also affects how the slippers fit, so this choice matters for both comfort and sizing.
A few basic tools make the process easier:
The main stitches in this pattern - chain (ch), single crochet (sc), and half double crochet (hdc) - are simple and beginner-friendly. If you need a quick refresher, it helps to watch a stitch tutorial for ch, sc, or hdc before moving from the sole to the side wall. The Alpaca Direct YouTube channel covers these techniques in short, focused videos.
Once you've picked your yarn and hook, the next step is measuring the foot and adjusting stitch counts before starting the sole.
Get the fit right before you start. If the slipper is too loose, the crossover style can slide off. If it's too tight, the upper can pull across the instep. That's why it helps to measure first, so the sole and upper match your foot. Those numbers shape the sole, side wall, and crossover placement.
Two measurements do most of the work in this pattern: heel-to-toe length and widest-foot width. Trace your foot on paper while standing, and if you can, wear the kind of socks you plan to use with the slippers. Then measure from the heel mark to the longest toe for length, and across the widest part of the foot for width.
Heel-to-toe length tells you how long the sole should be. Foot width affects both the sole and how far the crossover panels need to reach. Together, these measurements shape the sole length and the upper overlap. Measure both feet and use the larger one if they don't match. That's the usual approach in adult sizing.
Make the slipper about 0.25 to 0.75 inch shorter than your foot. Yarns with less stretch usually need less negative ease. Stretchier stitches, or a softer house slipper, may need a snugger fit so the slipper stays on.
Stitch counts can shift with tension, so crochet a small test section and measure it before you begin the sole. Then use these ranges to line up the sole with your foot measurement.
| Approx. Adult Size | Foot Length | Fit Note |
|---|---|---|
| Women's 5–6 | 8.5–9 in | Snug fit |
| Women's 7–8 | 9.25–9.5 in | Standard indoor fit |
| Women's 9–10 | 9.75–10 in | Slightly roomier fit |
| Women's 11–12 / Men's 9–10 | 10.25–10.75 in | Best for less-stretchy fibers or thicker socks |
Use the table as a starting point, not a hard rule. If you'll wear thicker socks, or if your yarn doesn't stretch much, go toward the roomier end. If the sole feels too tight after the first few rows, add foundation chains or work one more increase round. If it feels too loose, remove chains or stop increasing a round earlier. Check the sole while it's lying flat and make changes now, before you add the side wall.
Use these measurements to start the sole in the next section.
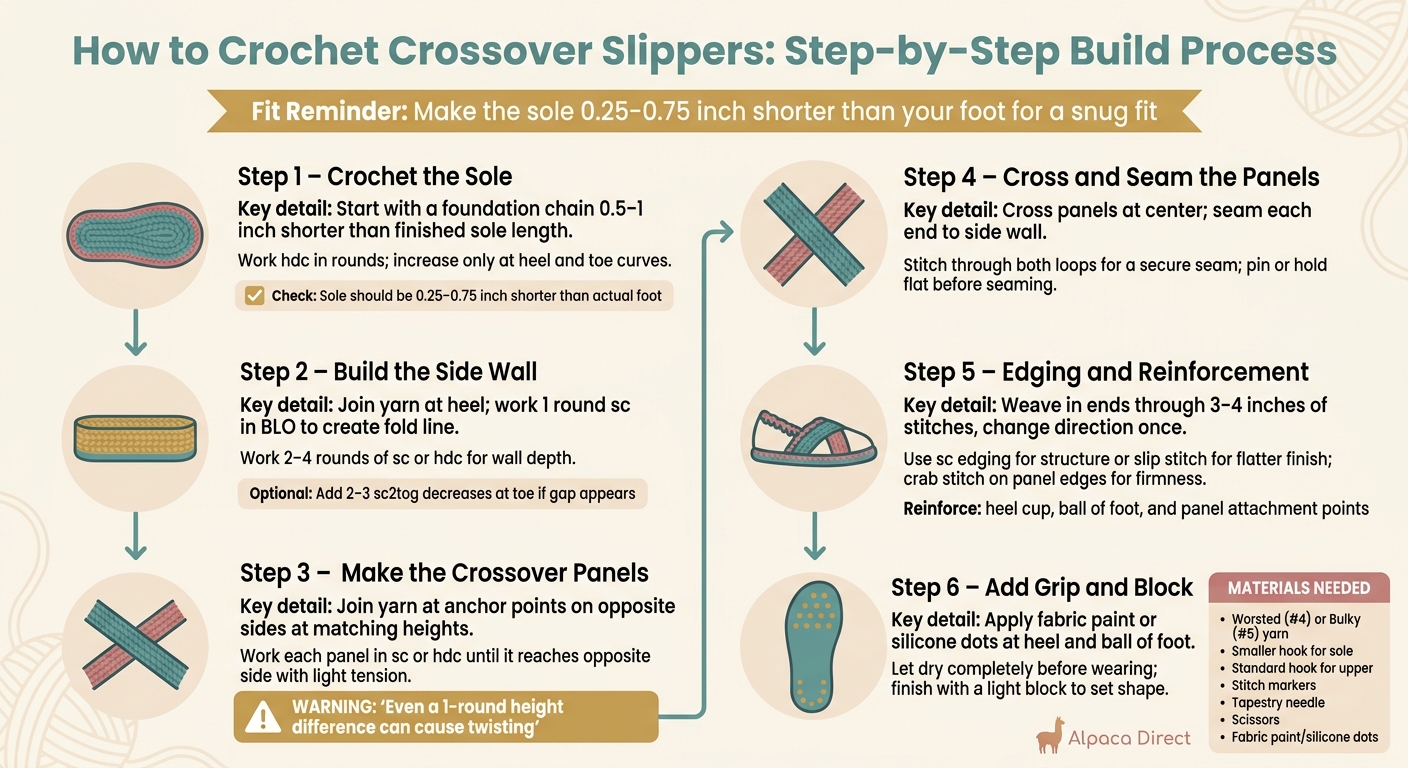
How to Crochet Crossover Slippers: Step-by-Step Build Process
Start with a foundation chain that's 0.5 to 1 inch shorter than the finished sole length. In round 1, work 2 hdc into the first and last chain to curve the heel and toe, then keep working regular hdc along both sides of the chain.
On the next rounds, add increases only at the heel and toe curves. Leave the straight sides alone. That's what keeps the sole oval instead of letting it spread into a circle. It also helps to count stitches at the end of each round, so you can catch small mistakes before they snowball.
A shaped oval sole gives the steadiest base for the crossover upper. Lay the sole over your foot outline and stop when it's slightly shorter but still lines up with the ball of the foot.
Once the sole looks right, move on to the side wall. Join the yarn at the heel and work 1 round of sc in back loop only (BLO). This makes a fold line at the edge of the sole. Then work 2–4 rounds of sc or hdc in both loops, based on how deep you want the slipper base to be.
If the toe area gaps a little, add 2–3 evenly spaced sc2tog decreases across the front of one wall round. Keep them light. You're aiming for a soft curve toward the foot, not a tight squeeze that throws off the sole shape or crowds the toes.
After the wall is in place, set the crossover panels at matching heights. Mark the toe-center line so both anchor points land evenly. Put both anchor points at the same side-wall height. Even a one-round difference can make the crossed straps twist or sit unevenly across the instep. The wall depth from the last step tells you where those straps should sit.
Join yarn at each anchor point on opposite sides of the slipper. Before you fasten off, check the panel length against the foot. Work each panel in sc or hdc until it reaches the opposite side with light tension, then cross the panels at the center and seam each end to the side wall.
Pin the panels in place, or just hold them flat before seaming. Stitch through both loops for a secure seam.
Now that the upper is attached, it’s time to finish the slipper so it looks neat, holds up well, and has a bit more grip. After assembly, weave in the ends, edge the opening, shore up high-wear spots, and add traction.
Use a yarn needle to run each tail through at least 3–4 inches of stitches, and change direction once so it stays put. Keep the tension snug, not tight, so the fabric doesn’t pucker. If you’re using alpaca or an alpaca blend, the soft halo can help hide the tail. Even so, weaving ends into the sole and heel is a smart move because it keeps them away from bare skin.
Around the opening, a round of single crochet adds a bit more structure. If you want a flatter finish that feels less tight, use slip stitch edging instead. And if the crossover panels seem floppy, a row of reverse single crochet (crab stitch) along the panel edges can firm them up and give them a clean line.
Pay extra attention to the heel cup, the ball of the foot, and the spots where the crossover panels attach to the side wall. Those areas take the most stress. A few options can help them last longer:
For grip, add small dots or short lines of fabric paint or silicone under the heel and ball of the foot. Let the soles dry all the way before you wear them.
Finish with a light block to set the shape and flatten the crossover upper.
Before you start pair two, test the fit on the pair you just made. Wear them indoors and walk around a bit. Check the toe room, heel support, and whether the crossover panels sit flat.
If one strap feels tighter than the other, the slipper can twist. That’s a good sign to keep the crossover tension even on the next pair. If the opening feels a little too loose, you don’t need to rebuild the whole slipper. Just redo the edging with a hook one size smaller to tighten the opening.
| Fit Issue | Quick Fix for Current Pair | Adjustment for Next Pair |
|---|---|---|
| Sole too long | Add a tuck inside the toe area | Remove 1–2 sole rows |
| Sole too short | Add a toe extension or one heel round | Add 1–2 sole rows |
| Opening too loose | Redo the edging with a hook one size smaller | Reduce side-wall stitch count |
| Panels uneven | Keep both straps even and flat | Keep the crossover tension even on the next pair |
Write down each change as you go. That way, the next pair has a much better shot at fitting just right.
Crossover slippers should fit snugly and stay put without feeling tight. They need enough structure to keep their shape, while still stretching around your foot in a comfortable way.
Check that the fabric doesn’t sag or slide when you walk, but also doesn’t pinch. If you need a bit more room across the arch or instep, try changing your needle size or working fewer decreases.
Don’t force a one-size-fits-all fit. Shape each slipper upper to the foot it’s meant for, and check the fit as you go, with extra attention to the heel and arch.
If one foot feels tight, add stitches. If it feels loose, use fewer stitches. It also helps to do a quick gauge check and measure the length and width before you finish joining the sole and upper.
To help prevent crossover straps from stretching out, hand-wash them in cool water and dry them flat, away from direct heat or sunlight. If you hang them while they’re wet, especially if they’re made with alpaca, they can slowly lose their shape.
When you make the straps, use a yarn and hook size that gives you a firm fabric instead of one that feels loose or floppy. If you want a visual guide, check the Alpaca Direct YouTube tutorials.

Comments will be approved before showing up.










