Your Cart is Empty



I’d start with the standard invisible join: cast on 1 extra stitch for a low-bulk finish. If your stitch count must stay exact, choose the tail swap or twisted join instead.
The goal is less visible, not a promise of a hidden join. Before joining, <u>check for twists and count your stitches</u>. Leave a 6–8-inch tail, and keep the edge relaxed.
Quick Comparison
| Method | Extra stitches | How it closes the gap | Main caution |
|---|---|---|---|
| Standard invisible join | 1 | Passes the extra stitch over the first | Avoid pulling too tight |
| Tail swap join | 0 | Uses the tail to close the gap after knitting starts | Don’t cinch the edge |
| Twisted join | 0 | Crosses the first and last stitches | Don’t twist the whole edge |
| Overlap join | 2 | Knits two overlapping pairs together | Adds thickness and may limit stretch |
| Hook-assisted join | 1 | Uses a crochet hook to work the extra-stitch join | Avoid splitting the yarn |
I’d check the join after 3–5 stitches, then again over the first few rounds. Look for a flat edge, the right stitch count, and stretch that matches the surrounding fabric. These methods address the cast-on gap and loose stitches - not the jog at a color change.
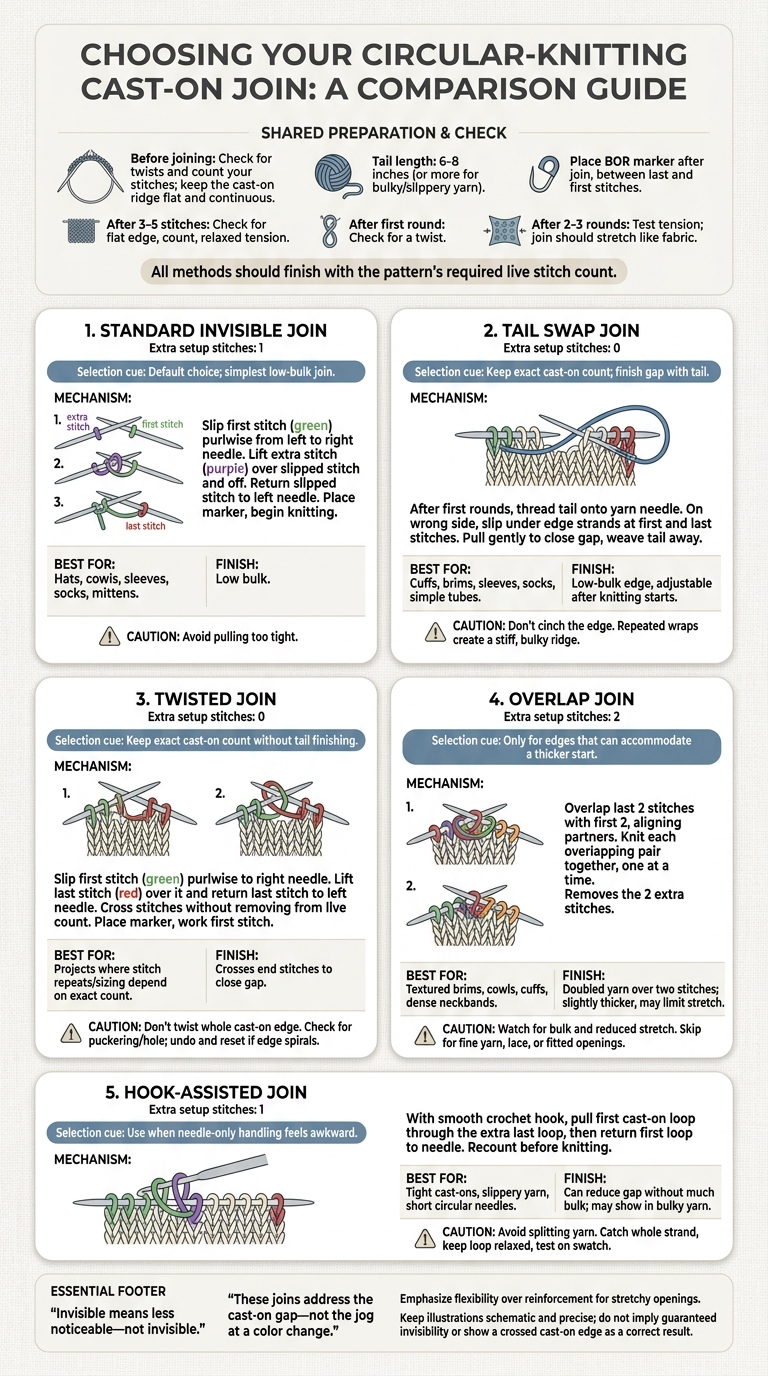
5 Invisible Joins for Circular Knitting Compared
Lay the needle flat and run a finger along the cast-on ridge. The ridge should form one continuous curve without crossing the cable. Straighten any twist before joining to help prevent twisted joins and hidden gaps.
Some joins add an extra setup stitch, then remove it by passing it over another stitch or knitting two together. Keep track of that stitch, follow the method exactly, and check your stitch count after joining. Only add a stitch if the instructions call for one. Pay close attention when the setup shifts stitches.
Leave a 6–8-inch tail, or more if you’re using bulky or slippery yarn.
Place the beginning-of-round marker after you finish the join, between the last and first stitches.
After knitting the first 3–5 stitches, check that the edge still moves freely. If the edge feels pinched or a stitch is tight, loosen it rather than giving it another tug. With the edge flat and the stitch count correct, choose a join method below.
Once you’ve checked the edge and stitch count, this is the simplest low-bulk join.
Cast on one extra stitch on your circular needles or DPNs. Slip the first stitch purlwise from the left needle to the right. Lift the extra stitch over the slipped stitch and off the needle, then return the slipped stitch to the left needle. Place your marker and begin knitting in the round. This method is also effective when knitting brioche in the round, where maintaining a consistent stitch count is vital.
The extra stitch creates a low-bulk join without knitting two stitches together at the transition.
Use this method for hats, cowls, sleeves, socks, and mittens when you want a clean start without extra bulk.
For a different balance of security and speed, the next join uses the tail itself to hide the gap.
Tail Swap Join uses the cast-on tail to close the gap after the first round. It’s a good choice for a clean edge without changing the live stitch count.
Use the circular needle or set of DPNs your pattern recommends, a stitch marker, and a tapestry or yarn needle. Leave a cast-on tail long enough to thread and secure.
Cast on the exact stitch count specified by the pattern. Don’t add an extra stitch.
After the first few rounds, thread the cast-on tail onto your yarn needle. Working on the wrong side, slip the tail under the edge strands at the first and last cast-on stitches.
Pull gently in small steps until the gap closes. Then weave the tail into the wrong side, away from the edge. Don’t wrap it around the edge repeatedly - those wraps can form a stiff, bulky ridge.
Use this finish for cuffs, brims, sleeves, socks, and simple tubes when you want a low-bulk edge you can fine-tune after knitting starts. Pull the tail just enough to close the gap, without drawing in the edge.
If you’d rather hide the join in the stitch flow than use the tail, the next method twists the first stitch to seal the gap.
Cross the end stitches to close the cast-on gap and make a clean join - without adding a stitch.
Use the needles you’re already working with and keep your marker nearby. Position the first cast-on stitch at the left needle tip and the last at the right. Keep the cast-on edge flat, with no twists around the needle.
Cast on exactly the number your pattern calls for - no extra stitch.
Slip the first stitch purlwise onto the right needle. Lift the last cast-on stitch over it and return that last stitch to the left needle. After the exchange, place your beginning-of-round marker and work the first stitch as the pattern directs.
Crossing these stitches closes the gap while keeping the stitch count unchanged. With fuzzy or dark yarn, the crossing can be hard to see. Use bright lighting and spread the stitches slightly to check your work.
Use this join when stitch repeats or sizing depend on an exact count. Knit two or three stitches, then check the join from the outside. If you see puckering or a hole, redistribute the slack. If the edge spirals, undo the join and reset it.
To close the gap by overlapping the first stitches rather than crossing them, use the overlap join next.
Overlap join closes the cast-on gap by stacking the first stitches rather than crossing them.
Cast on 2 extra stitches beyond the pattern count. Then overlap the last 2 cast-on stitches with the first 2, keeping each stitch flat and lined up with its matching partner.
Knit each overlapping pair together, one pair at a time. This removes the 2 extra stitches and brings you back to the pattern count.
The overlap doubles the yarn at the start of the round. That closes the gap, but it also makes the join slightly thicker than the surrounding fabric - especially in stockinette or bulky yarn. Keep your tension even, and don’t pull the join tight.
Use this join for textured brims, cowls, cuffs, and dense neckbands. Skip it for fine yarn, lace, or fitted openings that need maximum stretch and the flattest finish. After a few rounds, check the join for lumps or puckering, or watch knitting video tutorials to refine your technique.
A crochet hook can help you make a cleaner join when a tight cast-on is hard to work with needle tips alone.
Cast on the pattern’s stitch count plus 1 extra stitch. Use a smooth crochet hook to join the first cast-on loop and the extra last loop.
Like the standard invisible join, this method uses one extra stitch. Pull the first cast-on loop through the extra loop with the hook, then return the first loop to the needle. Recount your stitches before knitting.
This join can reduce the gap without adding much bulk, though it may still show in bulky yarn. If the edge will be visible, test the join on a small swatch first.
Insert the hook through the center of the loop and catch the whole strand - not just one ply. If the yarn snags, back the hook out and insert it again.
This extra-stitch join works well when handling the stitches with needles alone feels awkward, especially with tight cast-ons, slippery yarn, or short circular needles. Keep the loop secure but relaxed. Pulling too tight can pinch the edge.
After 3–5 stitches, check for split yarn or a tight first stitch. If you spot either, redo the join right away.
Use this chart to compare stitch counts, gap control, and stretch, then choose the join that fits your yarn and project edge.
| Method | Extra stitches required | Best use | Bulk / gap control | Watch for |
|---|---|---|---|---|
| Standard invisible join | 1 extra stitch | General-purpose cast-on joining | Hides the join with little bulk. | Don’t overtighten. |
| Tail swap join | 0 extra stitches | Cuffs, hat brims, and simple tubes | Closes the gap when you finish the tail. | Don’t cinch the edge. |
| Twisted join | 0 extra stitches | Joining without changing the cast-on count | Crosses the end stitches to close the gap. | Don’t twist the whole cast-on edge. |
| Overlap join | 2 extra stitches | Edges that can handle doubled stitches | Strengthens the join with doubled yarn over two stitches. | Watch for bulk and reduced stretch. |
| Hook-assisted join | 1 extra stitch | Joins that are awkward to work with needles | Uses a hook for a cleaner extra-stitch join. | Avoid splitting the yarn. |
For stretchy openings, put flexibility over reinforcement. Close the gap without making the edge stiff. Test the overlap join for reduced stretch, and keep the hook-assisted join relaxed.
With extra-stitch methods, count only the final stitches after removing the temporary setup stitches. Check the first few rounds for gaps or tight spots.
Use the chart above to narrow your options, then pick the join that closes the cast-on gap with the least bulk. The standard invisible join is your default. Choose tail swap only if you want to finish the join with the tail, or the twisted join when the cast-on count must stay exact. Use overlap only if the edge can handle a thicker start. If the first and last cast-on stitches are hard to handle with needles alone, use hook-assisted joining.
Invisible means less noticeable - not invisible. Adjust any visible gap or bulky spot, then check that the join lies flat and matches the surrounding fabric.
Confirm your stitch count, check for a twist after the first round, and test tension after 2–3 rounds. The join should stretch like the surrounding stitches without feeling rigid or leaving a gap. It should blend into the fabric rather than draw the eye.
Yes, these joining methods work with most standard cast-ons. Before joining, check that the cast-on edge lies flat and isn’t twisted. The extra-stitch join needs one more stitch than your pattern calls for.
For a long or complex cast-on, try knitting one or two rows flat before joining. This helps keep the edge steady and free of twists.
You may not need to start over. Small gaps often settle into the fabric after 5 to 10 more rounds. If the gap still shows, the best fix is to sew it closed with the yarn tail as you weave in your ends.
To prevent gaps in future projects, tighten the first stitch right after joining. Or hold the working yarn and tail together for the first few stitches.
For ribbing, the extra-stitch join creates a clean, sturdy edge with no visible seam and helps maintain tension in stretchy fabric. Cast on one extra stitch, move it to the left needle, and knit it together with the first stitch to secure the cast-on ends. This hides the join and keeps your ribbing even and gap-free.

Comments will be approved before showing up.










