Your Cart is Empty



I’d choose 3- or 4-stitch applied i-cord for a narrow, firm edge and applied ribbing for a deeper band with more stretch - if that stretch runs around the opening. Both attach directly to the neckline without picking up a full round.
The catch? Stretch doesn’t guarantee recovery. With alpaca, I’d block an attached-edge swatch first, then check head entry, attachment tension, and whether the edge returns to its shape using our guide for alpaca knitters.
Quick Comparison
| What I’d check | Applied i-cord | Applied ribbing |
|---|---|---|
| Stretch | Usually limited | Often greater when oriented correctly |
| Shape and recovery | Defines the edge; can restrict entry | Can spring back, but alpaca may relax |
| Width and weight | Narrow and light | Adjustable depth; deeper bands add weight |
| Fabric and fit | Suits light fabric and open necklines | Often suits heavier sweaters and close-fitting necklines |
| Attachment | Tight joins can gather fabric | Wrong spacing can cause flaring or restrict stretch |
Before finishing, I’d measure the blocked opening in inches, gently stretch it for 10 seconds, then release and remeasure. <u>The opening must pass over your head comfortably</u> - and settle back afterward. Blocking won’t fix an opening that’s too small.
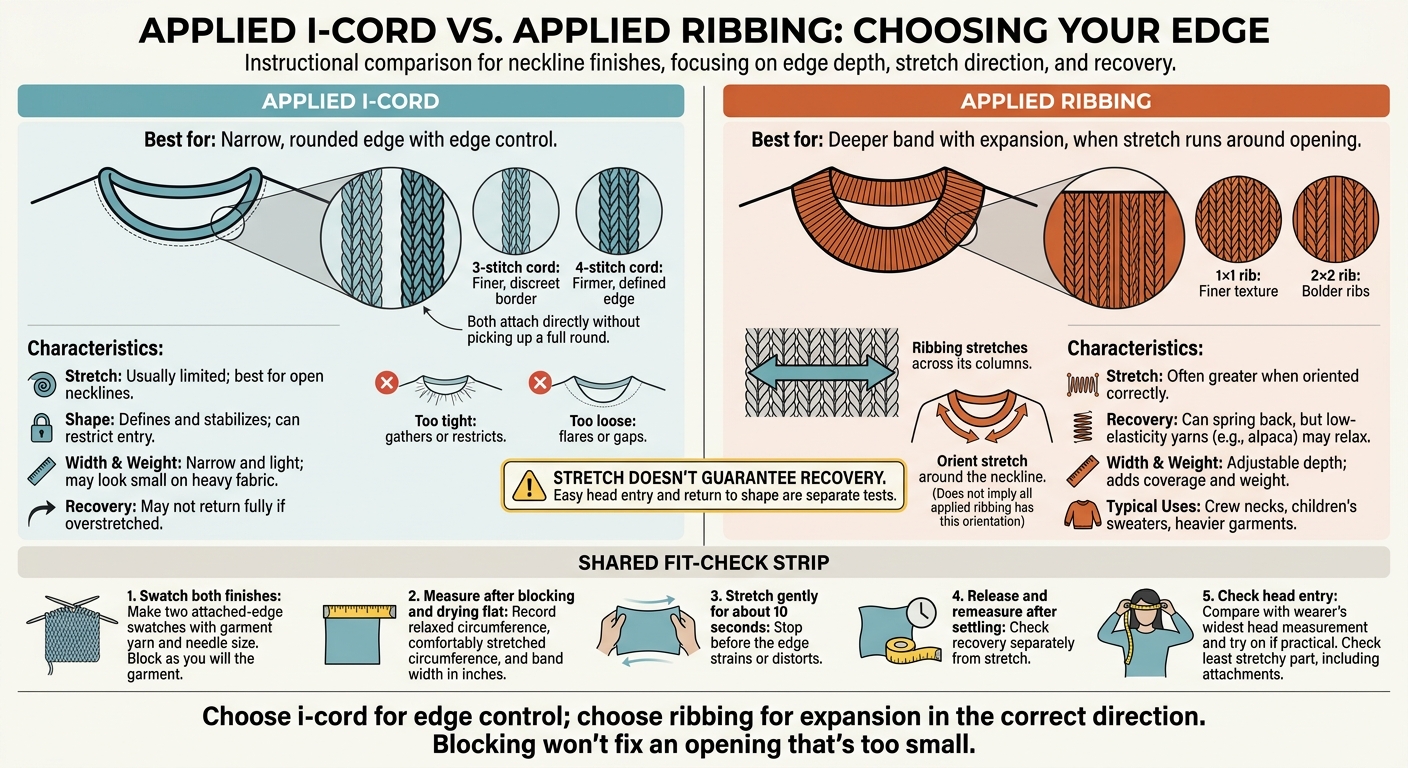
Applied I-Cord vs Ribbing for Necklines
Cast on three or four cord stitches. For a four-stitch cord, knit three stitches, then knit the fourth together with the next live neckline stitch. Slide the stitches back to the other needle tip without turning, and repeat around the opening. The carried yarn forms a tube, while the decrease keeps the stitch count steady. A three-stitch cord follows the same process with fewer stitches, making a narrower edge. This finish puts shape before stretch.
For a bound-off neckline, attach the cord to each bound-off stitch one at a time rather than picking up a full round. The cord forms a narrow ridge that covers the edge, helps prevent rolling, and adds less depth than a standard neckband.
Don't pull the yarn tight after each decrease. Every few repeats, lay the cord flat against the fabric and check the curve from the right side. Too much tension can shrink the opening or gather the fabric. Too little can make the cord flare or leave gaps. Check how the finished edge fits on the garment itself.
Divide the neckline into eight marked sections to check attachment spacing. On a finished edge, space the attachments evenly within each section, adjusting gradually around curves. On a live edge, keep a steady attachment rhythm so the cord and neckline stay aligned without pulling either out of shape. This shape control makes i-cord a good edge finish, but it's not the best option for a neckline that needs to open widely.
Choose a three-stitch cord for a discreet border on lightweight pullovers and fine alpaca garments, or to preserve the proportions of boatnecks and open crew necks.
Use four stitches for a firmer, more defined edge. With a close-fitting opening, check that your head passes through before weaving in the cord ends. If it's tight, loosen the tension or use fewer cord stitches. If the opening needs more stretch, try ribbing instead.
Applied ribbing is a ribbed strip worked directly onto the neckline edge. It joins through decreases, edge stitches, or another method rather than a picked-up round.
Ribbing stretches most easily across its knit-and-purl columns. That means sideways construction doesn’t automatically add stretch around the opening. A sideways band needs a clear row-to-neckline ratio to fit properly. When the stretch runs around the opening, ribbing offers more stretch but less edge control than applied i-cord.
1×1 rib alternates one knit column with one purl column; 2×2 rib alternates pairs. Both expand as their folds open and contract when released. Choose 1×1 for a finer texture or 2×2 for bolder ribs. But test your yarn rather than assuming one will recover better.
In a sideways band, stitch count sets the band’s depth. Row gauge and the attachment ratio help set its length around the neckline. Smaller needles generally produce a firmer band. A looser gauge lets it extend more easily but may give you less control over the edge.
Follow the pattern’s attachment ratio. A loose attachment can create waves or flaring, while a join that’s too tight can restrict the opening.
Test the band in its finished orientation before committing, since stretch depends on direction. Check stretch and recovery separately with the exact yarn and best needles for alpaca you plan to use. Alpaca ribbing may relax without fully springing back, especially at a loose gauge.
Choose applied ribbing for close-fitting crew necks, children’s sweaters, or pullovers with ribbed cuffs and hems when stretch around the neckline matters more than a narrow, structured edge.
Visible ribs don’t guarantee easier head entry. A deeper band adds texture and more weight at the edge than applied i-cord. That can suit heavier sweaters, but it may weigh down a light alpaca neckline.
Use applied i-cord for edge control and applied ribbing for more expansion, with the ribbing’s stretch running around the neckline.
The main differences are stretch, edge weight, and how each finish controls the opening.
| Criterion | Applied i-cord | Applied ribbing |
|---|---|---|
| Opening stretch | Usually modest; best when the opening already allows easy entry | Often greater when worked so the stretch runs around the neckline |
| Return to shape | Holds a compact edge, but may not return fully if overstretched | Can recover well, but may relax in low-elasticity yarns |
| Edge control | Stabilizes and defines the neckline | Depends on band length, attachment tension, and finishing |
| Band width and weight | Narrow and relatively light; typically uses 3 or 4 cord stitches | Adjustable width; broad bands add coverage and weight |
| Fabric suitability | Usually suits light fabrics; a narrow cord can look too small on heavy fabric | Often balances heavy garments; a wide band can overpower light fabric |
Judge the neckline by its fit, not the stitch pattern alone.
| Finish | Advantages | Limitations | Practical checks |
|---|---|---|---|
| Applied i-cord | Rounded, compact border | Can restrict the opening or gather fabric | Test head entry without forcing; inspect curves for dents and gaps |
| Applied ribbing | Adjustable coverage and texture | Can flare or grow | Test the full opening, including joins and bind-off edges |
Check the least stretchy part of the opening, not just the fabric. Even a flexible band can be held back by its attachment or bind-off.
Lay the garment flat without stretching or pinning it. Repeated dents suggest pulling at the join. An edge that stands away from the garment suggests excess length or uneven tension.
Once you’ve chosen a finish, check the opening after blocking, when alpaca shows its finished shape.
After blocking and drying the garment flat, measure three things in inches: the relaxed circumference, the comfortably stretched circumference, and the band width. Stretch the opening for about 10 seconds, release it, and measure again after it settles.
Stop before the edge strains or distorts. Compare head entry with the intended wearer’s head measurement, then try the garment on if practical. Passing over the head and returning to the intended shape are two separate tests.
Choose applied i-cord for a narrow, rounded edge. Go with applied ribbing for a deeper band that offers more stretch and recovery.
Let swatches guide your choice. Make two attached-edge swatches - one with applied i-cord and one with applied ribbing - using the garment’s yarn, needle size, and attachment method. Block both as you’ll block the garment, then compare their stretch, recovery, weight, and comfort.
After blocking, measure the opening against the wearer’s widest head measurement. If it feels too tight, adjust the attachment spacing, stitch count, or needle size, then test again. Blocking won’t fix an opening that’s too small. Check that the blocked opening passes comfortably over the head before you finish the edge.
Yes, but the difference in stretch matters. Ribbing provides elasticity, especially around necklines that need to stretch over the head. Applied i-cord gives you a structured, polished finish, but it has much less stretch.
If you choose applied i-cord, make sure the finished opening is large enough for your needs. It may not work for necklines that need a lot of stretch.
Compare the number of stitches you’ll pick up along the neckline edge with the number of rows in your ribbing strip. The available resources don’t give a specific formula. Instead, aim for ribbing that lies flat, without flaring or puckering.
To help reduce flare, a common approach is to decrease one stitch every eight to ten stitches on the final row before binding off or attaching the trim.
Use needles one or two sizes smaller than your main project needles for the neckline ribbing. Alpaca yarn’s natural stretch can relax over time. Smaller needles help the ribbing hold its shape and keep the neckline tidy. A structured bind-off can also help control its shape.
For help with these techniques, check out Alpaca Direct’s educational resources and tutorials, or watch our instructional videos on YouTube.

Comments will be approved before showing up.










