Your Cart is Empty



If you want a double-knit edge to stay neat on both sides, keep both yarns active, work the front and back stitches in order, and watch tension from the first few stitches.
I’d sum it up like this: this bind-off closes both layers at once, keeps the edge reversible, and helps both colors stay where they belong. The big trouble spots are simple too: tight edges, twisted yarns, gaps between layers, and one color looking larger than the other.
Here’s the short version:
One small check every 6–10 stitches can help prevent most edge problems before they spread across the whole row.
So if I want a clean finish on a scarf, hat, mitten cuff, or cowl, this is the main idea: keep the order steady, keep the tension even, and treat each front/back pair as a unit.
Before you bind off, take a minute to check the last row. Once the stitch order looks right, get the edge ready so the bind-off goes smoothly.
Lay the work flat with the right side facing up. Then check that the stitches alternate across the row: front layer, back layer, front layer, back layer. Front stitches should show the front color, and back stitches should show the back color.
If you see two stitches of the same color next to each other, or the front/back sequence breaks, fix it now. Mistakes at the edge stand out fast and are hard to clean up after the bind-off is done.
If your last pattern row had increases, decreases, eyelets, slipped stitches, or other shaping, work one or two plain double-knit rows first. That gives the two layers a chance to sit more evenly on the needle and makes the edge easier to handle. Once everything lines up, get your tools and yarn hold set.
Keep scissors and a blunt-tip tapestry needle nearby for finishing. For most projects, use the same needle size you used for the body of the piece. That usually gives you a bind-off that matches the fabric in feel and look.
If you want more stretch, like on a hat brim or mitten cuff, go up one US needle size for the bind-off row.
Decide how you'll hold the yarn before you work the first stitch. You can hold one yarn in each hand or both in one hand. Either way, move both strands together when shifting between front and back. If you separate them, you'll create a gap at the edge.
That keeps both strands in place and ready for the first bind-off stitch.
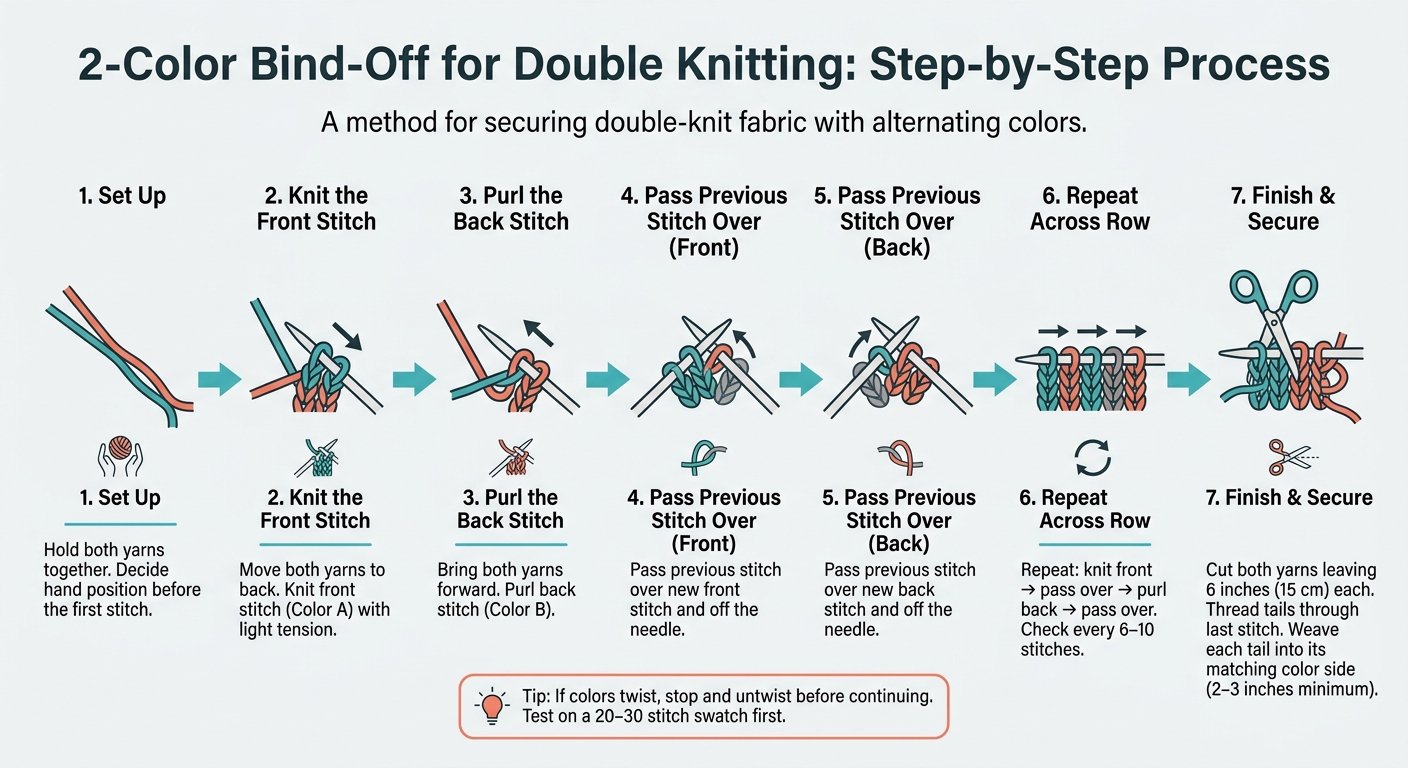
2-Color Bind-Off for Double Knitting: Step-by-Step Visual Guide
With both yarns in place, knit the front stitch with light tension so the edge doesn't get too tight. Then bring both yarns to the front and purl the back stitch. That gives you your first pair.
After that, keep working in the same front-back rhythm across the row.
From here, the bind-off settles into two moves: one for the front stitch and one for the back stitch.
For the front repeat, move both yarns to the back, knit the next front stitch (Color A), then pass the previous stitch over the new stitch and off the needle. For the back repeat, bring both yarns to the front, purl the next back stitch (Color B), then pass the previous stitch over the new purled stitch.
In plain terms, the repeat goes like this:
If the colors cross, stop for a second and untwist them before you keep going.
When you're down to the final stitches, keep the pattern going until only one stitch is left on the right needle. Don't skip the last front or back stitch. Both still need to be worked so the two layers stay lined up all the way to the corner.
Cut both yarns, leaving 6 inches (15 cm) for each tail. Thread both tails through the last stitch, then snug them just enough to flatten the loop. Weave each tail into its matching color side - Color A into the front layer, Color B into the back layer - using a shallow zigzag for at least 2–3 inches.
If the edge starts to feel tight after the first few stitches, fix it right away instead of pushing through the whole row. A tight edge usually won’t improve on its own. Try the bind-off on a larger needle first, and test it on a small swatch before you finish the project.
Once the bind-off starts flowing well, look at the edge for color balance too, not just stretch. Sometimes one color’s loops look taller or puffier than the other, or the whole edge starts leaning toward one shade. The fix is simple: match the size of each loop and keep checking as you go. A quick glance every few stitches can help you catch one color before it starts taking over the edge.
Twisting often happens when the two yarns are handled differently from stitch to stitch. Keep the same color in the same hand or finger position through the whole bind-off. When you move from the front layer to the back layer, or back again, bring both yarns along together. If the strands start coiling around each other, stop, drop both yarns, and let them untwist.
Ladders and gaps between layers show up when the yarn stays too slack as it travels between the front and back fabric. After each layer change, snug the yarn gently - just enough to close the space without squeezing the edge. Every 6–10 stitches, spread the stitches on the right-hand needle and check your work. That makes it easier to spot tight areas and make sure the edge still stretches evenly.
Before you bind off the full project, test the edge on a small swatch. Try 20–30 stitches first. It’s a small step, but it can save a lot of hassle later.
If something feels off, unravel the bind-off, change your needle size or hand tension, and try again. And if you want to see the yarn path, hand position, or tension in motion, use the Alpaca Direct YouTube channel as a visual guide.
A 2-color bind-off helps double knitting stay even, flexible, and reversible. It closes both layers neatly and keeps the fabric’s color order in place along the edge.
When you keep the sequence consistent, the edge comes out even on both sides. That matters. If you’re finishing a double-knit scarf, a reversible hat, or a cowl, a neat bind-off carries that reversible look all the way through the last stitch. The edge doesn’t feel like an afterthought - it feels like part of the design.
If you notice a few small uneven spots, don’t panic. They often relax after blocking, especially with wool and alpaca blends. For a visual demo, watch the Alpaca Direct YouTube channel.
Yes - you can use this bind-off for ribbed double knitting.
The two-color tubular bind-off (also called the Kitchener bind-off) is often a good pick because it helps the edge stay neat, stretchy, and polished.
Other sewn bind-off variations can work too, depending on the stitch pattern. The big thing is tension: keep it even so the edge doesn’t sag or pucker.
Check your double-knitting edge stability. Your bind-off should match an elastic or tubular method that suits the fabric. A two-color tubular or Kitchener bind-off can help keep the edge neat and stretchy. Also pay close attention to tension. If one yarn is tighter than the other, the layers can sag or pull the edge outward.
It also helps to swatch first. And leaving 3–5 background pairs on each side can make the edges steadier.
Yes. It’s important to match your yarns by weight and behavior when double knitting.
When both yarns have similar traits, neither side tends to overpower the other. That gives you a cleaner, more even fabric, which is exactly what you want in double knitting.

Comments will be approved before showing up.










