Your Cart is Empty



Knitting socks that fit wide or narrow feet requires accurate measurements and pattern adjustments. Standard sock patterns often don’t suit all foot shapes, leading to issues like tightness, slipping, or fabric bunching. By customizing stitch counts, heel construction, and gusset shaping, you can create socks that fit perfectly. Here's how:
Whether you knit toe-up or cuff-down, these adjustments ensure comfort and a tailored fit. Visit Alpaca Direct for premium yarns and tutorials to guide your sock-making journey.
Sock Knitting Pattern Adjustments for Wide vs Narrow Feet
Getting the perfect sock fit starts with taking precise measurements. Amy Palmer, Editor at Interweave, emphasizes the importance of this step:
To customize socks to fit your feet, you first need to study your feet. The key areas are the calf, ankle, arch, and the ball of the foot.
These measurements help determine crucial details like the number of stitches to cast on, heel placement, and toe shaping.
Once you've measured your foot, reduce each value by 10%. This adjustment accounts for the stretch needed to keep the sock snug without sagging or sliding. For wider feet, allow extra room at the ball and instep. Narrow feet, on the other hand, require tighter measurements to avoid fabric bunching.
Grab a flexible fabric tape measure, paper, and a pen to jot down your measurements. A helper can be handy for tricky angles, but you can do this solo by ensuring your foot is properly positioned. Tracing your foot can also help identify toe shape and the widest areas.
Start by measuring the circumference of the ball of your foot - the widest part just before the toes. Then, measure the arch at its highest point to capture the full circumference. This is especially important for high insteps to avoid a tight, uncomfortable fit.
For the ankle, stand in an L-shape position and wrap the tape measure at an angle from under the heel to where your foot meets your leg. Lastly, measure your calf about 9 inches above the heel to determine the cuff placement. To accommodate wide feet, use fewer gusset decreases and extend the heel flap for added room.
The same measurement points apply for narrow feet, but smaller numbers will indicate the need for tighter adjustments. Measure the arch snugly to ensure a secure fit without twisting. The ball of the foot measurement is critical, as it determines the stitch count for toe decreases.
Since narrow feet are more prone to sock bunching, plan to add extra gusset decrease rounds - typically two additional rounds, which remove about ½ inch of fabric. Don't forget to record ankle and calf measurements, as these areas may also need adjustments to prevent the sock from slipping. Proper measurements here will guide pattern modifications for a snug, comfortable fit.
Once you’ve taken your measurements, it’s time to tweak your pattern. Wide feet require extra space in three critical areas: the heel, the arch, and the toe. These adjustments work together to ensure a snug yet comfortable fit without any pinching.
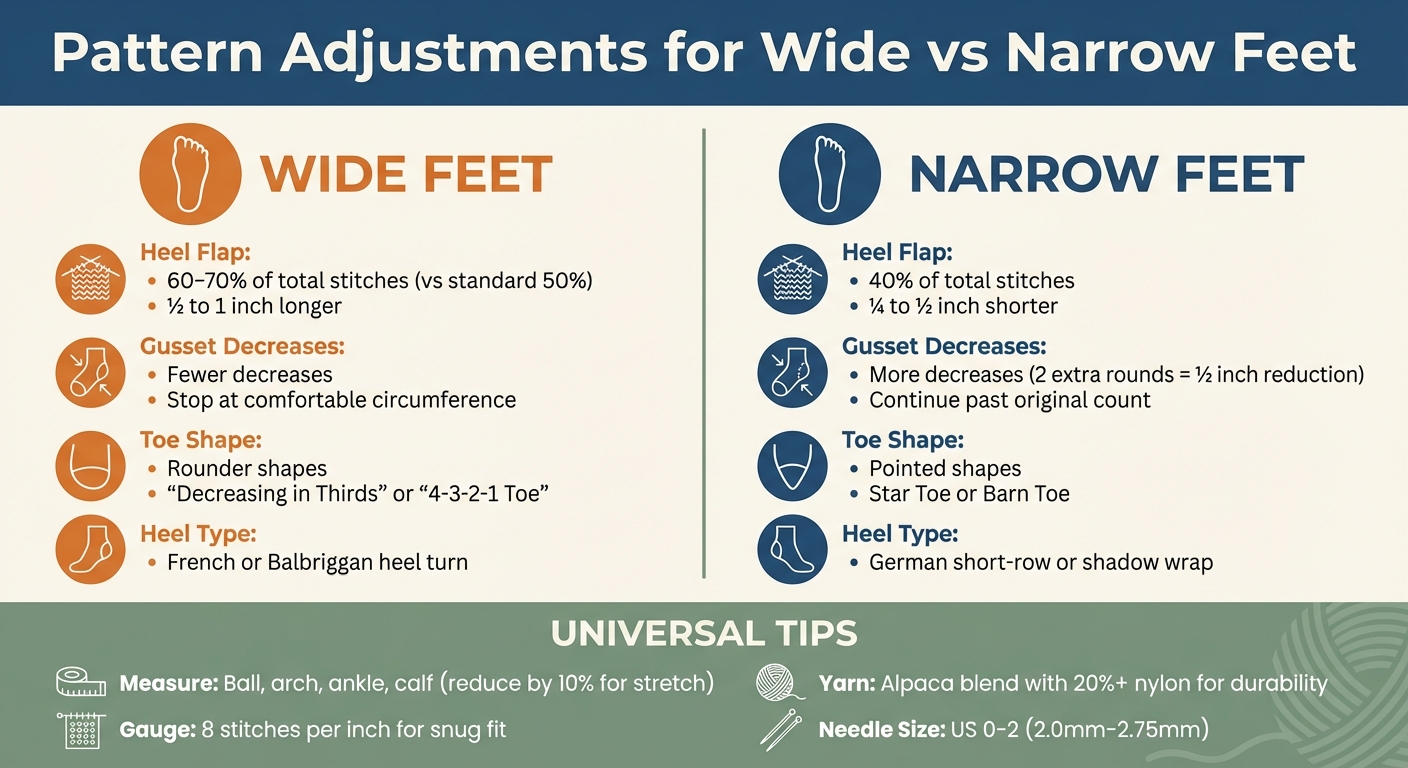
Start with the heel flap - this is where most adjustments for wide feet begin. Instead of using the standard 50% of your total stitches for the flap, increase it to 60–70% of your total stitch count. For example, if you’re knitting a sock with 64 stitches, allocate 38–45 stitches for the heel flap instead of the usual 32.
Make the heel flap ½ to 1 inch longer than the pattern suggests. To accommodate this, adjust the heel turn by increasing the number of stitches in the center (often called the "bridge") to create a wider, more rounded base. Amy Palmer, Editor at Interweave, explains:
The extra depth means you'll need to work extra gusset decreases, giving you more fabric over the arch and making a more comfortable fit.
For a better contour around wide heels, opt for a French or Balbriggan heel turn instead of a square or Dutch heel. With the extended heel flap, you’ll also need to adjust the gusset to maintain balance through the midfoot.
Once you’ve picked up stitches along the extended heel flap, you’ll notice you have more stitches than usual. To keep the midfoot wide enough, reduce the number of gusset decreases. You can stop decreasing once the sock reaches a comfortable circumference, even if it leaves you with a higher stitch count than the original pattern.
Amy Palmer offers this advice:
Work fewer gusset decreases to increase the amount of fabric going around the foot. ... Once you've knitted past the arch, you can work a few decreases on either side to make a more snug fit around the ball of your foot.
If you’re knitting toe-up socks or using short-row heels, try adding mini gussets. Add 2–4 stitches to each side of the instep just before starting the heel shaping, then decrease them back out after finishing the heel. This simple tweak adds extra depth over the arch without altering the sock's overall look.
Standard wedge toes often taper too sharply for wide feet. Instead, try the "Decreasing in Thirds" wedge variation or the "4-3-2-1 Toe" for a rounder, more spacious fit.
The "Decreasing in Thirds" method divides your decrease rounds into three sections. In the first section, work two plain rounds between each decrease round. In the second section, work one plain round between decreases, and in the final section, work decrease rounds consecutively. This method creates a broader, less pointed toe.
The "4-3-2-1 Toe" offers even more room. After your first decrease round, work four plain rounds; after the second, work three; after the third, work two; and after the fourth, work one. Then finish the remaining decreases without any plain rounds in between. Roxanne Richardson, Certified Master Handknitter, highlights its benefits:
The wider shapes of the wedge toe decreased in thirds and the 4-3-2-1 variation are a good fit for my friend Rosemary [who has shorter, less tapered toes].
These toe shapes are especially helpful for feet where the first three toes are nearly the same length. Up next, we’ll explore how choosing the right yarn and gauge can further improve sock comfort and fit.
When it comes to narrow feet, the focus shifts to removing excess fabric for a snug fit that stays in place. These adjustments aim to prevent slipping, bunching, or twisting by refining the heel, instep, and toe areas.
The heel flap is often worked as a square (e.g., 32 stitches by 32 rows). For narrow feet, shorten the flap by ¼ to ½ inch by knitting fewer rows than the pattern suggests. This adjustment creates a shallower heel cup, reducing bunching behind the ankle.
Shaina, Founder of Yumi Yarns, explains:
Since we're building the depth of the sock's heel when we make the heel flap, you can easily make it deeper or more shallow by adding or decreasing rows.
For particularly narrow heels, consider reducing the flap width to 40% of your total sock stitches instead of the usual 50%. Knitwear Designer Miriam Felton notes:
If you have a super narrow heel, some like to use 40% of the total stitches.
Shortening the heel flap also means fewer selvedge stitches to pick up for the gusset. For an even tighter fit, try a German short-row or shadow wrap heel. These techniques wrap the heel closely, minimizing excess fabric.
With a snug heel cup in place, you can move on to refining the instep.
After completing the heel turn, increase the number of gusset decreases to remove extra fabric more quickly. Instead of stopping at the original cast-on count, continue decreasing until the sock fits snugly around the arch. Amy Palmer, Editor at Interweave, suggests:
Work more gusset decreases to fit a foot with a low arch or narrower foot circumference. The sole of the foot is the best place in a sock to fiddle with numbers.
To adjust the fit around the ball of the foot, add extra decreases on the sole rather than the instep. The plain stockinette on the sole makes these changes less noticeable. Alternatively, you can incorporate 2x2 ribbing around the arch area. This naturally pulls in the fabric without requiring complex calculations.
Once the heel and instep are adjusted, focus on shaping the toe for a better fit. Standard wedge toes can leave excess room for narrow feet. Instead, consider a Star Toe or Barn Toe, which offer a more tapered finish.
Kate Atherley, Knitting Expert, advises:
For a longer, pointier toe, work more decrease rounds.
Finish by threading the yarn tail through the remaining stitches and pulling tight, rather than grafting a larger number of stitches. This creates a sleek, tailored fit that mirrors the natural shape of narrow toes.
Once you've adjusted your pattern for the perfect fit, the next step is choosing the right yarn and gauge. These choices fine-tune your socks' performance, ensuring they not only fit well but also hold their shape over time.
Alpaca yarn is a fantastic option for socks because it's both moisture-wicking and warm, much like wool, but with added softness that feels great on the skin. When knitting for wide or narrow feet, elasticity and recovery are key. The fabric needs to stretch comfortably over wider areas without losing its shape. While alpaca offers incredible softness and temperature regulation, blending it with nylon enhances its durability and fit.
For a sock that lasts, look for yarn with at least 20% nylon. Wool and wool blends are also excellent because of their natural "memory", which allows them to bounce back to their original shape after stretching. As Mary Maxim explains:
Wool is considered the universal fiber for socks because it is soft, elastic, and always goes back to its original shape.
For socks you’ll wear daily with shoes, fingering weight yarn (Category #1) is ideal. For thicker socks, like those meant for boots or lounging, sport or worsted weights are better suited. Alpaca Direct offers a variety of alpaca blends, including nylon-reinforced options for extra strength. Before starting your project, always knit a swatch to test the gauge and elasticity. Rub the swatch on different surfaces to check for pilling.
A durable sock typically requires a gauge of 8 stitches per inch, which results in a dense fabric that stands up to wear and tear. Amy Palmer, Editor at Interweave, explains:
The recommended amount of negative ease for socks is generally 10%.
To achieve this firm gauge with fingering weight yarn, use small needles - US 0–2 (2.0mm–2.75mm). Knit your swatch in the round using the same yarn, needles, and stitch pattern you plan to use for the socks. If your gauge is too loose, the socks may sag or slide. Too tight, and they might feel constrictive, like a tourniquet. For added strength in areas prone to friction, like the heel or toe, you can hold a strand of nylon reinforcement thread alongside your yarn.
For narrow feet, making just two extra decrease rounds at a gauge of 8 stitches per inch will reduce the width by ½ inch, giving a snugger fit. On the other hand, for wider feet, you can skip some gusset decreases or go up a needle size to add extra room.
Once your gauge is set, you're ready to dive into techniques like toe-up or cuff-down construction to complete your personalized sock design.
Once you've decided on your custom modifications, the next step is choosing a construction method. Whether you go for toe-up or cuff-down, each approach brings its own benefits for fine-tuning the fit and adapting to your needs.
Knitting socks from the toe-up offers a major advantage: you can try them on as you knit. This makes it easier to tweak the shape for a snug, personalized fit. Starting at the toe and working your way up lets you adjust the width and length before finalizing the heel and leg. As Jen Arnall-Culliford notes:
"This is another benefit to knitting toe-up – you get that reassurance that the size is good before the whole sock is finished."
For wider feet or high insteps, you can add 2–4 stitches on each instep about 2 inches before the heel to create a deeper arch. Similarly, you can adjust the heel flap width to suit your foot shape.
If your feet are narrower, you might want to reduce the overall stitch count. Pairing this with tighter heel styles, like the German short-row or shadow wrap heel, ensures a better grip and eliminates excess fabric.
If you're more inclined toward a traditional method, the cuff-down approach offers a different way to achieve a custom fit.
Cuff-down knitting starts at the leg and works downward, giving you a structured framework for precise modifications. This classic method is ideal for knitters who enjoy traditional techniques like heel flap and gusset construction.
For wider feet, you can deepen the heel flap and reduce the number of gusset decreases to maintain extra fabric over the arch. On the other hand, for narrower feet, increasing gusset decreases and reducing the heel cup depth helps create a snug fit.
While cuff-down knitting doesn't allow for try-on adjustments mid-project, it still provides flexibility for making detailed instep modifications and remains a favorite among knitters who prefer its timeless structure.
Need some extra help mastering these techniques? Head over to Alpaca Direct's YouTube channel for step-by-step tutorials on essentials like heel turning and toe grafting with the Kitchener stitch.
Knitting socks that fit wide or narrow feet boils down to three key steps: getting accurate measurements, making smart pattern adjustments, and choosing the right yarn. As CraftGossip explains:
The key to making socks that fit you (or the foot you're knitting for) is to measure the foot well if you have it available and also to make a good gauge swatch.
From tweaking the heel flap for wider feet to incorporating gusset decreases for a snugger fit, every adjustment helps tailor the socks to the foot in question. Whether you prefer toe-up or cuff-down construction, these small changes make a big difference in comfort and fit.
Using alpaca yarn adds another layer of success. Its natural elasticity and durability help the socks maintain their shape over time while staying soft and comfortable. Combining precise measurements, thoughtful pattern adjustments, and high-quality yarn ensures socks that feel like they were made just for you.
Ready to get started? Visit Alpaca Direct to explore a variety of yarn options perfect for sock knitting. For hands-on guidance, check out the YouTube channel for tutorials on techniques like heel turning and the Kitchener stitch. With the right approach, you'll be knitting socks that fit perfectly in no time.
Start by measuring the circumference of your foot at its widest point. Next, knit a swatch using your selected yarn and needles to figure out your gauge - this tells you how many stitches you’re getting per inch.
Once you have these numbers, multiply your foot circumference (in inches) by your gauge. For instance, if your gauge is 8 stitches per inch and your foot measures 9 inches, you’d cast on 72 stitches. You can tweak this number slightly if you prefer a snugger or looser fit.
A heel flap and turn is a great option for those with a high instep. This method provides a secure, comfortable fit while easing pressure around the ankle, which is why it's often favored for this particular foot shape.
To figure out if your socks need adjustments to the gusset decreases, pay attention to how they fit around your heel and arch. If the sock feels too tight or pulls at the gusset area, try reducing fewer stitches. On the other hand, if it feels too loose or starts sagging, you’ll want to decrease more stitches. Tailor the gusset shaping to match your foot’s unique features, like a high instep or a wide heel, to ensure a comfortable and secure fit.

Comments will be approved before showing up.










