Your Cart is Empty



You can knit a kids sweater on straight needles without learning hard stitch patterns or circular-needle shaping first. The main idea is simple: knit flat pieces, seam them together, and keep the stitch work to garter, stockinette, and ribbing.
If I wanted the short version, here’s what I’d take from this article:
The five pattern types covered are:
What changes from one to the next is mostly the amount of shaping, finishing, and seaming. The first options keep things very plain. Later ones add details like neck shaping, button bands, or sideways construction.
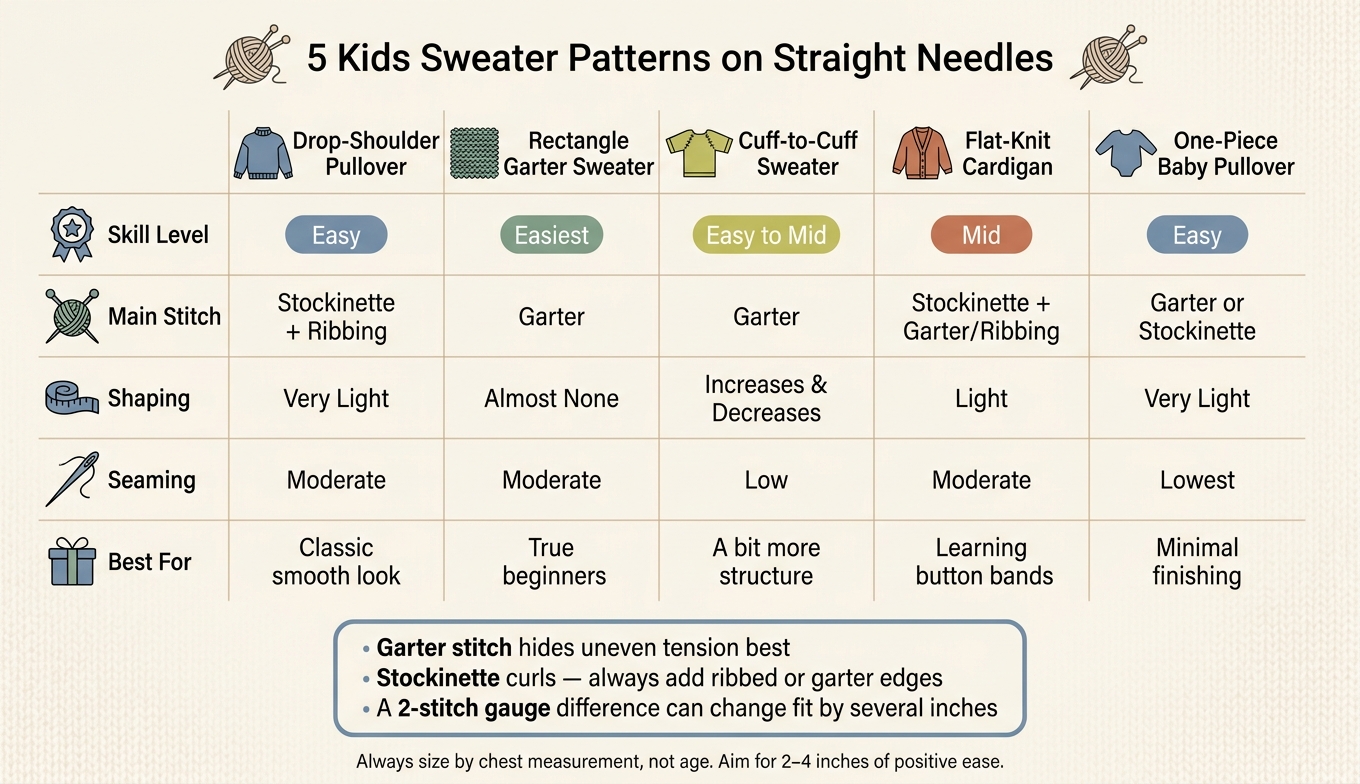
5 Kids Sweater Patterns on Straight Needles: Quick Comparison Guide
| Pattern | Skill Level | Main Stitch | Shaping | Seaming |
|---|---|---|---|---|
| Drop-shoulder pullover | Easy | Stockinette + ribbing | Very light | Moderate |
| Rectangle garter sweater | Easiest | Garter | Almost none | Moderate |
| Cuff-to-cuff sweater | Easy to mid | Garter | Increases and decreases | Low |
| Flat-knit cardigan | Mid | Stockinette + garter/ribbing | Light | Moderate |
| One-piece baby pullover | Easy | Garter or stockinette | Very light | Lowest |
A few points stand out. Garter stitch is the most forgiving because it lies flat and hides uneven tension. Stockinette looks smooth but curls, so ribbed or garter edges help. And even a 2-stitch gauge difference over 4 inches can change fit by several inches on a kids sweater, so swatching is not optional.
I’d sum it up like this: if you can knit flat fabric and follow plain finishing steps, you’re already close to making your first kids sweater.
Before you pick a pattern, look for three things: simple shaping, stitches that repeat, and finishing steps that are spelled out clearly. That combination makes the whole project feel much less intimidating.
Drop-shoulder sweaters are one of the easiest places to start. The body is knitted straight to a set length, and the sleeve joins a flat horizontal edge. So instead of tracking a bunch of decrease rows, you're mostly using a measuring tape and checking length as you go.
Straight bodies with no waist shaping also make life easier. The same goes for easy necklines, like a basic crew neck or a wide boat neck. When the pieces stay close to rectangles, sewing them together feels a lot more natural.
The easiest beginner patterns usually stick with garter stitch, stockinette, and simple ribbing. These stitches are easy to settle into because they repeat row after row.
Garter stitch is especially forgiving since you knit every row and don't have to stop and think about which side you're on. Stockinette helps you get used to a steady knit/purl rhythm without making the pattern harder than it needs to be. And ribbing at the cuffs, hem, and neckband adds stretch, which helps the sweater stay in place and fit well.
A good beginner pattern doesn't leave finishing up to guesswork. It should lay out the steps in a clear order: block the pieces, seam the shoulders, attach the sleeves, close the side and sleeve seams, and then add the neckband or button band.
For the seams themselves, use mattress stitch or a 3-needle bind-off. Both give you stronger seams, which matters a lot in kids' clothes.
For an everyday kids sweater, aim for 2–4 inches of positive ease beyond the child's actual chest measurement. And don't trust the age label by itself. Always check the pattern's finished garment measurements, since sizing can vary a lot from one pattern to another.
When it comes to yarn, think practical first: soft and washable. Superwash wool stands up well to frequent laundering. Alpaca and alpaca blends feel extra soft, which can help if a child doesn't like scratchy fibers. For day-to-day wear, machine-washable yarns marked for cold water and low-heat drying are the safest bet.
With those basics in place, the five patterns below start with the easiest shapes and then move into sweaters with a bit more structure.
Start with this one if you want the simplest sweater on the list: a drop-shoulder pullover with almost no shaping. The body is made from plain rectangles. Cast on at the hem, work ribbing for about 1–2 inches, then knit straight in stockinette.
Stockinette gives the sweater that smooth, classic look. But on its own, it loves to curl. That’s why ribbing at the hem, cuffs, and neckband matters so much. It helps the edges stay put and adds stretch where kids need it most. Gauge usually falls around 17–22 stitches over 4 inches in DK or worsted weight.
The shaping stays very light. Work the front and back straight, with no armhole shaping at all, and keep the neckline simple. The easiest path is to bind off straight across both pieces for a wide boat neck. If you’d rather make a crew neck, bind off the center front stitches, then work each side on its own with a few decreases at the inner edge. Sleeves can be knit flat from the cuff up in stockinette, then seamed into the armhole opening.
Finishing is simple too. Seam the shoulders, set in the sleeves, and close the side seams. A 3-needle bind-off at the shoulders makes a neat, sturdy seam that handles the weight of the sleeves well. After that, sew in the sleeves, then close the side and sleeve seams in one continuous mattress stitch line from cuff to hem. For the neckband, pick up stitches around the opening at about 3 stitches for every 4 rows along the vertical edges, then work 1–2 inches of 1x1 ribbing and finish with a stretchy bind-off options. That helps the neckline lie flat and feel comfortable.
If the drop-shoulder pullover felt like a bit much, this one gives you more room to breathe. It’s the most forgiving flat-knit sweater in this group. You make it from four flat pieces: one front, one back, and two sleeves. And each piece is just a rectangle. That means almost no shaping, so you can put your energy into even stitches and neat seaming.
Garter stitch is a great fit for first sweaters on straight needles. It lies flat, doesn’t curl much, and it does a good job of hiding small tension wobbles while you’re still getting the feel for your knitting. If your gauge shifts a little, it usually won’t stand out as much.
For a 24-inch chest, aim for a sweater that measures about 26 to 28 inches around, or 13 to 14 inches for each body piece. Body length often lands between 14 and 18 inches for young children, while sleeves are usually about 10 to 14 inches long. Worsted-weight yarn on US 7–9 needles is a solid place to start, with a garter gauge of about 4–5 stitches and 8–10 rows per inch. Swatch first. In garter stitch, row gauge matters just as much as stitch gauge.
The neck is simple too. Knit each body piece to full length, then bind off the center stitches for the neck opening. Around 12 stitches is a common starting point. After that, finish each shoulder on its own and work 2 more rows before binding off. Once the shoulders are joined, pick up stitches for a 1–2-inch garter-stitch neckband. Bind off loosely so the neckline slips on without a fight. Alpaca or alpaca-blend yarns from Alpaca Direct work well for the neckband because they feel soft against sensitive skin.
Assembly is pretty direct:
Use mattress stitch for neat, sturdy seams. The next sweater adds button bands and a little more finishing practice.
If you want a sweater with a bit more shape, but you’re not ready to deal with separate fronts and backs, this sideways design is a solid next step. It’s knit from cuff to cuff in garter stitch, so the texture stays simple, but the shaping moves beyond plain rectangles.
You’ll work it in four parts: cast on for one cuff, increase to the body width, knit straight across the chest, then decrease back down to the second cuff. That increase to center, then decrease back out rhythm is the main new skill here. In sideways garter stitch, row gauge controls length, so swatching matters. Since the shaping mirrors itself, a row counter can save you a headache. Mark each increase row so you can match those decrease rows on the second sleeve.
The neckline happens in the middle of the body section. Once you reach the midpoint, split the stitches into front and back and work each side flat to make a vertical neck opening about 2–3 inches deep. Then rejoin the stitches and continue toward the second sleeve. After the knitting is done, pick up stitches around the neck opening and work a few rows of garter stitch or 1×1 ribbing, then bind off loosely.
You only need to seam the underarm and side edges, which keeps finishing pretty simple. Mattress stitch works well here because it keeps the seams neat and steady. Line up ridge to ridge before sewing so the garter ridges meet cleanly across the seam.
Soft alpaca-blend yarns are a good match for this pattern because they stay warm without adding too much bulk. That works well with denser garter fabric and helps keep small shoulders from feeling weighed down. You can find alpaca-blend options at Alpaca Direct. If you want a more traditional flat-knit project after this, the cardigan brings in button-band finishing.
After plain rectangles and basic garter-stitch sweaters, this cardigan adds one new idea: the button band. The nice part is that the project still stays flat-knit from start to finish.
You knit it in five pieces on straight needles:
The front opening is built into the shape, so each front is narrower than the back.
Most beginner-friendly versions use a stockinette body with garter-stitch borders at the hem, cuffs, and front edges. That small detail does a lot of work. The garter edges help stop curling and give the button band a firm edge. Armhole shaping is often kept very light, and the shoulders are usually straight or only slightly shaped, which makes the pieces much easier to match up at seaming time.
Assembly is simple: join the shoulders first, set in the sleeves next, then seam the sides and sleeves from hem to cuff.
For the button bands, you have two common options. You can work them along with the fronts for the easiest finish, or pick up stitches after seaming if you want a cleaner edge. Buttonholes go on one band only, using a basic yarn-over or bind-off/cast-on method, spaced evenly down the opening. The integrated version is the easier path because it cuts down on finishing.
If you're using this pattern to learn one cardigan-specific skill, make it the button band. That's the step that makes a cardigan feel different from a pullover.
After the shoulders are joined, pick up stitches for the neckband, work 1x1 ribbing or garter stitch, then use a Channel Island bind-off or bind off loosely so the neckline stays comfortable. Soft alpaca-blend yarns from Alpaca Direct are a nice option here because they are lightweight and non-itchy.
If you want even fewer finishing steps, the next sweater is a one-piece flat pullover.
This one-piece pullover is knit flat in a simple T-shape. You work the back first, cast on for each sleeve, and then keep going into the front. That means very little seaming at the end. It’s the lowest-seam option in this list, and it’s also the smallest and easiest flat-knit pick for kids.
Since the whole garment is made in one piece, simple stitch patterns work best. Garter stitch is the easiest route. Stockinette can work too, but it helps to add a garter or rib border so the edges don’t curl. Keep the shaping simple: no side shaping, plus either a basic center-neck bind-off or a few decreases along the neck edge.
Once the body is done, finishing is straightforward. Sew the short underarm seams with mattress stitch, then work the neckline. Pick up stitches and knit 1x1 or 2x2 ribbing for about 1 to 1.5 inches, then bind off loosely so it’s easy to pull on and off. A soft alpaca blend yarn adds warmth and comfort without extra bulk.
All five patterns use the same small set of skills. You don't need anything fancy to get started. Just learn a few basics that come up again and again in each sweater.
A simple cast-on, like the long-tail cast-on or knitted cast-on, gives you a clean starting edge for hems, cuffs, and sweater borders. From there, the main stitch patterns stay pretty simple: garter stitch means knitting every row, stockinette means alternating knit and purl rows, and ribbing gives you those stretchy edges that help a sweater hold its shape.
You'll only need plain increases and decreases, and only when the pattern tells you to use them. When it's time to bind off, do it loosely. You can also switch to a needle one size larger for necklines and cuffs if your edges tend to come out tight. For shoulder seams, use the Three-Needle Bind-Off tutorial to make a firm seam that holds up well.
Mattress stitch joins pieces with a flat, almost invisible seam. That means the finished seam sits smoothly against the body instead of feeling bulky. If you can, block your pieces before seaming. It helps the edges line up better, and small size differences are much easier to ease into place.
Pick up stitches evenly so the band stays flat instead of getting wavy or puckered. Work the ribbed band on a smaller needle than the one you used for the main sweater fabric to help it stay snug. For button bands, even pickup also helps the front edge lie flat. After that, you're ready to match your size, yarn, and needles to your gauge and the child's chest measurement.
Use these size, yarn, and needle checks before you cast on any of the five patterns above.
Choose size by chest measurement, not age. Wrap a soft tape measure around the fullest part of the chest and keep it level across the back. Then compare that number with the measurement the pattern gives, either body chest or finished garment chest.
As a general guide, a child age 2–3 usually measures about 21–22 in, a 6-year-old about 24–25 in, and a child age 10–12 about 28–30 in. If you can’t measure the child, use the age-based chest range as a starting point and go up a bit in size.
For most everyday pullovers and cardigans, 2–4 in of positive ease beyond the child’s actual chest measurement tends to work well.
Always knit a gauge swatch in the actual yarn and stitch pattern you plan to use. Wash and dry the swatch the same way you’ll care for the finished sweater, then measure it. If your gauge is off, change needle size.
That step matters more than many knitters expect. A 2-stitch gauge difference per 4 in can change the finished chest by several inches on a kids’ sweater.
For yarn and needle pairings, the Craft Yarn Council's standard weight system is a useful starting point:
| Yarn Weight | Typical U.S. Needle Size | Approx. Gauge (Stockinette) |
|---|---|---|
| DK / Light Worsted | US 5–7 (3.75–4.5 mm) | 21–24 sts per 4 in |
| Worsted / Medium | US 7–9 (4.5–5.5 mm) | 16–20 sts per 4 in |
Once your gauge is set, pick a fiber that fits how the sweater will be worn and washed.
For straight-needle, seamed kids' sweaters, fiber choice mostly comes down to care and feel.
Seamed construction also helps alpaca blends keep their shape, which makes them a good match for these flat-knit patterns. Plan to wash alpaca pieces gently and dry them flat. You can find alpaca-blend options suited to kids' cooler-weather projects at Alpaca Direct.
With your size, yarn, and gauge sorted out, the last call is shape: pick the one that fits what you can do right now.
If you’ve only knit flat pieces like scarves or dishcloths, start with garter-stitch rectangles or the one-piece flat baby pullover. If knit and purl feel comfortable, the drop-shoulder stockinette pullover is a solid next step. These five options keep things simple from cast-on to seaming.
And that matters. A simple sweater with neat seaming and even tension often looks better and holds up better than a more complicated one that’s finished in a rush. Your first kids sweater teaches the same core skills you’ll use again and again: seaming, picking up stitches, ribbing, and reading patterns.
For a true beginner, the Baby Surprise Jacket is a smart place to start. It uses mostly garter stitch and only a few simple shaping steps, so it fits well as a first sweater project.
Straight needles help keep things simple too. You knit flat, back and forth, instead of dealing with circular needle cords.
Use the pattern’s sizing chart, and make sure your gauge swatch matches the pattern. Wash and block the swatch as directed so your finished measurements stay accurate, since blocking can make the sweater bigger.
It also helps to check the ease built into the pattern. If you’re not sure how the fit will look, compare the listed measurements with a sweater you already like. Then pick the size that comes closest to that shape.
Yes - always knit, wash, and block a gauge swatch exactly as your pattern directs.
That step matters more than it may seem. Some fibers change after washing and blocking, and they can relax or bloom in a way that makes your finished sweater come out much larger than you planned.
A swatch gives you a clearer picture of what the fabric will do before you commit to the full project. In plain terms: it helps you get a better fit.

Comments will be approved before showing up.










