
Double Knitting Edges: Keeping Colors Consistent

I keep double-knitting edges consistent by keeping Color A on Face A and Color B on Face B - even at the borders. I move both yarns together between knit and purl stitches, then cross them once at each row end to join the layers.
I use a 24-stitch, 12-row swatch to check the routine:
- Set the color order: Knit A, purl B with Face A toward me; knit B, purl A after turning.
- Compare two edges: Working every edge stitch gives me a firmer baseline. Slipping the first pair can leave longer stitches and more exposed contrast.
- Check both faces: I track wrong-color stitches, gaps, and puckering, then rework from the first faulty row.
- Finish without pulling tight: I use a loose two-color bind-off and check the borders before blocking.
My main check: <u>border-stitch color matters more than a visible joining strand</u>. A contrasting bridge can be normal; blocking won’t fix a wrong-color stitch or a missing join.
Cast On and Set the Color Order
Arrange 12 Stitch Pairs
Cast on in alternating A/B order for the planned 12 stitch pairs. If your method includes a temporary starting slipknot that you’ll remove, don’t count it. Start the border colors in the order you want to keep on both faces. Row 1 locks that order in place.
Your cast-on direction and any setup turn affect which color comes first. Check the working edge from the needle tip: the sequence should begin A-B and continue alternating across the row.
With Face A toward you, work Row 1 as knit A, purl B across, using the planned edge crossover. Label Face A with a removable marker or make a note so you can track turns. Read the face colors from Row 1 - not the cast-on ridge.
Check Strand Placement Before Each Row
After Row 1, use the same check after every turn: confirm which face is toward you, check the colors of the next pair, and make sure the previous row’s edge crossover is secure. After turning from Face A, work knit B, purl A. The color order flips only because you’ve turned the work. Record each row’s sequence in your swatch notes. This helps when you read double knitting charts for more complex patterns.
Keep strand placement separate from the edge crossover. Cross the strands only at the designated joining point. Extra crossings can trap yarn and tighten the edge.
Double-Knitting Tips, Tricks and Projects
Compare Worked and Slipped Edge Pairs
With the yarn order fixed, test two edge treatments on matching swatches. Keep A on Face A and B on Face B, including the visible border stitches. Use the same yarn, needles, and tension so the edge treatment is the only difference.
Check which method keeps the border colors most consistent.
| Working method | Firmness | Color tracking | Face A appearance | Face B appearance | Suitable uses |
|---|---|---|---|---|---|
| Work both edge stitches on every row | Firmer, more compact | Easier; follows the center sequence | Consistent with the center fabric | Consistent with the center fabric | Blankets, scarves, and swatches that need a compact side edge |
| Slip the first pair | Looser or more flexible | Moderate; requires care when restarting yarns | May show elongated stitches | May expose contrasting strands | Decorative borders where elongated edge stitches are acceptable |
Fiber, tension, and the crossover can affect the results. Springy wool may make a slipped edge feel less loose after blocking. Smooth, less elastic yarn can leave those slipped stitches more exposed.
Work Both Edge Stitches on Every Row
Start with the firmer baseline swatch. Work both stitches of the first and last pairs just as you work the center. Don’t slip either edge stitch.
Keep the end-of-row crossover the same in both swatches.
Try a Slipped First Pair on a Separate Swatch
Slip the first pair purlwise with both yarns in front. Then work the remaining pairs, including the final pair, in the same color order.
Compare both faces. Check border color consistency, crossover gaps, diagonal color shifts, and differences in edge firmness and length. Watch for chainy edges, exposed contrast, gaps, loose loops, or uneven side tension that interrupts the visible border.
Use the better-performing edge routine in the full 12-row swatch, and keep notes for each row.
Knit the 12-Row Swatch
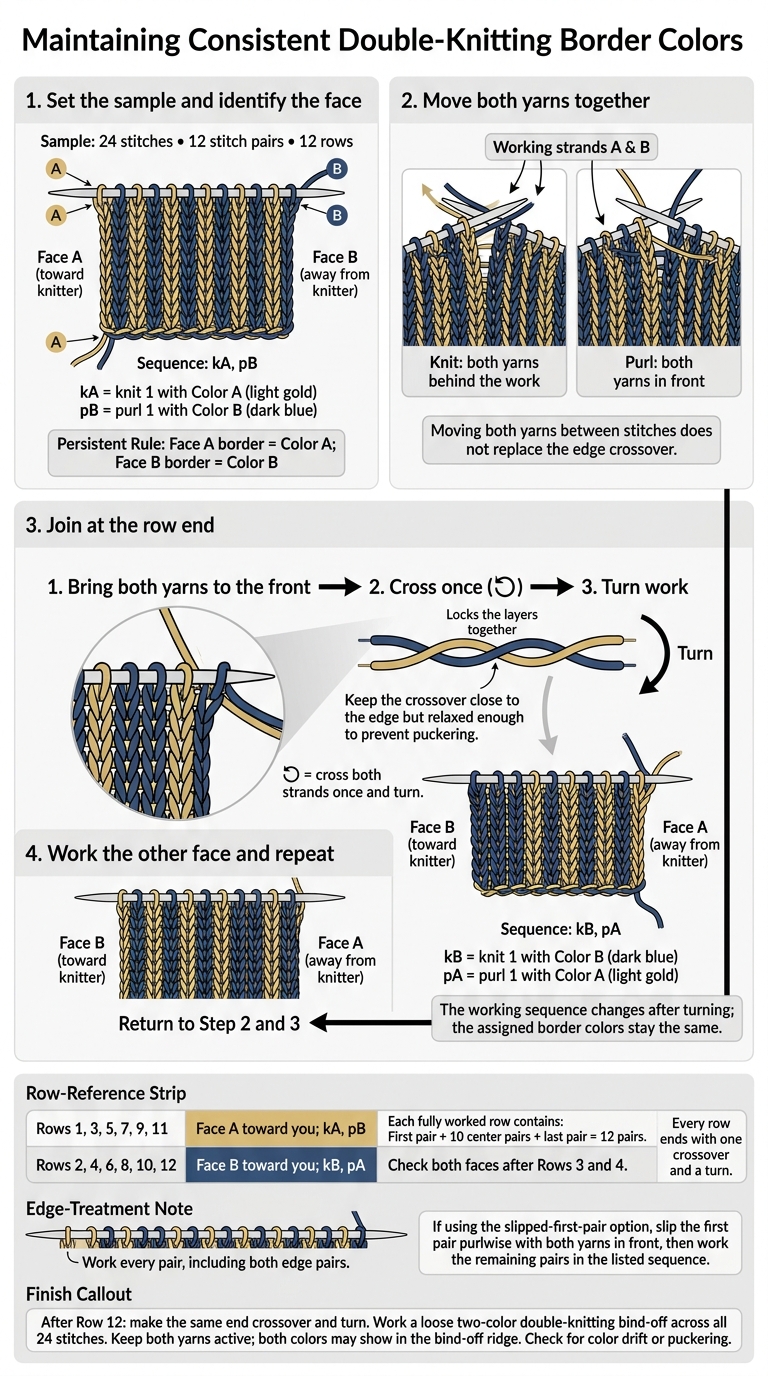
Double Knitting Edges: Yarn Movement and Row-End Joins
Work the full 24-stitch sample with the edge treatment you chose in the comparison swatch. Keep the same yarn order for all 12 rows.
Define the Stitch Symbols and Edge Crossover
kA means knit 1 with Color A; kB means knit 1 with Color B. pA means purl 1 with Color A; pB means purl 1 with Color B. Keep both yarns behind the work for each knit stitch and in front for each purl stitch.
At each row end, bring both yarns to the front. Cross them once so the next row’s working yarn sits on the correct side, then turn. Keep the crossover close to the edge but relaxed enough to prevent puckering.
This edge crossover locks the layers together. Moving both yarns between stitches does not replace it.
Follow Rows 1–12 and Bind Off
Follow the double knitting chart and table with your chosen edge treatment. If you chose to slip the first pair, slip those stitches purlwise with both yarns in front, then work the listed sequence for the remaining pairs. Otherwise, work every pair as written.
Check both faces after Rows 3 and 4 before continuing. Record the internal crossover as hidden, and note any exposed connecting strand separately.
After Row 12, make the same end crossover and turn. Then work a two-color double-knitting bind-off across all 24 stitches. Keep both yarns active and the loops loose enough that the top edge does not pull inward. Both colors may show in the bind-off ridge.
Check the edges for color drift or puckering.
Track Edge Colors After Each Row
The table shows which face is toward you on each row and the border color you should see on each face. Watch the outermost stitches to check that your yarn order stays consistent. Check both side borders on each face, and use your notes to pinpoint when a problem first appears.
↻ means cross both strands once and turn. For Rows 5–11, note any color shifts, gaps, or puckering.
| Row | Facing side | Stitch-pair sequence | End crossover | Face A border | Face B border | Notes |
|---|---|---|---|---|---|---|
| 1 | Face A | First kA, pB; 10 × (kA, pB); last kA, pB | ↻ | Color A | Color B | Note floats, gaps, or wrong-color stitches |
| 2 | Face B | First kB, pA; 10 × (kB, pA); last kB, pA | ↻ | Color A | Color B | Note any deviation |
| 3 | Face A | Same as Row 1 | ↻ | Color A | Color B | Check both faces |
| 4 | Face B | Same as Row 2 | ↻ | Color A | Color B | Check both faces |
| 5 | Face A | Same as Row 1 | ↻ | Color A | Color B | - |
| 6 | Face B | Same as Row 2 | ↻ | Color A | Color B | - |
| 7 | Face A | Same as Row 1 | ↻ | Color A | Color B | - |
| 8 | Face B | Same as Row 2 | ↻ | Color A | Color B | - |
| 9 | Face A | Same as Row 1 | ↻ | Color A | Color B | - |
| 10 | Face B | Same as Row 2 | ↻ | Color A | Color B | - |
| 11 | Face A | Same as Row 1 | ↻ | Color A | Color B | - |
| 12 | Face B | Same as Row 2 | ↻ | Color A | Color B | Note deviations before binding off |
Check and Fix Edge Problems
Use your swatch’s row notes to find the first row where the edge changed.
Inspect Both Faces Before Blocking
Lay the 12-row swatch flat without stretching it. Face A should show light-color stitches along both side borders; Face B should show dark-color stitches. Check the first and last pairs separately - one edge may be correct while the other isn’t. Look for gaps, loose joins, and twisted edge stitches.
Blocking can soften tension and improve shape. But it can’t correct a misplaced color, restore a missing crossover, or connect layers that were never joined.
Fix Wrong Colors, Gaps, and Puckering
Once you find the first bad row, match what you see to the likely cause:
- Miscolored borders: A color change after the turn usually means an edge pair was worked in the wrong order. Check which edge changed first, then restore the pair order as you rework that row.
- Gaps or puckering: Gaps suggest a missing or loose crossover; puckering suggests a tight join. Restore missing crossovers, spread loose yarn through neighboring stitches, or ease tight edge pairs without pulling sharply at the turn.
- Uneven slipped edges: Inconsistent slipping - or wrapping yarn around the edge rather than between the layers - can distort the slipped-edge swatch’s border. Always slip purlwise with both yarns in front, and judge this swatch on its own.
After finding the cause, mark the first bad row. Tink back to just before it, then rework the affected edge pairs using the same method you used to knit them. If you need a refresher on basic stitches, knitting video tutorials can help you visualize the correct needle movements.
Keep the Same Edge Routine
Stick with the edge routine that worked for your test swatch: Face A gets A, Face B gets B.
At the end of every row, make the crossover in the same place and direction. A visible join can still be correct, as long as each face keeps its assigned border color.
Follow your test swatch’s row notes to repeat the same working order in larger projects.
FAQs
How can I tell a normal joining strand from a wrong-color stitch?
Check your stitch pairs against the pattern legend. Each chart square represents two stitches - one front and one back - with assigned color roles. Two neighboring stitches of the same color, or a break in the expected front/back sequence, likely points to a wrong-color stitch.
A normal joining strand simply connects the layers. If the join feels loose or leaves a gap, gently snug the yarn without pulling so tightly that the fabric puckers.
Can I fix an edge mistake without undoing the whole row?
Yes. For a small mistake along a double knitting edge, use duplicate stitch to fix the color or alignment.
For larger issues, check your work every 6 to 10 stitches. This helps you spot tension problems or mismatched pairs before they spread. For visual help with these techniques and yarn tension, watch the tutorials on the Alpaca Direct YouTube channel.
How do I keep border colors consistent around colorwork?
In double knitting, treat each front-and-back stitch pair as one unit. Keep both yarns active, and carry them together as you switch between layers. Hold steady tension: loose yarn leaves gaps, while tight yarn pulls the fabric out of shape.
For a stable, reversible finish, check stitch alignment every 6 to 10 stitches. Untwist the yarns if they start to coil. For visual guides, visit the Alpaca Direct YouTube channel.