
Double Knitting: How to Pick Up Dropped Stitches

I start by securing the dropped loop, then rebuild it using only the strands from its own layer. Each strand restores 1 row - catching a strand from the other layer can join the two faces.
Here’s my repair checklist:
- Secure and check: Hold the loop with a locking marker. Trace its column and check the chart; color alone doesn’t identify the layer.
- Rebuild: Face the knit side of the affected layer toward you. Hold the other layer aside and use a crochet hook to fix the dropped stitch by working from the lowest rung upward.
- Inspect: Return the loop to the needle without twisting it. Check both faces, the stitch count, and whether the layers still separate.
- Fix before continuing: If I catch the wrong strand or join the layers, I secure the live loops and undo the repair to the last correct row. I ease loose yarn into nearby stitches rather than pulling the loop tight.
My final check: <u>the stitch sits securely on the needle, and neither layer is caught in the repair.</u>
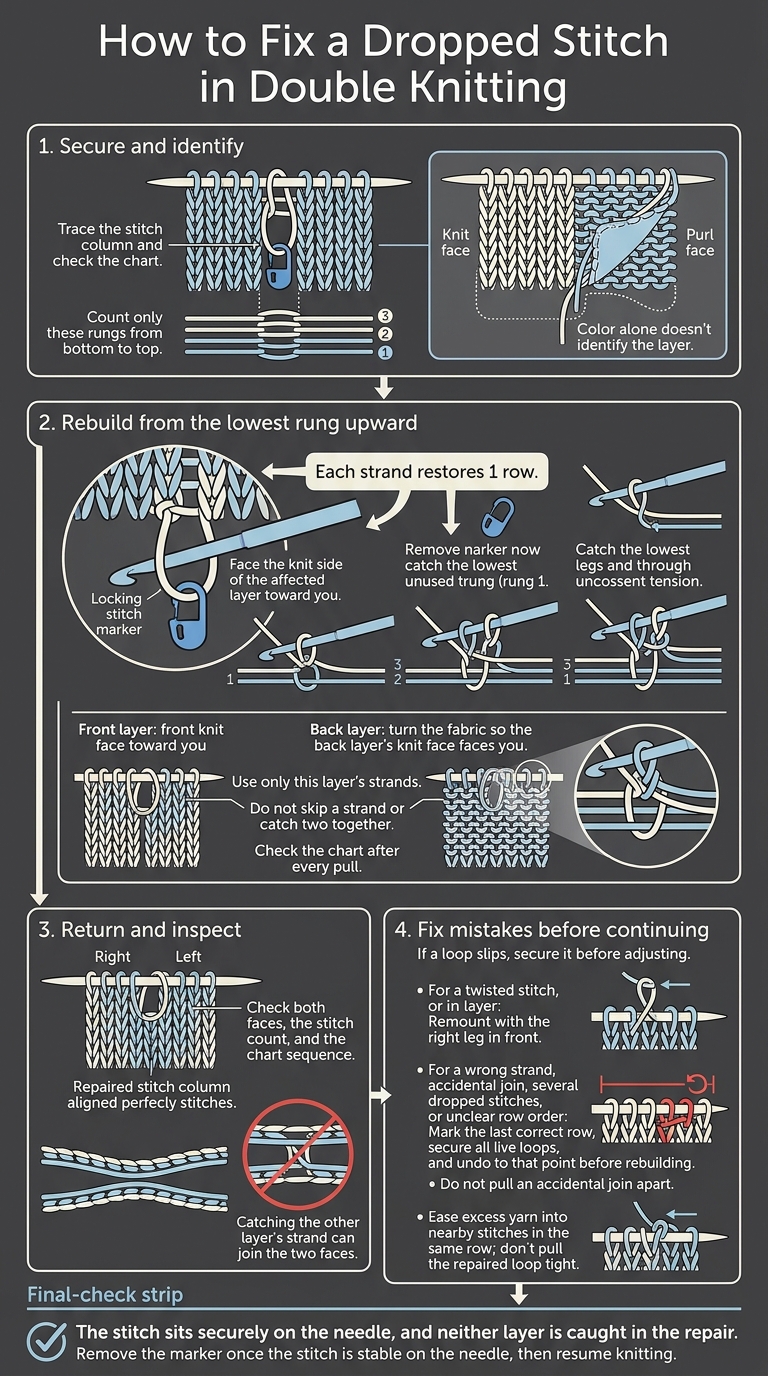
How to Fix a Dropped Stitch in Double Knitting
Secure the Loop and Identify Its Layer
Hold the Loop With a Locking Marker
Thread a locking stitch marker through the center of the dropped loop. Close it without tightening the loop. If you use scrap yarn instead, leave enough slack for the loop to rest naturally.
Hold the fabric a few stitches away and gently spread it to expose the ladder rungs. Fold the unaffected layer aside, supporting it with a finger or spare needle. Don’t pull directly on the secured loop.
Trace the Stitch Column and Check the Chart
Follow the intact stitch column below the loop up toward the needle. Compare it with neighboring stitches on both faces. A knit stitch forms a V on one face and a purl bump on the other, so seeing the purl side doesn’t mean something is wrong.
Check the chart’s key, too. Use color only to confirm the stitch sequence - not to identify the layer on its own. In double knitting, color alone can lead you astray.
Count the rungs from bottom to top, including only those belonging to the dropped column’s layer. Before picking them up, confirm the face you’re repairing, the row sequence, and the loop’s orientation. Keep the other layer aside so its strands stay out of the repair path.
Once you’ve confirmed the layer, use the crochet hook to rebuild the column one rung at a time.
How To Fix A Dropped Knit Stitch - Quick 1 Minute Knitting Tutorial
Rebuild Each Row With a Crochet Hook
Once you’ve confirmed the layer, rebuild the dropped column one rung at a time.
Front Layer: Rebuild From the Front Face
With the front layer’s knit face toward you, insert the crochet hook through the secured loop from front to back. Remove the marker once the loop is on the hook.
Catch the lowest unused strand for that layer and draw it through to form the next loop. Keep the stitch legs uncrossed. Pull just enough to match the neighboring stitches.
Work upward in row order, using each remaining strand from that layer. Check the chart after every pull, and keep the opposite layer aside. Each pull rebuilds one row, so don’t skip a strand or catch two together.
Use the same rung-by-rung method on the reverse face.
Back Layer: Rebuild From the Reverse Face
Turn the fabric so the back layer’s knit face is toward you. Hold the front layer aside, and rebuild from the lowest unused strand upward.
When the loop reaches the working row, return it to the needle with the right leg in front and the left leg in back.
With the loop back on the needle, move to the repair check.
Inspect the Repair and Fix Mistakes
Before you keep knitting, check that the repair lies flat and sits on the correct layer. If you are new to these techniques, reviewing knitting video tutorials can help clarify basic stitch movements.
Check Front- and Back-Layer Repairs
Compare both faces with neighboring columns and the chart. Confirm that you rebuilt the dropped stitches on only one layer and that the repaired column matches the surrounding stitch count and ladder sequence.
| Layer repaired | Access point | How to work it | What to check |
|---|---|---|---|
| Front layer | Front face | Enter the dropped loop from the front. Pull up only the matching front-layer ladder strand, row by row. | Uncrossed stitch legs, chart match, no back-layer strands |
| Back layer | Back face | Enter the dropped loop from the back. Pull up only the matching back-layer ladder strand, row by row. | Uncrossed stitch legs, chart match, no front-layer strands |
If either face fails these checks, look for crossed layers or twisted stitches.
Gently spread the faces near the repair. In double knitting, the two faces should move separately. A stray bar between the layers or stitches that stick together points to an accidental join.
If the repair doesn’t lie flat, fix it before knitting on.
Fix Twists, Layers Caught Together, and Loose Stitches
If a loop slips, secure it with a locking marker before making adjustments. To fix a twisted stitch, take it off the needle and remount it with the right leg in front.
For a wrong strand, an accidental join, several dropped stitches, or unclear row order, mark the last correct row and secure all live loops. Then undo the work to that point before rebuilding. Don’t try to pull an accidental join apart.
As you rebuild, hold the opposite layer away with a spare needle. Check the chart’s sequence after each row to avoid catching the wrong strand or joining the layers again.
Ease excess yarn into nearby stitches in the same row rather than pulling the repaired loop tight.
Conclusion: Check Both Layers Before Knitting On
After rebuilding the last rung, make sure the stitch sits securely on the needle, untwisted and in the correct layer.
Check both faces before knitting on. The repaired stitch should align with the correct column, the double knitting chart sequence and stitch count should match, and the layers should still separate cleanly. Keep the marker in place until the stitch is stable on the needle. Then remove it and resume your double-knitting sequence.
FAQs
What size crochet hook should I use for repairs?
Choose a crochet hook that fits comfortably within your stitches. With brushed alpaca or mohair yarn, fibers can cling together, making stitches harder to separate. If that happens, use a slightly smaller hook to help avoid snagging the yarn.
For visual demonstrations of this technique and other repair methods, visit the Alpaca Direct YouTube channel.
How do I identify ladder strands at color changes?
Check the tension of the horizontal bars between your stitch pairs. At each color change, make sure the unused yarn runs correctly between the front and back layers.
If you spot a loose or unexpected strand, compare it with the chart legend to see whether it’s part of the pattern or a tension error. Every so often, spread the stitches across your needle and check for puckering or sagging.
How can I repair a dropped edge stitch?
Secure the live loop with a locking stitch marker, then identify which double-knitting layer it belongs to. Use a crochet hook to pull each horizontal bar through the loop, working from front to back. Keep the two layers separate.
For a purl stitch, turn the work to the knit side. Or use a double-ended Fix-A-Stitch tool to repair it without turning. Slip the repaired stitch back onto your needle with its right leg in front.