
Floral Alpaca Lace Shawl: Free Knitting Pattern PDF

I’d start with a blocked lace swatch - not the full shawl. Plan for an estimated 600–800 yards of alpaca yarn and a target blocked size of 60 inches wide by 28 inches deep. Choose your needles based on how the washed, dried lace looks and feels.
In this guide, I cover the yarn and tools, top-down setup, floral lace charts, repeat tracking, size changes, border, and bind-off. I also explain how to block the shawl and store it folded.
Before casting on, <u>check that your pattern copy includes the actual chart, numbered rows, and stitch counts</u>. Those details - not general knitting tips - are what you’ll need to work each repeat.
How to Block an Alpaca Lace Shawl
2. Choose Yarn and Check Gauge
Yarn, Needles, and Tools
Start with an estimate of 600–800 yards (549–732 m) of lace- or fingering-weight alpaca yarn. You’ll also need US 4–6 (3.5–4 mm) circular needles with a 32–40-inch (80–100 cm) cable, plus tools to block the finished shawl. Gather removable stitch markers, a tapestry needle, blocking wires or rustproof pins, a blocking mat, and measuring tape. Before you cast on the shawl, knit a swatch.
Pick a smooth yarn that lets the lace motifs show clearly. Lace weight makes a finer fabric; fingering weight gives it more substance. An alpaca/silk blend adds drape, while alpaca/fine merino adds structure. Choose your needle size based on the blocked fabric, not the yarn label. The floral shapes need room to open, so test the fabric before starting the body.
Swatch and Measure Blocked Gauge
Swatch the actual floral repeat - stockinette gauge won’t match. Knit complete repeats, leaving a measurable center area at least 4–6 inches (10–15 cm) wide and tall. Keep both the cast-on and bind-off loose.
Wash or wet-block the swatch following the yarn label’s directions. Gently shape the lace and let it dry completely. Then lay it flat without stretching and count stitches and rows across a 4-inch (10 cm) center section. Check two or three spots. Record the yarn, needle size, wash method, blocked dimensions, and stitch and row gauge.
Treat 20–24 stitches per 4 inches (10 cm) as a placeholder, not a required gauge. Use your tested, blocked gauge to assess the shawl’s target 60-inch wingspan and 28-inch depth - not measurements taken before blocking. If the fabric looks too open or won’t hold its shape, try a smaller needle. Adjust in 0.25–0.5 mm steps and swatch again until the lace opens cleanly and keeps its shape.
More repeats, a deeper border, or a looser gauge will use more yarn. Revisit the 600–800-yard estimate after testing complete motifs, and allow enough yarn for both swatching and the border.
Once you’ve settled on your blocked gauge, cast on the garter tab, work the setup rows, and begin the first lace repeat.
Tips For Knitting With Lace | Technique Tuesday
3. Knit the Shawl Step by Step
Once your gauge is set, work the shawl in the order below.
Abbreviations, Garter Tab, and Setup
Abbreviations: RS = right side; WS = wrong side; k = knit; p = purl; yo = yarn over; pm = place marker; sm = slip marker; k2tog = knit two together.
For ssk, slip two stitches knitwise one at a time, then knit them together through the back loops. For cdd, slip two stitches together knitwise, knit the next stitch, then pass both slipped stitches over it.
Follow the pattern’s garter-tab cast-on and place markers before and after the center spine. Check the pickup count and first-row stitch total before starting the lace. Have your chart and row counter beside you before beginning the lace repeats.
Work the Floral Lace Rows
Follow each charted row exactly, including the borders, increases, repeats, and center spine. Check your stitch count before each WS row and at the border transition to fix any lace mistakes early.
Before starting another motif, thread a lifeline through a row you’ve checked and confirmed is correct.
Add the Border and Bind Off
Work the garter-border rows as the pattern directs, continuing the shaping only where indicated.
Use a stretchy lace bind-off: knit 1, then knit the next stitch. Insert the left needle into the fronts of both stitches on the right needle and knit them together. Repeat from “knit the next stitch” until one stitch remains, then pull the yarn through that final stitch.
Keep the bound-off edge loose enough to let the lace open during blocking.
4. Use the Chart and Track Repeats
Read Chart Rows and Symbols
When the floral repeats begin, use the chart as your row-by-row guide.
Read from the bottom up: right to left on RS rows and left to right on WS rows. Keep chart and written row numbers matched - Chart Row 7 goes with Written Row 7.
Before knitting, check whether the chart shows every row or only pattern rows. Locate the borders, floral repeat boxes, center spine, and shaping stitches. No-stitch cells are placeholders, not stitches.
| Chart-key item | Meaning |
|---|---|
| Blank square | K on RS, p on WS, unless the legend says otherwise. |
| Dot/dash | P on RS, k on WS, unless the legend says otherwise. |
| Open circle | Yarn over; knit or purl it as the return-row instructions direct. |
| Decrease symbols | Follow the separate instructions for k2tog, ssk, and cdd. |
| Border and spine labels | Work these stitches once, outside the repeat boxes. |
| No-stitch cell | Skip it entirely; it’s only a placeholder. |
Track Rows, Count Stitches, and Add Lifelines
Place removable markers to follow stitch repeats. Keep border and center-spine stitches outside those repeat markers. When a decrease requires it, slip the marker, work the decrease as written, and reposition the marker only as directed. Keep the written and chart row numbers in sync.
Check stitch counts at each marker and after every repeat or shaping row. Pay extra attention beside the borders and center spine. If the count is off, compare your stitches with the chart and look for a missed yarn over or an incorrect decrease.
To add a lifeline, thread smooth, contrasting yarn through the live stitch loops of a checked row. Don’t trap the markers, and leave 6-inch tails. If a count goes wrong, compare that section with the chart. Use the lifeline for errors several rows back; fix one- or two-stitch mistakes in place. Don’t add or remove stitches just to make the count match unless the pattern directs you to.
Find Knitting Technique Videos
For visual help with chart symbols and inserting lifelines, visit the Alpaca Direct YouTube channel.
5. Adjust the Shawl Size
Compare Repeat Counts, Sizes, and Yardage
Change size only at approved stopping points. Finish each floral motif repeat, including its final row, before starting the border. Leave the garter tab and setup rows out of the repeat total. Don’t stop mid-repeat just to reach a target width. Check the blocked sample to confirm where each size change belongs.
As the shawl grows, later repeats add more width and depth - and use more yarn. Choose your size by blocked width and depth, not unblocked measurements or multiples of the first repeat’s yarn use.
Build a comparison chart for those size options. For each size, include the number of complete floral motif repeats, blocked width and depth, ending stitch count, and total yardage. State whether stitch counts include edge stitches, yarnovers, and border stitches. List inches first, with centimeters in parentheses, and label each measurement as blocked or estimated.
Set Aside Yarn for the Border
Use the finished sample to establish a tested yarn reserve for the border and bind-off. Record the allowance for each size in yards and meters, based on its finished border and bind-off.
Before starting another full repeat, weigh your remaining yarn and compare it with the amount used for the last repeat. Allow for both the next repeat’s higher stitch count and the border reserve. If you’re unsure about the reserve, stop at the approved endpoint or get matching yarn.
Mark your chosen size, last completed chart row, and repeat count in the PDF. Once you finish the chosen size, block the shawl to check its final measurements.
6. Block and Finish the Shawl
After the last approved repeat, block the shawl to set the lace and check its size.
Wet-Block and Measure the Shawl
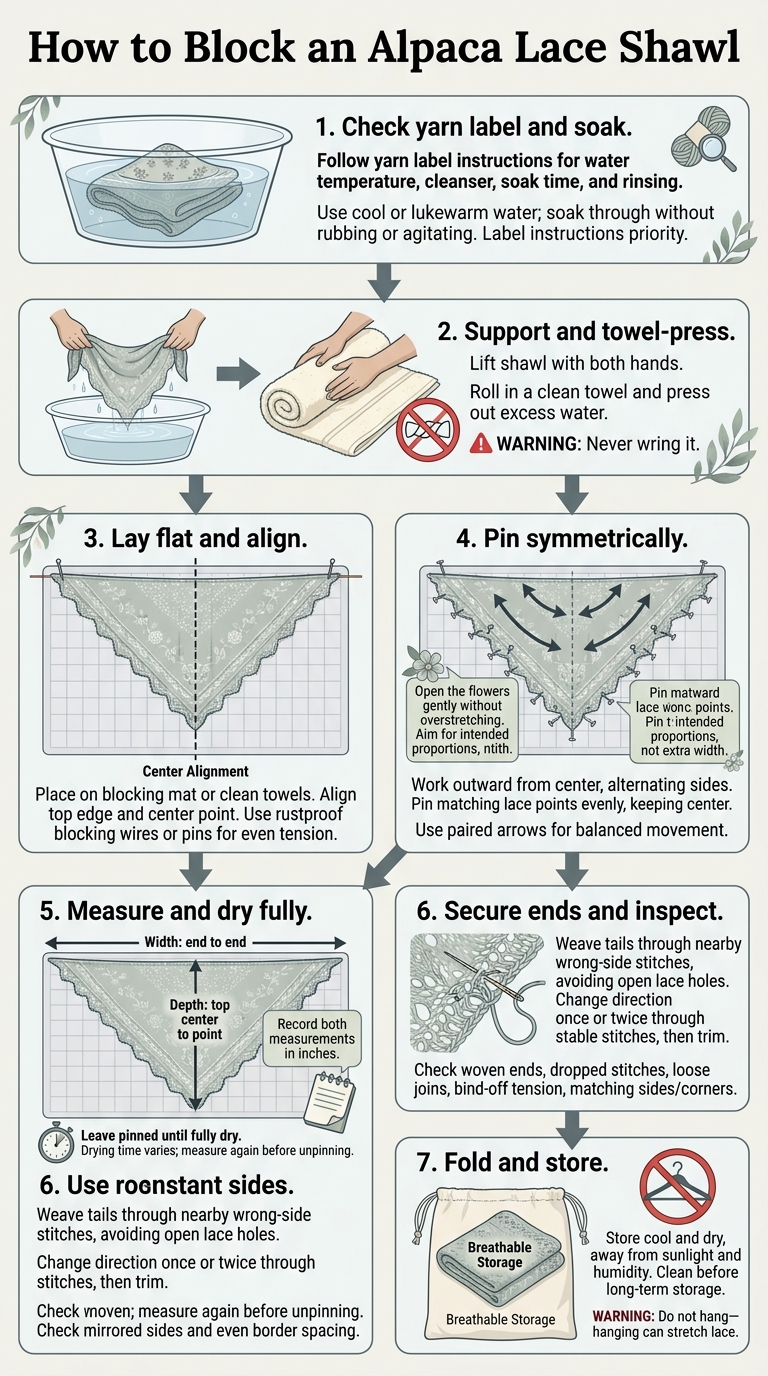
Blocking opens the floral lace and shapes the triangle. Check the yarn label for water temperature, cleanser, soak time, and rinsing instructions. Use cool or lukewarm water, and let the shawl soak through without rubbing or agitating it. Soak only as long as needed, with the yarn label’s instructions taking priority.
Lift the shawl with both hands. Roll it in a clean towel and press out excess water - never wring it. Lay it flat on a blocking mat or clean towels, then align the top edge and center point. Use rustproof blocking wires or pins to apply even tension.
Work outward from the center, alternating sides and pinning matching lace points evenly. Keep the center point aligned so the triangle stays even. Open the flowers gently without overstretching them. Aim for the intended proportions rather than pulling for extra width.
Measure the shaped shawl while it lies flat: across the top edge from end to end, then from the top center down to the point. Record both measurements in inches. Check that the sides mirror each other and the border spacing is even. Leave the shawl pinned until fully dry; thickness, humidity, and airflow all affect drying time. Measure again before removing the pins.
Weave In Ends and Store Folded
After blocking, thread each tail onto a tapestry needle. Weave it through nearby stitches on the wrong side, following the fabric’s direction rather than crossing open lace holes. Change direction once or twice through stable stitches, then trim the secured tail. Check any ends woven in before blocking, too - blocking can reveal loose tails or ends that need more anchoring.
Inspect the border, points, and lace for dropped stitches, loose joins, uneven bind-off tension, and mismatched corners. Make sure the left and right sides match before storing.
Fold the fully dry shawl to protect the lace structure. Do not hang it, since hanging can stretch it. Store it in a breathable cotton bag or pillowcase in a cool, dry spot away from sunlight and humidity. Clean it before long-term storage, since worn fibers can attract moths.
7. Final Knitting and Finishing Checklist
Use this checklist before you cast on, after each repeat, and before blocking.
- Check your pattern copy. Use the latest PDF. Confirm the abbreviations, chart symbols, border instructions, yardage, and blocked measurements.
- Verify gauge and row numbering. Compare your blocked gauge with the pattern before continuing. Match the written instructions to the chart. Stop if the row number, symbol key, or repeat boundary doesn't line up.
- Track repeats and stitch counts. Track every repeat. Check stitch counts after setup, after each repeat, after the border, and at bind-off. Use stitch markers and place a lifeline on a row you've checked.
Once you've finished the repeats, check the border and finishing details.
- Check the border and bind-off. Before starting the border, make sure you have enough yarn to finish it. Complete the full border repeat, then check that your bind-off is even and flexible.
- Block and store your shawl. Wet-block it to the target size and let it dry fully. Weave in the ends securely, then store it folded in a clean, dry place.
For yarn, needles, and technique videos, visit Alpaca Direct and the Alpaca Direct YouTube channel.
FAQs
Where can I download the PDF and lace chart?
Download free knitting and crochet patterns from the Alpaca Direct website, including PDFs and lace charts. Many patterns are available for instant download.
Is this shawl suitable for lace beginners?
Yes, the trellis pattern is within reach if you’re comfortable with basic knitting skills and lace techniques like yarn overs, knit two together (k2tog), and slip slip knit (SSK).
Start with a gauge swatch, then check that your stitch count matches the pattern repeats. Follow the wet-blocking instructions for a polished finish. For more help, Alpaca Direct offers knitting resources and tutorials.
How can I prevent alpaca lace from stretching?
Alpaca has little natural memory and can grow 10%–15% when wet. When blocking your shawl, gently pin it to the target dimensions without stretching the lace thinner than intended.
Store it folded flat, not hanging, so its own weight doesn’t pull it out of shape over time. To reduce the risk of overstretching, consider steam blocking instead of full wet blocking.