
Free Chunky Cowl Patterns: Yarn and Needle Checklist

Before I cast on a chunky cowl, I check the yarn weight, circular needle setup, and washed swatch. “Chunky” can mean bulky #5, super bulky #6, or jumbo #7, so I start with the pattern and yarn label - not the name alone.
Here’s my before-you-knit checklist:
- Yarn: Calculate skeins from the pattern’s yardage, then allow extra for swatching and finishing.
- Needles: Match the size and circular length to the pattern, construction method, and stitch count.
- Gauge and fit: Measure stitches and rows over 4 inches on a washed, dried swatch. Check circumference, height, and whether the cowl will slip over your head.
- Tools: Gather markers, a tapestry needle, scissors, measuring tools, and blocking supplies.
- Finishing: Review the cast-on, bind-off, seaming, and care instructions before starting.
My rule: <u>check the fabric, not just the needle size</u>. I keep my final gauge, yarn quantities, and adjustments with the free pattern so they’re ready for next time.
Three Needle Bind-Off - Knitting Tutorial
Choose Needles for Your Cowl
With your yarn chosen, match your needles to the pattern before casting on. Swatch first, then record the final needle size in both US sizes and millimeters. Check the printed millimeter size, since US labels can vary. Your needle setup also depends on whether you’re knitting flat or in the round.
Check Circular Length and Extra Needles
Circular needle length is measured tip to tip. For standard knitting in the round, choose a circular slightly shorter than the cowl’s finished circumference. The stitches should fit without stretching. Magic loop calls for a long, flexible cable.
Add cable needles, DPNs, or a second needle only if your pattern calls for them. Keep a beginning-of-round marker handy, too.
Compare Needles by Knitting Method
Use this table to match your construction method to the right needle setup.
| Construction method | Needle requirements | Seam required | Marker use | Finishing tool |
|---|---|---|---|---|
| Knitted in the round | Circular; use 16 inches (40 cm) only when stitches fit without stretching | No | Beginning-of-round marker | Tapestry needle |
| Knitted flat and seamed | Straight needles or a circular used flat, with room for all stitches | Yes | As specified by the pattern | Tapestry needle |
| Magic loop | Long, flexible circular; often 32–40 inches (80–100 cm) | No | Beginning-of-round marker as needed | Tapestry needle |
Check Gauge and Finished Size
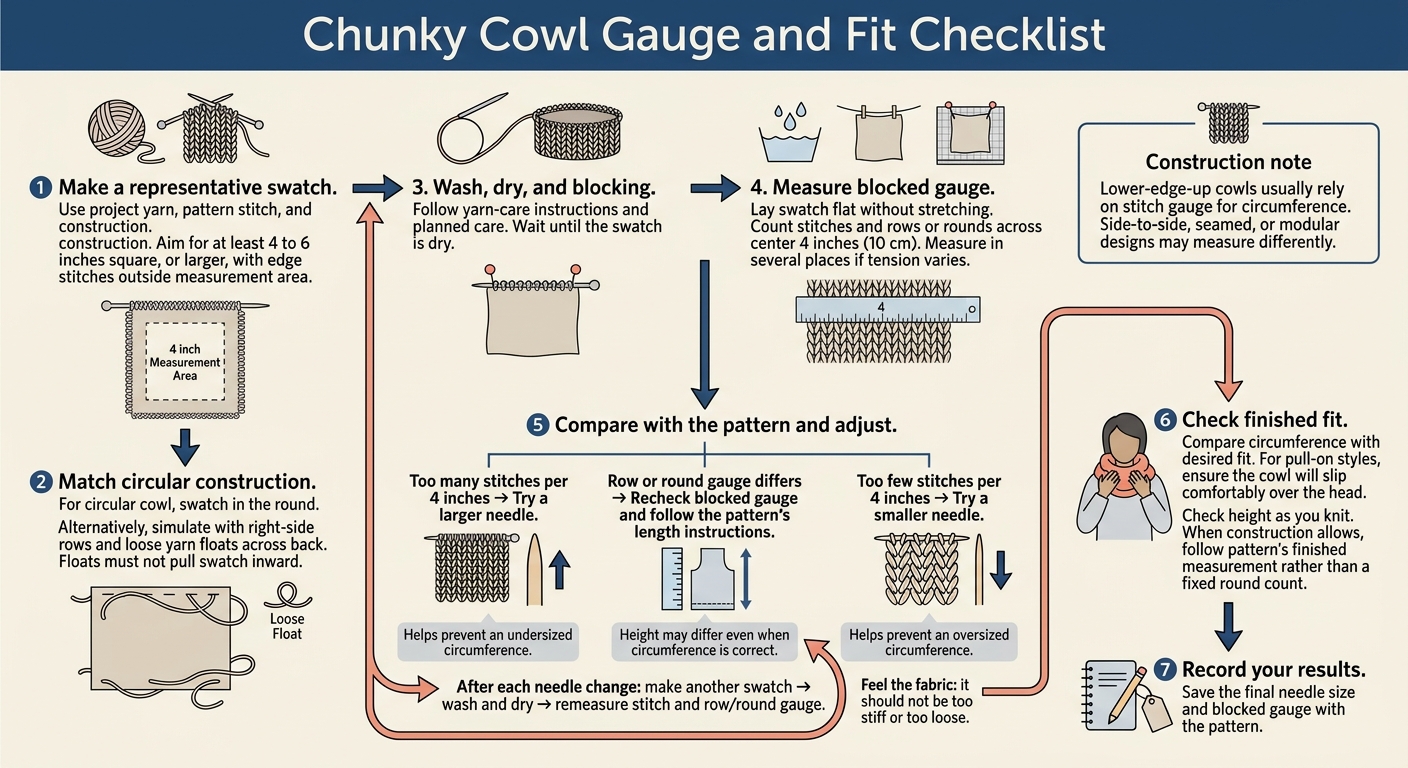
Chunky Cowl Gauge and Fit Checklist
Once you’ve chosen your alpaca yarn and needles, make a swatch using the pattern’s stitch and construction method. Aim for at least 4 to 6 inches square, or larger if possible, so edge stitches won’t affect your measurements. Use a ruler or gauge tool to count stitches and rows or rounds. This helps you check the cowl’s circumference, height, and drape.
For a circular cowl, swatch in the round. If knitting a tube isn’t practical, simulate circular knitting by working right-side rows and carrying the yarn loosely across the back. Leave those floats loose enough that they don’t pull the swatch inward.
Wash, dry, and block the swatch following the yarn-care instructions and the care you plan to use for the finished cowl. Once it’s dry, lay it flat without stretching. Measure across the center 4 inches (10 cm), including partial stitches in your count. If your tension varies, measure in several places.
Adjust Needle Size for Gauge
After each needle change, make another swatch, wash and dry it, then remeasure both stitch and row/round gauge. Feel the fabric, too: it shouldn’t be too stiff or too loose.
| Gauge issue | Suggested adjustment | Why it matters |
|---|---|---|
| Too many stitches per 4 inches | Try a larger needle | Helps prevent an undersized circumference |
| Too few stitches per 4 inches | Try a smaller needle | Helps prevent an oversized circumference |
| Row or round gauge differs | Recheck blocked gauge and follow the pattern’s length instructions | Height may differ even when circumference is correct |
Check Circumference and Height
Your blocked gauge shows whether the cowl will match the intended circumference and height. Compare the finished circumference with the fit you want. For a pull-on style, make sure it will slip comfortably over your head.
Cowls worked from the lower edge up usually rely on stitch gauge for circumference. Side-to-side, seamed, or modular designs may measure differently. Check height as you knit. When the construction allows, follow the pattern’s finished measurement rather than a fixed round count.
- [ ] Swatch made with project yarn and stitch pattern
- [ ] Circular knitting swatched in the round or simulated
- [ ] Swatch larger than the measurement area
- [ ] Swatch washed, dried, and blocked
- [ ] Stitch and row/round gauge measured over 4 inches (10 cm)
- [ ] Circumference checked against desired fit
- [ ] Pull-on comfort checked, if applicable
- [ ] Height checked against pattern measurements
- [ ] Needle size adjusted and swatch repeated if needed
- [ ] Final needle size and blocked gauge recorded
Gather Markers and Finishing Tools
- [ ] Stitch markers that fit your needles.
- [ ] Large-eye tapestry needle for weaving in ends and seaming flat-knit cowls.
- [ ] Scissors, measuring tape, and a ruler or gauge tool.
- [ ] Blocking supplies: a clean towel and a flat drying surface, plus mats and pins if needed.
- [ ] Cable needle, only if your pattern calls for one.
Review Cast-On, Bind-Off, and Seaming
Choose finishing methods that suit your tools and yarn. Before you start, read the cast-on and bind-off instructions. Check whether you’ll need extra tools or yarn, and how much stretch the edges need.
For a flat-knit cowl, review the seaming method, line up the edges carefully, and plan to weave in the ends securely.
### Prepare to Wash and Block
Follow the care instructions on the yarn label and in the pattern. Block gently, and support wet alpaca as you move it to the towel. Check the pattern’s photo or video tutorial if you need help with a technique.
Before you cast on, use the checklist below to check that your supplies and notes are ready.
Final Checklist Before Casting On
- [ ] Pattern instructions reviewed, including cast-on, bind-off, and finishing.
- [ ] All yarn, needles, markers, and finishing tools gathered.
- [ ] Gauge and intended fit confirmed.
- [ ] Final needle size and exact yarn quantities recorded alongside any adjustments; keep these notes with your free pattern for future reference.
FAQs
How much extra yarn should I buy for swatching?
There’s no set amount of extra yarn to buy for swatching. Start with your pattern’s yardage requirements, then budget extra yarn for a gauge swatch so you won’t run short on the cowl. Your stitch type, tension, and needle size all affect how much yarn you’ll use.
For help with project planning and knitting techniques, check out Alpaca Direct’s tutorials, project ideas, and educational videos.
Can I substitute super bulky yarn for bulky yarn?
You can often substitute super bulky yarn for bulky yarn in a cowl pattern. Both make warm, lofty cowls that knit up fast. But switching yarn weights changes your gauge and how much yarn you’ll need.
Knit a gauge swatch before you start. You may need to change your needle size or stitch count to match the pattern’s intended dimensions.
What if matching gauge makes my cowl too stiff?
For more stretch and a better fit, try a stitch pattern that drapes naturally, like ribbing. Blocking your finished cowl can also even out the stitches and help the fabric drape more softly.
If the fabric feels too dense, try slightly larger needles to loosen the tension. Or switch to a lighter-weight yarn for warmth with less stiffness.