
Classic Full-Finger Gloves: Free Knitting Pattern

I start with knuckle measurements and a washed gauge swatch: aim for 20 stitches and 32 rows per 4 inches. Plan on about 200–250 yards of worsted-weight yarn for an adult pair.
Here’s the cuff-to-fingertip plan:
- Check the fit: Measure around your knuckles without your thumb, and use a hand tracing to check lengths.
- Build the glove: Work a ribbed cuff, shape the thumb gusset, then knit the hand using DPNs or magic loop.
- Add the fingers: Knit the pinky first, followed by the ring, middle, and index fingers, then the thumb. Mirror the thumb placement on the second glove.
- Finish and save notes: Close gaps, weave in ends, wash gently, and dry flat. Record stitch counts and length changes for your next pair.
My rule: <u>check the fit as you go</u>. Blocking comes last - not instead of fixing fit problems.
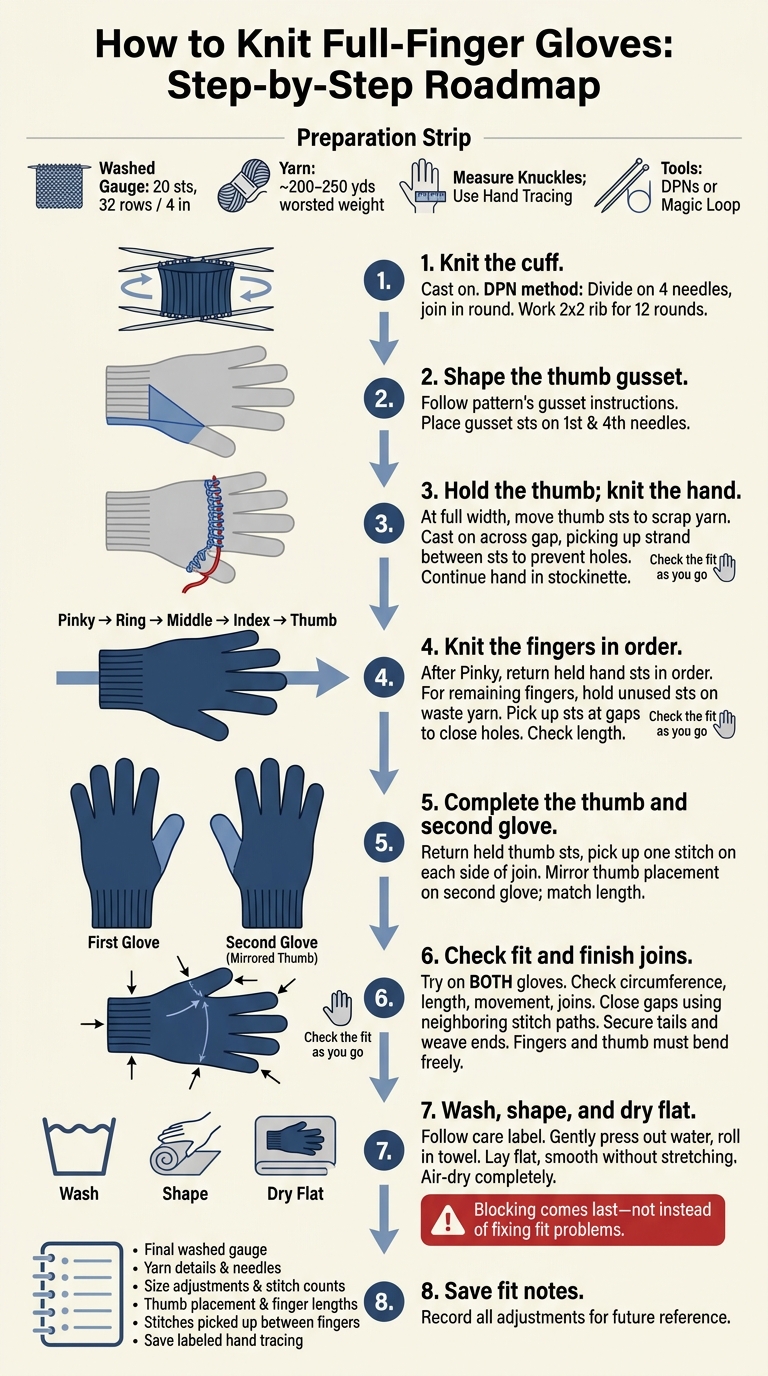
How to Knit Full-Finger Gloves: Step-by-Step Roadmap
Knit the Cuff and Hand
Cast On and Work the Ribbed Cuff
Cast on the number of stitches for your size and divide them evenly across four double-pointed needles (DPNs). Join in the round, making sure the stitches aren’t twisted, then work 2x2 rib for 12 rounds.
Shape the Thumb Gusset
Once the cuff is complete, start shaping the thumb gusset. Place the gusset stitches on the first and fourth needles, then follow the gusset instructions. Work the second glove as a mirror image of the first.
Work the Hand to the Pinky Base
When the gusset reaches its full width, slip the thumb stitches onto scrap yarn. Cast on across the gap to rejoin the hand in the round.
To prevent a hole at the thumb join, pick up the strand between the last and next stitch and knit it together with the last stitch of the hand. Repeat on the other side of the gap. Continue in stockinette stitch to the base of your pinky, checking the length against your hand as you knit.
How To Avoid Gaps When Knitting Gloves or Fingerless Mitts
Knit the Fingers and Thumb
Once the hand reaches the base of the pinky, separate the fingers one at a time.
Knit the Pinky and Remaining Hand Stitches
Knit the pinky first. Then return the held hand stitches to the needles in the correct palm-and-back order, casting on stitches across the gap. Check your row count against the glove measurements to track finger length as you knit.
With the remaining hand stitches back on the needles, work the other fingers in sequence.
Knit the Ring, Middle, and Index Fingers
Knit the ring, middle, and index fingers, in that order. Keep unused stitches on waste yarn. For each finger, pick up stitches at the gaps to close holes, keeping the palm and back-of-hand stitches in the correct order on the needles.
Knit the Thumb and Mirror the Second Glove
After the last finger, return the held thumb stitches to the needles and knit the thumb. Pick up one stitch on each side of the thumb join to close the gap.
For the second glove, mirror the thumb placement so it sits on the opposite side, and match its length to the first glove.
Finish and Block the Gloves
Check the fit before washing or blocking. This is the time to fix small issues before the gloves take their final shape.
Try on both gloves. Look for dropped stitches, loose joins, gaps at the finger bases, uneven fingertips, and ends that need weaving in. Check hand circumference, finger length, thumb movement, and cuff fit before securing the joins.
Close Gaps and Weave In Ends
Once both gloves are fully knit, finish the joins before blocking.
Thread a yarn tail onto a tapestry needle. Use small stitches through neighboring edge loops to close gaps at the finger bases and thumb opening. Follow the surrounding stitch paths, closing only the hole without drawing in the fabric around it. Try on the glove before tightening further: the fingers should bend and the thumb should rotate freely.
Pass each fingertip tail through the remaining stitches, draw the tip closed evenly, and anchor the tail on the wrong side. Weave each tail through several nearby stitches, then reverse direction to secure it. Spread the ends across separate areas so they don’t form a thick bundle inside a finger. Check both sides for smooth closures before trimming.
With the openings closed, the gloves are ready for blocking to set their size and drape.
Wash, Shape, and Check Fit
Follow the yarn’s care label for the washing method and water temperature. Turn the gloves inside out if the label permits, and avoid harsh agitation. Support wet gloves from below - never lift them by a finger. Gently press out the water, then roll the gloves in a clean towel and press again. Do not twist or wring.
Lay the gloves flat on a clean towel or use glove blockers sized to fit them. Smooth the cuffs, hands, thumbs, and fingers to size without stretching. Let them air-dry completely, away from direct heat and strong sunlight.
Try on both dry gloves to check their final blocked dimensions. Compare hand and cuff widths and finger lengths for fit and symmetry before making any final adjustments.
Conclusion: Save Your Fit Notes
Save the fit notes for this pair: washed gauge, size changes, thumb stitch counts and placement, and the number of stitches picked up between fingers.
Alongside your final washed gauge, record the yarn brand and weight, needle sizes, and any stitch-count or length adjustments. Include a labeled hand tracing so you can check finger and thumb lengths.
FAQs
How do I calculate my cast-on stitch count?
Check your pattern’s required stitch count or stitch multiple before casting on. Some patterns let you adjust the size in multiples of four. Others call for a fixed count, such as 20 stitches for the classic glove style.
Changing yarn weight may mean changing your stitch count - for example, adding four stitches to a 32-stitch cast-on. Always check your gauge to make sure your cast-on will give you the right finished size.
How do I divide stitches for each finger?
Divide your stitches among double-pointed needles, keeping each section’s assigned stitches on a separate needle so the round stays organized. When you reach the fingers, move each finger’s stitches onto scrap yarn or separate needles.
To help prevent holes between fingers, pick up stitches snugly at the joins. Choose techniques that keep these gaps closed without adding extra bulk.
How do I shape the fingertips?
The provided materials don’t specify how to decrease stitches for rounded fingertips. Follow your pattern’s decrease instructions to shape them. For general knitting technique tutorials that may help, visit the Alpaca Direct YouTube channel.