
How to Work Tubular Bind-Off Setup Rows

I work 2 setup rows before a sewn tubular bind-off on flat 1×1 ribbing: (or follow a similar process for a tubular bind-off in the round) knit 1, slip 1 purlwise with yarn in front, then turn and repeat. I keep the yarn behind for knits and between the needle tips when moving it forward for slips.
Before sewing, I check three things:
- Stitch count: No added loops or missing stitches.
- Needle setup: For a two-needle finish, knit-facing stitches go on the front needle and purl-facing stitches on the back, without twists.
- Yarn and tension: The tail starts at the sewing end, and the stitches stay loose enough to stretch.
Then I make the two grafting setup passes and begin sewing. My rule: <u>check the first few stitches before going farther</u>, so I can fix twists, yarn errors, or tight tension early.
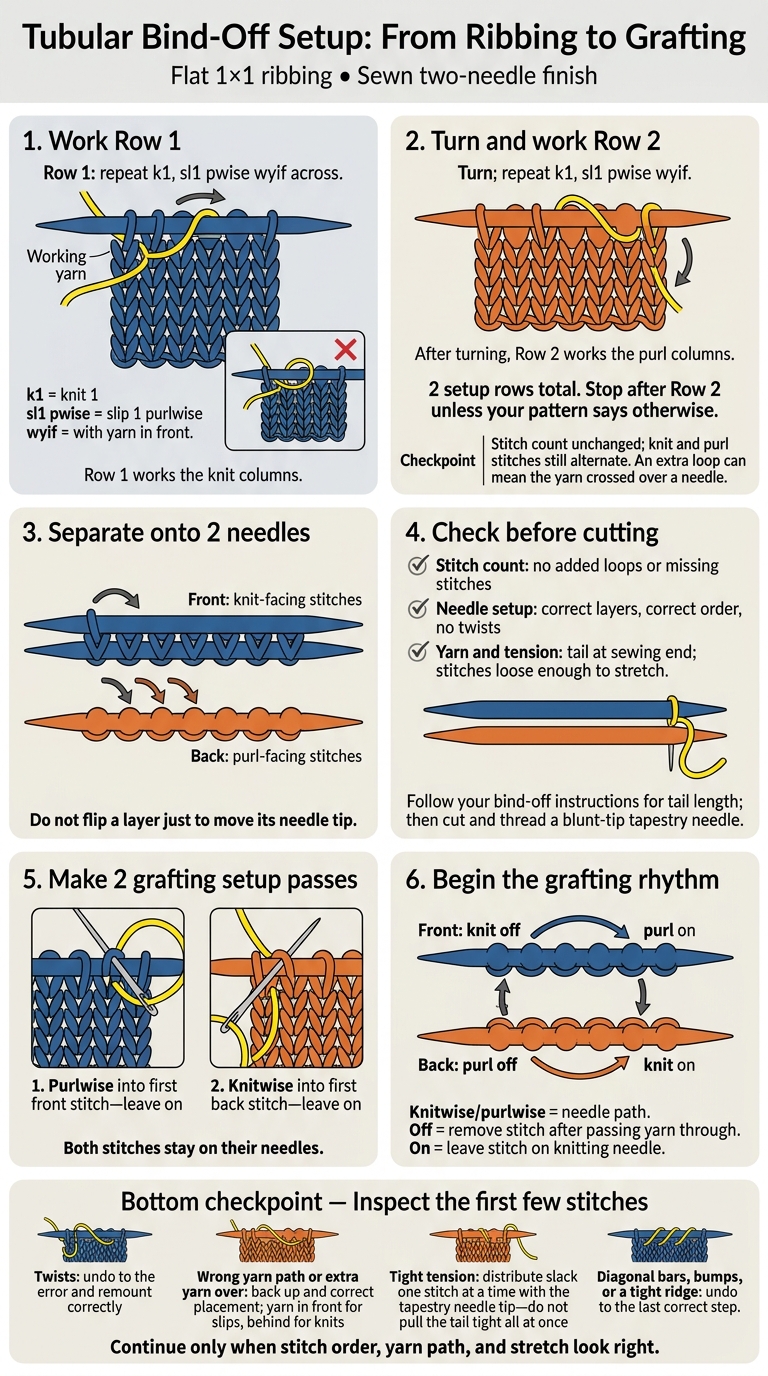
Tubular Bind-Off Setup: From Ribbing to Grafting
Tubular Bind Off Tips Technique Tuesday
2. Work the 2 Setup Rows
Use the same k1, sl1 pwise wyif sequence for both rows. Turning the work changes which column you work. Together, these rows create the layered edge needed for a sewn tubular bind-off.
k1 means knit 1, and sl1 pwise means slip 1 purlwise. wyif means keeping the yarn in front of the work, between the needle tips - not looped over a needle. Keep it between the tips as you move from a knit stitch to a slipped stitch.
For Row 1, repeat k1, sl1 pwise wyif across the row. Turn your work, then repeat that sequence for Row 2. Stop after Row 2 unless your pattern says otherwise.
Compare Rows 1 and 2
Row 1 works the knit columns. After you turn, Row 2 works the purl columns.
Your stitch count should stay the same. An extra loop means the yarn crossed over a needle while you switched between stitches.
After Row 2, check that the stitches still alternate evenly before separating them onto needles.
3. Separate the Stitches Onto 2 Needles
Use this split only for sewn two-needle tubular bind-offs. After Row 2, divide the ribbing into front and back layers so they're ready for grafting.
Transfer Stitches Without Twisting
Before you start, check which side should face you and whether the first stitch matches the grafting direction. From the right side, knit-facing stitches look like Vs; purl-facing stitches look like bumps. Slip each knit-facing stitch purlwise onto the front needle and each purl-facing stitch purlwise onto the back needle. Keep the stitches in each layer in order.
Keep the front needle in front and the back needle behind. Both tips should sit at the end where you'll begin sewing, with the yarn ready to use. Check for crossed stitch bases or twists between the layers. Don't flip a layer just to move its needle tip. Once both layers are on the correct needles, check the tail and starting end before cutting.
Check the Sewing Tail Before Cutting
Follow your bind-off instructions for the sewing tail length. Confirm that the stitches are on the correct needles and the yarn starts at the sewing end. Then cut the yarn and thread it onto a blunt-tip tapestry needle.
4. Start Sewing and Fix Setup Errors
Begin the Two-Needle Grafting Sequence
With the stitches split between the front and back layers and the tail threaded, begin the sewn finish. Make two setup passes: purlwise into the first front stitch, then knitwise into the first back stitch. Leave both stitches on their needles.
Then move straight into the stockinette grafting rhythm: front knit off, purl on; back purl off, knit on. Knitwise and purlwise describe the needle’s path. “Off” means remove the stitch after passing the yarn through it; “on” means leave it on the knitting needle.
Fix Twisted Stitches, Yarn Errors, and Tight Tension
Check your setup before continuing, and fix any mistakes as you go.
- Twisted stitches: If you slipped a setup stitch knitwise, undo back to that point and remount it correctly. If a stitch twisted during transfer or needle entry, remount it before moving on.
- Yarn placement: If the yarn crosses on the wrong side or creates an extra yarn over, back up and repeat the step with the yarn in front.
- Tension: Sew a few stitches, then use the tapestry needle tip to distribute slack one stitch at a time. Don’t pull the tail tight all at once - that will pucker the edge and reduce its stretch.
- Check the edge: Inspect the first few stitches. If you spot diagonal bars, bumps, or a tight ridge, undo to the last correct step.
5. Check the Setup Before Finishing
Before starting the sewn bind-off, check the stitch order and yarn path. The rib should still alternate knit and purl, every slipped stitch should have been slipped purlwise, and the yarn should have stayed in front for slips and behind for knits - with no extra yarn overs.
Hold the needles parallel. Make sure both layers lie flat, stay in order, and aren’t reversed.
If everything checks out, continue with the grafting rhythm.
FAQs
What if my setup row starts with a purl stitch?
If your setup row starts with a purl stitch, check that the stitches alternate between the front and back layers across the entire row before starting the bind-off. If the sequence breaks, work one or two more plain double-knitting rows to help the layers sit evenly on the needle. Once the stitches are in the right order, bind off for a neat edge.
How do I handle an odd stitch count?
A tubular bind-off in 1x1 rib needs an even number of stitches. If your stitch count is odd, increase or decrease by one stitch on the final setup row. This keeps knit and purl stitches alternating evenly along the edge.
Can I use these setup rows when knitting in the round?
Yes, you can use these setup rows when knitting in the round. The tubular bind-off, often called the Kitchener bind-off, gives projects like hats and sweaters a neat, stretchy edge.
Before starting the sewn bind-off, make sure your stitches are in the correct order. Work the setup rows to help the layers sit evenly on the needles.