
Seed Stitch Alpaca Headband Kit: Supply Checklist

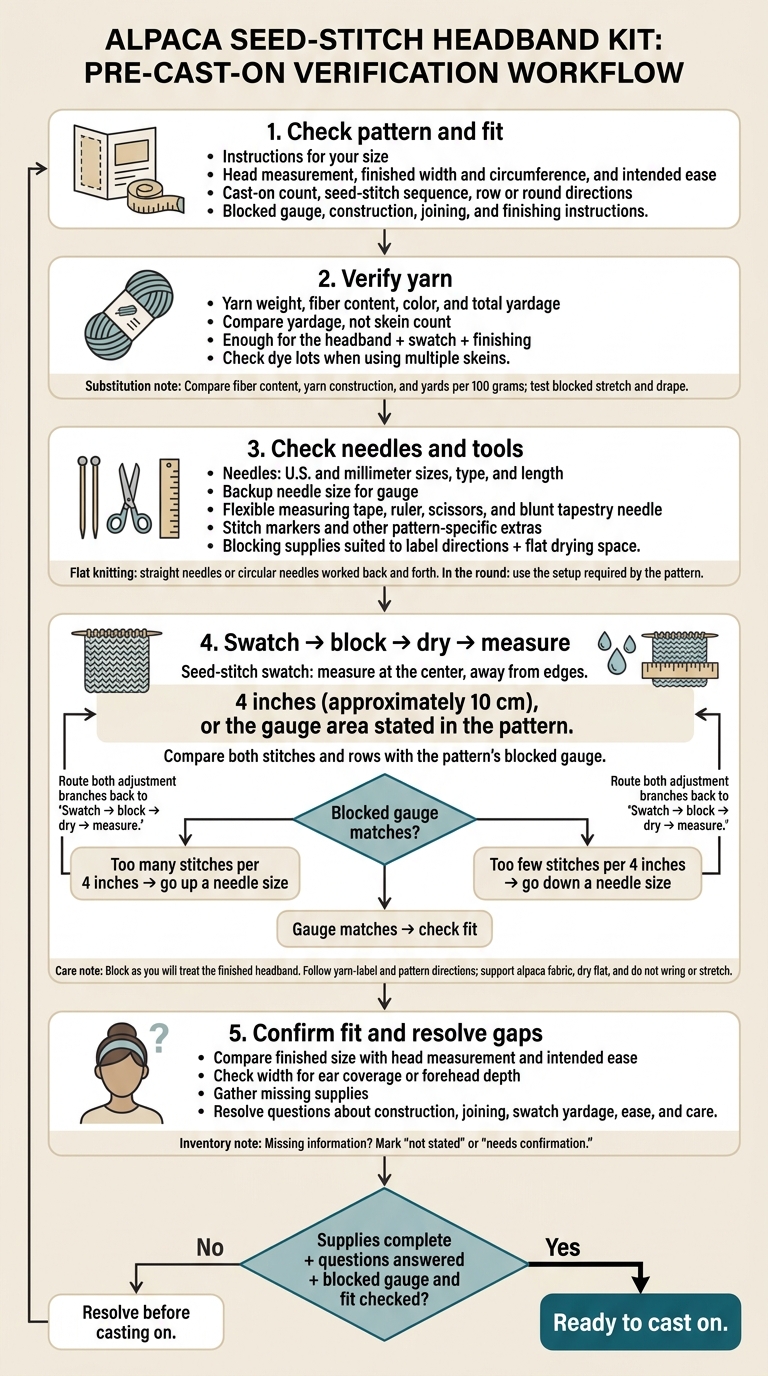
Before I cast on, I check the kit against my pattern - not just the yarn and needles. I confirm the yarn’s weight, fiber blend, and total yardage, then check my blocked seed-stitch gauge over 4 inches or the area the pattern specifies.
Here’s what I check before starting:
- Pattern and fit: Size, head measurements, finished width, ease, and joining method.
- Yarn: Enough for the headband, a swatch, and finishing - not just the right skein count.
- Needles: Size, type, and length, with a different size ready if my gauge is off.
- Tools: Measuring tape, ruler, scissors, stitch markers, and a blunt tapestry needle.
- Blocking and care: Supplies that suit the yarn label’s directions, plus a flat drying space.
My rule: <u>sort out missing supplies and unanswered questions first</u>. A kit is ready when it matches the pattern and my blocked fabric gives the intended fit.
Alpaca Headband Kit: Ready-to-Knit Checklist
How To Knit a Scarf for Beginners | Latest Techniques
Checklist: Pattern, Yarn, and Needles
Check your kit against the pattern’s exact material and measurement requirements.
Pattern Instructions and Yarn Quantity
- [ ] Instructions for your size: Mark the cast-on count, seed-stitch sequence, row or round directions, blocked gauge, finished width and circumference, construction method, and joining instructions.
- [ ] Yarn specifications: Note the required yarn weight, fiber content, color, and total yardage for your size. Compare yardage, not skein count, and check dye lot numbers if you’re using multiple skeins.
- [ ] Extra yarn for swatching and finishing: Add up the yardage in the kit’s skeins. Set aside enough for a seed-stitch swatch, weaving in ends, and any finishing or fit adjustments.
- [ ] Suitable substitution: Compare fiber content, yarn construction, and yards per 100 grams. Check a blocked seed-stitch swatch before choosing a replacement. Matching the label’s suggested needle size doesn’t guarantee the same fabric.
Once you’ve checked the yarn, check the needles.
Needle Size and Type
Match the needles to the pattern before you swatch.
- [ ] U.S. and metric sizes: Note the pattern’s U.S. needle size and millimeter equivalent, then check your needles against both.
- [ ] Correct type and length: For flat knitting, use straight needles or circular needles worked back and forth. For knitting in the round, check whether the pattern calls for a specific circular needle length, double-pointed needles, or magic loop.
- [ ] A backup size for gauge: Use the stated needle size as a starting point. Match the blocked gauge to get the intended fit. If your blocked swatch has too many stitches per 4 inches, go up a needle size; if it has too few, go down. Block and measure again before choosing your final size.
Checklist: Measuring and Finishing Tools
Check that you have the tools to measure, finish, and block your headband.
Measuring Tape, Scissors, and Markers
- [ ] Flexible measuring tape and ruler: Measure your head first, then check the finished headband’s width and circumference. Follow the pattern’s fit recommendation. Use a ruler with clear 1-inch markings to count stitches and rows per 4 inches at the center of a fully blocked, dry swatch, away from the edges.
- [ ] Small, sharp scissors: Use them to cut yarn cleanly and trim secured ends.
- [ ] Stitch markers: Have these ready if the pattern calls for marked locations or repeated sections.
Tapestry Needle and Joining Yarn
Choose a blunt tapestry needle with an eye large enough for your alpaca yarn. It should pass through the fabric without distorting stitches. Keep enough finishing yarn to weave in ends. If the pattern uses a sewn join, reserve the joining tail before cutting.
Swatching and Blocking Supplies
Before casting on, block your swatch the same way you’ll treat the finished headband to check fit and final shape.
- [ ] Yarn for swatching: Set aside enough yarn to make your swatch.
- [ ] Clean towel: Gently press out moisture with it, then use it to support the headband as it dries flat.
Follow the blocking directions on the yarn label and in the pattern. For specific techniques, see our steam blocking alpaca guide. Support the full piece while it dries, and don’t wring or stretch alpaca fabric.
Compare Kit Contents With Pattern Requirements
Use the pattern, yarn labels, and kit inventory to fill in the table below. Compare each item with the pattern line by line. For missing details, write “not stated” or “needs confirmation.”
| Requirement | Kit Contents | Status | Next Step |
|---|---|---|---|
| Yarn weight | Record the label category | Match, substitute, or mismatch | Confirm gauge or get the specified weight |
| Fiber content | Record the stated alpaca percentage and other fibers | Match, partial match, or different blend | Check how the blend affects drape, warmth, care, and gauge |
| Total yards | Record the pattern yardage and the kit’s labeled yardage | Sufficient, borderline, or insufficient | Confirm usable yardage, including yarn for swatching and finishing |
| Needles | Record U.S. size, millimeter size, length, and straight or circular type | Match, alternate size, or wrong type | Confirm the required needles or an acceptable alternative |
| Construction | Record flat or in-the-round knitting, seaming, cast-on, and shaping requirements | Compatible or incompatible with the kit | Confirm required needles and clarify unfamiliar techniques |
| Notions | Record tapestry needle, scissors, markers, waste yarn, and blocking tools | Included, partially included, or missing | Identify missing items and suitable substitutes |
Check Blocked Gauge and Fit
Knit a seed-stitch swatch large enough to measure in the center. Once it’s fully blocked and dry, compare stitches and rows over 4 inches (approximately 10 cm), or the gauge area stated in the pattern. Adjust the needle size until your blocked gauge matches.
Compare the finished size with the wearer’s head measurement and the pattern’s intended ease. Check that the finished width provides the desired ear coverage or forehead depth. Using a different yarn? Test the blocked fabric’s stretch and drape before accepting the substitution.
List Missing Supplies and Pattern Questions
Write down any missing supplies: the correct needle size or cable length, extra yarn, stitch markers, scissors, a tapestry needle, waste yarn, or blocking tools. Check each item’s specifications against the pattern.
Also note any unanswered questions about construction, joining, swatch yardage, ease, or care. Wait to cast on until you’ve addressed every missing item and question and completed the gauge and fit checks.
Final Checklist Before Casting On
Before you cast on, check that your instructions, supplies, and fit checks are ready.
- [ ] Pattern: Complete and readable, with sizing, gauge, cast-on, joining, and finishing instructions checked.
- [ ] Alpaca yarn: Matches the pattern, with enough for the project, swatch, and finishing.
- [ ] Needles: The right type, length, and size to achieve the pattern’s gauge after blocking.
- [ ] Basic tools: Flexible measuring tape, scissors or yarn snips, and a blunt tapestry needle are on hand.
- [ ] Pattern-specific supplies: All required extras are ready.
- [ ] Blocking supplies: Suit the care method listed on the yarn label and in the pattern.
- [ ] Gauge and fit: Blocked gauge and fit checks are complete.
- [ ] Ready to cast on: Any missing supplies have been gathered, and all pattern questions are answered.
FAQs
How much extra yarn should I reserve for swatching?
The extra yardage you’ll need depends on your pattern. Set aside enough yarn for a gauge swatch, adding about 10 extra stitches to help keep the edges from curling. This lets you see how the alpaca yarn behaves and adjust your tension and needle size before you start knitting your headband.
What if my stitch gauge matches but my row gauge doesn’t?
You can often make up for the difference by adjusting your project’s length rather than its width. If your headband pattern gives a length instead of a fixed row count, knit until it measures the right length for the recipient.
Before you start, knit and block a gauge swatch to check how your tension affects the finished measurements. For more tips and techniques, visit the Alpaca Direct YouTube channel.
How can I keep my alpaca headband from stretching out?
For a snug fit, knit your headband 1–2 inches smaller than your head circumference. Alpaca lacks elasticity, so use needles smaller than the recommended size to create a tighter, more stable fabric. Ribbing or cables can also help the headband hold its shape.
To finish, avoid soaking. Lightly mist or gently wet-block the headband, then pin it flat to its intended size. Store it folded flat rather than hanging.