
Crochet Ribbing Tutorial: Add-On Cuffs for Socks

I’ll show you how to add stretchy ribbed cuffs to finished socks by working back-loop-only single crochet and joining each short section to the opening as you go. For a cuff about 1.5–2 inches tall, I use a starting chain to set the height - not the distance around the sock.
Here’s what I check along the way:
- Yarn and fit: Match the sock’s yarn weight and care needs, check the edge for damage, and test a small swatch.
- Stitches and spacing: Keep the stitch count steady and the joins loose so the opening can stretch.
- Seam and second sock: Join the ends without twisting, then record counts and spacing to match both cuffs.
- Wear and washing: Check that each cuff clears the heel, feels comfortable, and springs back after washing.
My main rule: <u>check the stretch, not just the size</u>. A cuff needs to fit over your heel as well as around your ankle.
How To Single Crochet - Quick 1 Minute Crochet Tutorial
Gather Supplies and Prepare the Sock
Gather matching yarn, a crochet hook sized for the yarn, scissors, a yarn needle, a measuring tape, and an optional stitch marker. Choose yarn that matches the sock’s weight, softness, and care needs. Avoid anything much heavier than the sock. Start with the hook size listed on the yarn label, then adjust after making your test swatch.
Check the Sock Edge and Choose Cuff Height
Start with a clean, dry, intact opening. Check for broken yarn, holes, stretched sections, or damaged elastic. Choose evenly spaced stitches where the hook can pass through without splitting the yarn. If the edge is dense, machine-finished, or difficult to pierce without damage, make a separate foundation or carefully spaced attachment points first.
Measure from the opening to set your added cuff height. Aim for 1.5 to 2 inches (3.8 to 5.1 cm). Write down the height, then match your swatch to that measurement. Mark the first secure attachment point before you start crocheting.
Practice Back-Loop Single Crochet
Chain 10 to 15 stitches. Single crochet into the second chain from the hook and continue across. Chain 1 and turn. For each stitch, work under only the loop farthest from you in the top “V.” Yarn over, pull up a loop, yarn over again, and pull through both loops. Repeat for several rows, checking the back-loop position after each turn.
Measure the swatch, gently stretch it, and release it to see how well it returns to shape. Then test a short attached section for even spacing, stretch, and fit over the heel. Use back-loop-only (BLO) single crochet throughout; BLO slip stitch produces a different fabric.
Once the swatch stretches and returns to shape cleanly, begin the first attached row at the sock opening.
Crochet the Cuff onto the Sock
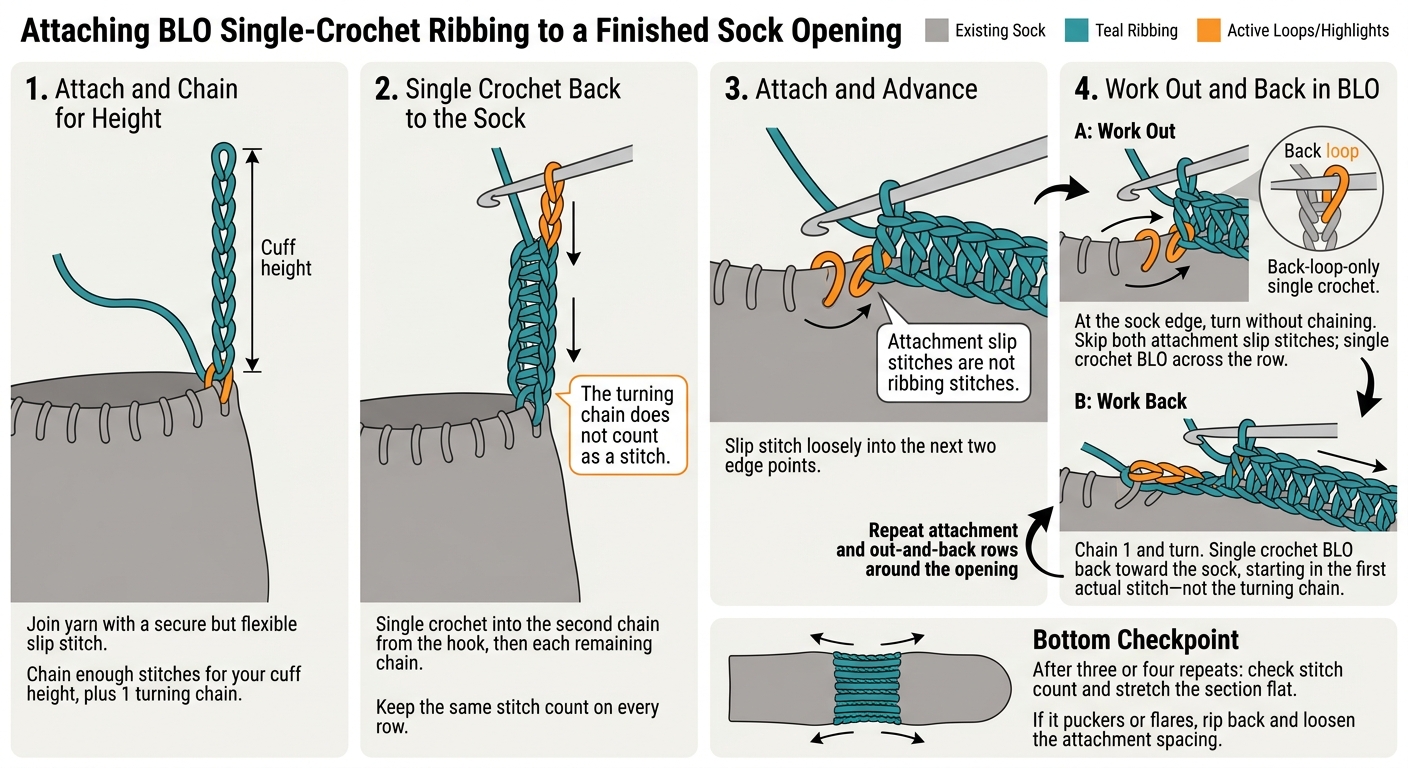
How to Crochet Ribbed Cuffs onto Socks
1. Attach the Yarn and Chain for Cuff Height
Start the attached cuff at the sock edge, using the same BLO rhythm you practiced in the swatch. Join the yarn with a slip stitch that’s secure but flexible. Chain enough stitches for your cuff height, plus 1 turning chain. The chain should extend perpendicular to the sock opening.
2. Single Crochet Back to the Sock
Single crochet into the second chain from the hook, then into each remaining chain toward the sock. Count your stitches and keep that same count on every row. Work this first row into the chain loops; the turning chain does not count as a stitch.
3. Join the Row and Move Along the Sock Edge
Slip stitch loosely into the next two edge points to attach the row and move along the sock. These slip stitches aren’t part of the ribbing. They hold the cuff in place without tightening the opening.
4. Work Out and Back in Back Loops
Build the ribbing in short, attached passes around the opening. At the sock edge, turn without chaining. Skip both attachment slip stitches, then single crochet BLO across the row.
Chain 1 and turn. Single crochet BLO back toward the sock, starting in the first actual stitch - not the turning chain. Repeat the attachment and out-and-back rows around the opening.
After three or four repeats, check your stitch count and stretch the section flat. If it puckers or flares, rip back and loosen the attachment spacing.
Watch the Video for Stitch Placement
Watch Alpaca Direct’s YouTube demonstrations of BLO single crochet and attached ribbing. Match the hook placement shown to your own stitches.
Join the Cuff Ends and Check Fit
Join the Final Row to the Starting Chain
Finish the final return row at the sock edge without adding another attachment point. Lay the cuff flat, keep the strip untwisted, and line up the final row with the starting chain. Match each stitch to one chain loop, skipping the turning chain and attachment slip stitches. Keep the seam as flexible as the BLO ribbing.
For a slip-stitch seam, insert your hook through the final stitch’s back loop and the matching exposed loop of the foundation chain. Yarn over, then pull through both loops and the loop on your hook. Repeat loosely across the cuff. You can also sew the matching loops with a flexible whipstitch or mattress-style seam.
Before fastening off, slide the cuff over your heel and check it around your ankle. It should pass without force, then spring back rather than stay stretched out. Check both sides for gaps or skipped loops. Once the fit is right, fasten off and weave in the ends without pulling the ribs together. If the seam lies flat and the cuff springs back after stretching, move to the second cuff.
Fix Cuff Fit and Seam Problems
If the cuff still feels off, try the fixes below. Test each correction on a small section first. A different hook size changes gauge, so you may need to rework the cuff. Starting-chain length sets cuff height; row count and attachment spacing set circumference.
| Problem | Fix |
|---|---|
| Opening is too tight | Loosen the seam and attachment stitches. If needed, rework with a larger hook or more rows around the opening. |
| Cuff is too loose | Rework with fewer rows, firmer tension, or a smaller hook. Check that it still passes over your heel. |
| Attachment edge waves or puckers | Space attachment points evenly. Use fewer attachment points for waves; loosen tight anchors for puckering. |
| Seam feels rigid | Undo the seam and rejoin with loose slip stitches or a flexible sewn seam. |
| Cuff is twisted | Open the seam, flatten the cuff, and realign both ends from sock edge to cuff top before rejoining. |
Make the Second Cuff Match
Record the yarn type and weight, hook size, starting-chain length, stitch type, working ribbing stitch count, total rows, and attachment intervals. Include any spacing adjustments.
Follow those notes for the second sock, using the same stitch count and attachment spacing. Before weaving in its tails, compare both cuffs for height, fit, seam placement, and how well they spring back after stretching. Check the counts rather than judging by appearance alone. With both cuffs attached, check their stretch and attachment spacing side by side.
Conclusion: Review Stretch and Attachment Spacing
Once the cuff is joined, check its fit after washing to see how it holds as part of the sock. Wash the BLO swatch according to the yarn label, dry it flat, and measure 4 inches without stretching it. Check that it stretches gently and springs back. Use the washed swatch to verify chain height, stitch count, and attachment spacing. Keep the closing seam flexible.
Before fastening off, wear the socks for several minutes. Walk around and flex your ankles. Both openings should slip over your heels without force and feel comfortable without digging in. Check the fit again after washing, and remake the cuff if it’s still too small. A finished cuff should clear your heel, feel comfortable, and spring back after washing.
FAQs
Can I add ribbing to store-bought socks?
The provided materials don’t explain whether you can add ribbing to store-bought socks. They cover hand-knitting socks from scratch, including ribbing, cast-on, and bind-off techniques.
For yarns, crochet hooks, and more knitting tutorials, visit Alpaca Direct or check out our YouTube channel.
How do I calculate attachment spacing for my sock size?
Your total stitch count should be divisible by the number of stitches in your ribbing repeat.
For example, K2, P2 ribbing needs a multiple of 4 stitches.
If your count doesn’t fit, increase it to the next multiple or choose a pattern that matches your count. K1, P1 ribbing works with any even number of stitches.
Which yarn fibers help cuffs keep their stretch?
The sources don’t name specific yarn fibers that help cuffs keep their stretch. Instead, they focus on ribbing patterns, such as k1, p1 or k2, p2, and knitting techniques like Jeny’s Surprisingly Stretchy Bind-Off or the German Twisted Cast-On.
Alpaca Direct offers yarn options and learning resources to help you practice these techniques.